Archive | Lowfat/Nonfat RSS feed for this section

Fun Friday: Baked Apple Oatmeal

31 Jan

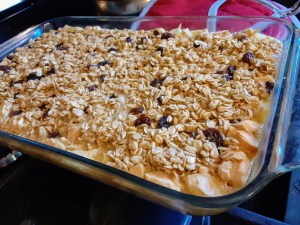
This was so delicious on a cold winter day.

It’s the weekend and there’s something so great about having a nice, homemade warm breakfast on a weekend morning. Today’s recipe is a perfect one for this weekend or any day.

We originally had this for breakfast earlier this month on Martin Luther King Jr. Day. Being a Monday morning, I knew we could eat it that day and then have it leftover for breakfast or snacks after school during the week too. and baked oatmeal is something my family requests frequently so I knew they’d enjoy waking up to the smell of this baking in the oven on their day off from school.

My initial plan had been to make the same baked oatmeal recipe I always do, substituting in frozen blueberries for the strawberries. But, we were out of blueberries. Then I thought we had frozen peaches, but we didn’t have enough. So, I started searching for a baked apple oatmeal, since I knew we had a few apples on hand. I’m so glad that I did, as this recipe was completely different than the usual one and everyone loved it. I’d definitely do it again. I did one and one-half of this in order to make it fill a 9×13 baking dish and it was a perfect amount.

We opted to add whipped cream on top (we have both regular and dairy-free whipped cream on hand) and I also tried it with maple syrup on top and that was great too. The oats I used were gluten-free and we used soy milk to make it dairy-free but I’ve also used almond milk to make allergy-friendly oatmeal in the past as well. This recipe also calls for walnuts but we don’t usually keep nuts on hand so I didn’t put any in. I happen to also really like pecans and I think chopped pecans would’ve been a good addition to the recipe as well.

I found the recipe on this site, called Once Upon a Chef, and it’s described as a traditional Amish breakfast casserole, which was a perfect description. It was such a great comfort food and it took about an hour total to prep and bake. I encourage you to check out the site itself because it includes all of the nutrition information also, but the ingredients and instructions for a single recipe are copied here as well. I hope you’ll head on over and see some of their other recipes too.


I made one and one-half recipes in order to have enough for breakfast and for leftovers.

INGREDIENTS

  • 2 cups old-fashioned rolled oats (not instant)
  • 3/4 cup light brown sugar
  • 1 cup chopped walnuts or pecans, divided
  • 1/2 cup raisins
  • 1 teaspoon baking powder
  • 2 teaspoons cinnamon
  • 1/2 teaspoon salt
  • large eggs
  • 2 cups milk
  • 1 teaspoon vanilla extract
  • 4 tablespoons unsalted butter, melted, plus more for greasing the dish
  • 2 tart yet sweet baking apples, such as Honey Crisp, peeled and cut into 1/2-inch chunks (about 2 cups)

INSTRUCTIONS

  1. Preheat the oven to 325°F. Grease an 8 or 9-inch baking dish with butter.
  2. In a medium bowl, combine the oats, brown sugar, 1/2 cup of the nuts, raisins, baking powder, cinnamon and salt. Mix well.
  3. In another bowl, break up the eggs with a whisk; then whisk in the milk and vanilla until well combined.
  4. Add the milk mixture to the oat mixture, along with the melted butter.
  5. Scatter the apples evenly on the bottom of the prepared baking dish. Pour the oatmeal mixture over top and spread evenly. Sprinkle remaining 1/2 cup nuts on top. Bake for 40-45 minutes, until the top is golden and the oats are set. Serve warm or at room temperature.


Welcome back recipe: Chocolate Banana Oatmeal Blender Muffins

17 Nov

These muffins made me want to do a blog post asap!

It’s me…

I know it’s been a very.long.time since I did a blog post in January. I’ve been super busy. Everyone is busy, I know, but I’ve been busy enough that I didn’t have any time or even any blog-writing mojo enough to do a blog post.

Last year I had taken on a one-year position working for our state’s Department of Education as a Communications Ambassador in addition to my regular freelance education reporter position. The position ran from the start of August 2018 to the end of July 2019 and it reached its busiest time last winter in January around the time I did my last blog post and lasted thru the end of the position. That busy time ran right into my reporter job’s busy time in April/May/June and I was just swamped. It was a wonderful job though, and I loved it, but between the two jobs and my other family responsibilities, I just couldn’t find the time or energy to do any more writing than I was already doing.

That job, however, gave me the extra experiences that I needed to apply for a new job that our school district posted in July 2019 for a Communications Specialist. The first week of August I got that job and I jumped right in, while still writing for the paper on occasion and doing my usual Mom jobs as well. So I’m finally feeling like I’m getting my feet back on solid ground and I am getting that itch to start blogging again. I’ve recently had some of my readers asking me when I thought I might start writing blog posts again. It was time.

This weekend has been super busy because we’ve been redoing our spare bathroom and I had to work at a school department event this afternoon, but when I came home from that I was starving, so I decided to make some muffins that I had been wanting to try out before I jumped back into helping out with continuing to paint the bathroom. I had seen these muffins come across social media and emailed the link to myself. They were gluten-free and didn’t contain any sugar or added oils, but they did contain things that everyone here loves: peanut butter, chocolate, and oatmeal. Most importantly they contained chocolate chips. What better way to jump back into my Whole Bag of Chips blog than with chocolate-chocolate chip recipe?

Today’s recipe was from a site I’ve never visited before, but I know I’ll definitely be going back. The name of the site is Dinner, Dishes, and Desserts and you can visit her site by clicking here. I highly recommend it, as all the recipes she described in her post sounded great to me! The recipe caught my eye not only for the ingredients but also because it’s all done in a blender. I thought that sounded easy. When I checked my kitchen I had all of the needed ingredients. I haven’t made muffins in a long time, so I was excited to try this out.

Here are the ingredients just as she’s listed them on her site. Other than the chocolate chips, you throw it all into a blender and blend it up!

  • 2 large ripe bananas
  • 2 whole eggs
  • 1 cup peanut butter
  • 3/4 cup old fashion oats
  • 1/2 cup honey
  • 1/2 cup cocoa powder
  • 2 tsp vanilla extract
  • 1 tsp baking powder
  • 1/2 tsp salt
  • chocolate chips

To make this dairy-free I used Enjoy Life mini chocolate chips and I used Bob’s Red Mill gluten-free oats.


Her directions are super easy and the recipe went as directed. I got 17 muffins in total and I cooked them for about 15 minutes. I did check them at 13 minutes but they weren’t done yet.

  1. Preheat oven to 350 degrees. Spray a 12 cup muffin tin with non-stick spray.
  2. To a blender add banana, eggs, peanut butter, oats, honey, cocoa powder, vanilla, baking powder, and salt. Blend until smooth and well mixed.
  3. Scoop batter into prepared muffin tin, filling about 2/3rd of the way.
  4. Sprinkle the top with chocolate chips.
  5. Bake for 13-15 minutes or until a tester comes out clean.
  6. Remove from the oven and let cool for 5 minutes before removing from the pan to cool.

Everyone voted that this recipe was a keeper. I tried to get a photo of how moist and delicious these were but I don’t think it does them justice. I’m sharing it anyway. The recipe recommended doubling the recipe, which I would plan on next time so that I have extras for the freezer. I didn’t have enough of everything on hand to do it this time.

Moist, healthy, allergy-friendly and delicious! A win-win for us!

Enjoy, and welcome back to the Whole Bag of Chips!

Jen

Fun Friday: Jelly Thumbprint Cookies for a great after school snack

10 Dec
Once I tried these cookies the first time, I knew the recipe was a keeper!

Once I tried these cookies the first time, I knew the recipe was a keeper!

ORIGINALLY PUBLISHED JANUARY 2, 2014

I tend to enjoy cookies of the chocolate variety.

I know, you’re completely shocked by this news.

However, last year when I made my cookie trays, I thought the chocolate was a little bit overwhelming to the non-chocolate choices on my trays.

What if someone doesn’t like chocolate?

Doubtful, but what if?

Then they’d only have two of my cookies to choose from: Snickerdoodles and Oatmeal Scotchies. I felt like I needed another option for this year’s trays. I wanted something easy, something without a ton of ingredients or steps.

Enter the Jelly Thumbprint cookie.

I had a Chocolate Thumbprint cookie, but these would be completely different, other than the thumbs.

I went to Allrecipes.com and found this recipe, and modified it to suit my own needs.

I made it a little bit healthier, with the addition of some wheat flour and by using I Can’t Believe It’s Not Butter.  I didn’t want the peanut butter glaze, so I just left them plain.

I first made them as an after school snack, making half with strawberry jelly and half with grape. The kids loved them so I decided they’d make it onto the trays. This year I’d been invited to participate in a cookie swap, so I made a double batch of these, using half for the swap, some for a Christmas party we were going to, and the rest for my trays.

They were a hit, all around!

This is a cookie that can be made for my family throughout the year, and I intend to make them a permanent addition to my trays in the future as well.

Below is the recipe from Allrecipes.com as it appears on their site, along with my modifications. If you’d like to make them with the peanut butter, you can try that as well!

Jelly Thumbprint Cookies

Ingredients:
1 cup butter, softened (I used I Can’t Believe It’s Not Butter)
2/3 cup white sugar
1/2 teaspoon vanilla extract
2 cups all-purpose flour (I used one cup of white, one cup of wheat flour)
1/2 cup grape jelly (I also used strawberry jelly)
1/2 cup creamy peanut butter (I skipped the peanut butter)
1 1/2 teaspoons vegetable oil (When skipping the peanut butter, no use for the oil either)
Directions:
1. Preheat an oven to 350 degrees F (175 degrees C); line a baking sheet with parchment paper.
2. Beat the butter and sugar with an electric mixer in a large bowl until smooth; add the vanilla and continue to beat. Mix in the flour mixture until just incorporated. Roll dough into 1 1/2-inch balls and arrange on prepared baking sheets. Make a small hole in the center of each ball, using your thumb and finger; fill the holes with grape jam.
3. Bake in the preheated oven until lightly browned, about 14 minutes; allow to cool on baking sheet for 1 minute.
4. Put the peanut butter in a microwave-safe bowl, and cook in a microwave oven until soft for 10 – 30 seconds, checking every 10 seconds. Be careful not to overheat the peanut butter; do not let it bubble. Stir the vegetable oil through the heated peanut butter; drizzle over the warm cookies.

Fun Friday: Low-fat Lemon Pound Cake

6 Apr

This was a winner last year, so we brought it back for an encore performance this year.


Earlier this week, I wrote a blog post about a new dessert we tried (and tried again) for our Easter meal. In it, I referred to the fact that I also made a second dessert, so today I thought I’d share that one with you. It’s one that can be made all year long, and it’s gotten rave reviews from my family for two years in a row.

Last Easter we did not host, but we did contribute to the meal, and one of the items we contributed was a dessert. I am not even sure now, how I found this dessert from Angel in the Kitchen, but it was fitting for a springtime, Easter meal and it was one we’d all like, as well as one that I could easily transform to be gluten free by switching out the flour for the Bob’s Red Mill 1:1 baking flour that we use here.

When I read through the recipe, I was a little bit nervous because it used real lemon juice and lemon zest, and I’d always been a cheater and used a bottle of lemon juice in my recipes. I was also nervous because the directions start with, “Unload your dishwasher,” and states that this is a five-bowl recipe. So there was that. Additionally, I doubled my recipe both years in order to make two pound cakes—one for the potluck party after church on Saturday night and one for Easter dessert on Sunday. So for me that was ten bowls because in this case, with this particular recipe, it was easier for me to make two of everything than it was to try to figure out splitting it into two at the end.

It was a multi-bowl recipe, but it was worth it.

I have to say, it’s a fabulous dessert, and it gets amazing feedback each year, whether from our immediate and extended family or from our friends at church, and no one can ever tell it’s gluten free unless I tell them. The use of the fresh lemon juice and lemon zest are what make the difference, and it also makes our house smell delicious as I’m squeezing the juice and grating the lemon for the zest.

My one change that I had to implement was in regards to the glaze. Both years I had to increase it. I tripled it this year, in order to have what I felt was the right amount on top of the cake, even though a lot drips down to the plate below.

I used two lemons, one per cake, and it did not make the 1 ½ tablespoons of zest, but it made enough to make it work, and it makes plenty of juice to make what is needed for the cake and the glaze.

I encourage you to give this recipe a try. It’s not fast and easy, but it’s not incredibly hard and it’s worth every step, every bowl, every minute it it takes.

Have a wonderful weekend!

Cooking with our newest Cave Tool: Stainless Steel Vegetable Grill Basket

27 Nov

The latest and greatest new Cave Tools product for our collection.

If you’re a long-time reader of The Whole Bag of Chips, you know by now how much we enjoy the cooking tools that Cave Tools sends us to try out. Last week we had the opportunity to give a new one a try and it might just be our very favorite one yet, the Stainless Steel Vegetable Grill Basket.

Cave Tools products can’t be beat when it comes to durability and quality and it’s one of the things we like best about them, especially because we cook at home on a grill and on a campfire when we are camping away from home with our camper. Their products are great for both. We also love that their tools are affordable and budget-friendly for consumers because those things are important to us too.

For our latest product trial, we opted to grill some fresh zucchini, squash, red onion and eggplant to go along with some grilled salmon and pesto that we were having for dinner. Coincidentally, the salmon was being grilled utilizing a Cave Tools product too, the small fish basket, and we were able to fit them side-by-side on our grill, which was so convenient. Even though we were using our vegetable basket to grill vegetables, it could also be used to grill other foods as well, such as shrimp or chicken, as well as other vegetables, fruits and meats. The fact that this tool is truly a basket, vented to let the grilled taste in, made for more flavorful veggies than if we’d tried grilling them in a foil pack. They were easily contained thanks to the depth of the basket, nothing fell out, no ripped foil packet, and no veggies dropping through our grill grates.

We loved being able to grill all of our veggies at the same time, in the same basket and on the same grill as our fish. No need to try to cook indoors and outdoors at the same time.

The Vegetable Grill Basket is a great size, at 13.5 x 11 x 2.5 inches, has great depth and is able to fit a good amount of vegetables in it, more than enough for all of us to eat, and even enough for leftovers too. One of the best things about the basket was the handles on the sides that were angled and a good size for being able to carefully lift the basket off the grill with our pot-holders.

The Vegetable Grill Basket is available for purchase both on Amazon.com and on the Cave Tools website. To purchase on Amazon, visit this link. To purchase it on the Cave Tools website, visit this link and be sure to utilize their special discount code to receive 15% Off: VEGGIE15  while you’re there.

As always, this Cave Tools product has a Lifetime Warranty with 100% of your money back, even if you’re not satisfied with your product at some point down the road. Although we’ve never needed to use this warranty, we love a company that stands behind its products forever.

I’m craving these all over again!

**Thanks to Cave Tools for sharing their product with us.

Although I was given the product in exchange for this review, all thoughts and opinions are my own.**

Fun Friday: Mini Strawberry Cheesecakes

9 Jun

If you’re looking for a new summertime dessert, this one comes highly recommended!

We don’t entertain often, but when we do, I like to try out new things. We are generally among friends and family so the “never try out new things for guests” rule gets bent a little bit, if I think it’s a new thing that I can pull off relatively easily.

Last Wednesday I shared our Burger Bar post from the previous Sunday’s get-together and I promised I’d share two other recipes. Today’s is one and I’ll still have another one for you coming up in a future post as well.

I was looking for a summery dessert to serve that Sunday, something different than brownies or cookies. I came across this recipe by Life, Love and Sugar and thought it would be different and something I could make gluten free, which is always a consideration. My grandmother has always made mini cherry cheesecakes which are my absolute favorite, and this reminded me of those. Additionally, they were summery and a little bit patriotic looking, which was an added bonus.

I had gluten free graham cracker crumbs on hand and I also had gluten free graham crackers in the freezer if I had needed to use them to make my own crumbs, which I didn’t need to do. I had enough left in my box to make a set of gluten free cheesecakes and a regular box to make a set of non-gluten free. I had colored cupcake liners in red, pink, orange and green in my cabinet too, so I made the red and pink liners the gluten free cheesecakes and the orange and green the non-gluten free cheesecakes so everyone could easily tell which was which.

These cheesecakes have multiple layers of deliciousness, and they’re able to be made gluten free to boot!

What I loved about this recipe was that it had layers to it: a layer of crumbs, a layer of fresh strawberries, a layer of cheesecake, more strawberries and some whipped cream. They were mini, but they were fancy and multi-faceted.

The thing to pay attention to in the recipe is the baking and cooling times. You need to pre-bake the crumbs for a few minutes, and the temperature for baking changes. The time and locations for cooling are specific as well. It’s not hard, but if you’re someone who doesn’t read a recipe all the way through to start, or who just skims and will wing it along the way, I encourage you to take the time to read it through first.

The entire recipe is easy, and the dessert was delicious, well-received by everyone and I would most definitely do it again. I like that it fed so many people. I had two trays of mini cheesecakes, minus just a couple. For my ingredients, I chose to substitute low fat sour cream instead of full fat and 1/3 fat cream cheese instead of full fat, and to use I Can’t Believe It’s Not Butter for my butter, which we always do. I also increased the recipe slightly, in order to make more mini cheesecakes, and increased my ingredients all accordingly. I also cheated and used a squirty whipped cream instead of making it homemade, given our time constraints.

I hope you’ll give this recipe from Life, Love and Sugar a try, and many thanks to them for sharing it!

*Tip: If you’re looking for gluten free graham cracker crumbs, I found these at a Super Walmart, but you can also make your own by using a blender or food processor to grind whole gluten free graham crackers into crumbs.*

Fun Friday: Three ingredient cookies

10 Mar

I added a fourth ingredient…can you guess what it is?

Good morning and TGIF!

Happy Friday to you all. It’s been a little bit since I did a Fun Friday post, so I thought I’d share a fun one with you this week.

My whole “after school snack” routine has gotten a bit derailed lately, mostly because many days no one is coming right home after school, which makes me really the only one who is home and hungry and means I’m always throwing an extra snack into everyone’s backpack to get them through the day. They eat lunch so early in the morning at school that they are starving by 3:00.

Additionally, since my youngest has had to go gluten free a little more than a year ago, one of the things she often takes for lunch is muffins (gluten free, obviously). That knocks off a good 3/4 of my go-to after school snack ideas. I love muffins and I loved making them to eat after school because then we have them for breakfast the next day, if there are any left. Now, out of convenience, I buy six packs of freshly made muffins, four varieties at a time every couple of weeks, at our local gluten free bakery, A&J’s, and I freeze them. By the time she eats lunch they have thawed.

I try to make my snacks healthy as often as I can, and so in going gluten free, I’ve relied on many dips (like this one from 2012 or this one from 2013), cheese and apples, fruit platters and the like. However, I did find a go-to cookie recipe that is fast, easy, healthy and gluten free, as long as you have gluten free oats, which I always do (thanks Bob’s Red Mill!). I have seen this recipe on several sites, and the one I am sharing today is from Recipe Diaries. I have seen versions of these cooked in the oven and I have even seen some that are microwaved. I have only ever cooked mine in the oven.

This week when I made these, I used 3 bananas and 1 1/2 cups of oats to make more cookies. I am also partial to Craisins over raisins, so I used a box of Craisins that is the lunchbox snack size (mostly because that’s what I had on hand) and it was the perfect amount. I’m also VERY partial to chocolate chips, so I threw some of those in too. In the past I have subbed dried pomegranates for the fruit and they were tasty too. Almost anything goes.

I have always tried to make my kids aware of serving sizes when it comes to food, and they always ask me how many or how much of something they are allowed to have, especially when it comes to something like muffins or cookies. With these, it’s nice to know that although they still can’t have an unlimited amount, at least the ones they are having are really pretty healthy, overall. They make a great snack and they satisfy my craving for a little something sweet.

I encourage you to try out the recipe at Recipe Diaries, and have a great weekend!

Kitchen Science: Hard Boiled Eggs

20 Feb
Perfection! How did we do it?

Perfection! How did we do it?

We can’t be the only ones who have this problem: we love hard boiled eggs for breakfast or for a healthy snack option, but every time we boil up a dozen we never know if they will be easy to peel and eat or if they’ll be a big battered mess of shells and whites.

Recently I was at a dentist appointment with Elizabeth and the television was on while we waited. We were watching The Rachel Ray Show and the featured guest was a chef who was talking about his trick for making the perfectly peel-able hard boiled eggs. My daughter and I took note, and I texted myself his instructions.

Which method would work? Cover and refrigerate or shake, shake, shake to peel?

Which method would work? Cover and refrigerate or shake, shake, shake to peel?

In a nutshell (eggshell?) he said to cook the eggs in boiling water for 12 minutes, and then to take them out and put them in a container, covered for 30 minutes in the refrigerator before peeling them.

In the meantime, Liz had seen a different video online that showed another completely different method of peeling the eggs that told cooks to put their freshly boiled eggs into a covered container and shake them vigorously, at which time all of the shells would come off easily.

This method of shaking the eggs to peel them seemed too intriguing not to try it out.

This method of shaking the eggs to peel them seemed too intriguing not to try it out.

One Friday afternoon after school I had a request for hard boiled eggs, and I had the time to do it, so we boiled them up. When it came time to cook them, we remembered the episode of Rachel Ray from the dentist office visit, and Liz remembered the video she’d seen online about shaking eggs. We decided to try it both ways.

We boiled up one dozen for the 12 minutes that the chef on Rachel Ray had suggested, and then we split them into two groups of six eggs each. The first six went into the covered container and into the refrigerator. I set the timer for 30 minutes.

Did it work?

Did it work?

We used that 30 minutes to experiment with the shaking of the eggs method. This was fun. Messy at times, but fun. And, as with any science experiment, we had to try this method several times, and we had some unusual outcomes mixed in with our results.

First off, for the shaking I used some small, square covered containers from the dollar store that I had on hand. We cracked two of them in the process and had to throw them out. So, if I were to do this again, I’d use a better quality container for shaking. Luckily it was a multi-pack, so we had lots of them for our scientific trials.

We ended up marking our egg with a Sharpie to see if it was the same one not cracking each time or not. It was.

We ended up marking our egg with a Sharpie to see if it was the same one not cracking each time or not. It was.

Second, we found the oddest thing in our results: one egg would crack perfectly, and one would not crack at all. It seemed to be the same one not cracking at all, and we could not figure out why. It was the strangest thing to open the case and see one egg whose shell was completely shattered and off the egg, and one completely untouched. We decided to mark the egg with a Sharpie marker to see if it was the same egg each time, and it was. We still don’t know why. Ultimately, when we peeled it separately, it peeled fine, so there were not issues with the egg itself. We couldn’t tell if it was something to do with the force of the two eggs together which made one break and one not, but it was fascinating.

We learned the first time that you can definitely shake the eggs too much, yet our first egg still never cracked.

We learned the first time that you can definitely shake the eggs too much, yet our first egg still never cracked, even with all that shaking.

When the timer went off to indicate the 30 minutes had ended, we had gone through our six shaken eggs with only one casualty of the six which was a result of a little bit too much shaking.

We brought in the covered container and uncovered it. Inside, the eggs were still hot. I began to peel them, which would be the ultimate test: would they peel easily or would they be a big mess?

eggs-6

The end result: the eggs peeled perfectly! The shells came right off and the eggs remained unscathed underneath the shell. No messy, pitted egg white disaster. It was amazing to see just how easily the shells came off.

Ultimately, we decided that although both methods worked, it was easier to do the refrigeration method: 12 minutes to boil and 30 minutes in a covered container in the fridge. No rinsing in cold water, no over-boiling.

This was not something we had planned to do, it was a completely spontaneous kitchen science experiment, but it was a fun one and it shows just how much science does go into cooking, and how fun cooking can be. As with any science experiment, you need to do it many times to see if your results are reliable, so we will be trying this out the next few times we make hard boiled eggs, but we do hope we have found a great solution.

Do you have any tried and true tricks for ensuring a great, easy-to-peel hard boiled egg? Leave them for me in the comments!

Perfection! How did we do it?

Perfection!

What’s for Dinner Wednesday: Skinnytaste Grilled Steak Lettuce Tacos

1 Feb
Another all thumbs-up meal at our house!

Another all thumbs-up meal at our house!

Recently, we tried out a new dinner meal and I wanted to share it with you today. It was not difficult to make, and everyone liked it, which doesn’t always happen, and I’m about to put it into the rotation again when we do our next two weeks of meals.

The Skinnytaste blog is one of my go-to sites. I love her recipes, I love that they’re healthy and delicious, they have nutrition facts and  Weight Watchers points attached to them for those who need them, and I get lots and lots of menu ideas from her. I have sworn off getting any new cookbooks because of space constraints, but if I were to break my own promise to myself, her cookbook would be the first one I’d buy.

Our family of five does really well when we can pick and choose what we'd like on our plates, all from one meal option.

Our family of five does really well when we can pick and choose what we’d like on our plates, all from one meal option.

This recipe came across someone’s radar, I can’t remember whose, but we put it on the list of recipes to try, and one of the reasons that I liked it is that we do well with meals and recipes where people can choose what they like or don’t like, but there is something for everyone at the table. This was one of those meals. We have one person who doesn’t love the steak, but loaded up her lettuce wrap with all the veggies. We have another person who doesn’t love the veggies but ate the steak, and we threw a bowl of cucumbers into the a la carte options because she likes them, and she ate those on the side. Everyone had something to love on their plate, and some of us just loved it all.

For our purposes, we used sandwich steaks for the meal, which are budget-friendly, but you can see Gina’s recipe here, and use the grilled sirloin steaks she recommends as well. I hope you’ll give this recipe a try, and while you’re on the Skinnytaste site, be sure to check out Gina’s other recipes. I’m sure you’ll find them as wonderful as I always do!


What’s for Dinner Wednesday: Two weeks of meals for your new year

11 Jan

meals-1

Happy New Year!

We are already ten days into the new year and looking ahead to Martin Luther King Day now. It doesn’t seem possible that we’re already halfway through January.

That being said, after the new year, it was time for us to get back on track with our weekly meal plans. Through the holiday weeks we were off our schedules completely. When school started up again we had a one week meal plan, so this is our first two week plan.

With a new plan comes the usual “all-call” to the kids, asking if anyone has anything they’re craving or wanting over the next couple of weeks. We had one kid down for the count with a virus, so she did not weigh in this time around. However, the other two both sent me recipes they wished to try this time. I was happy to see some new recipes on the list, and I am happy to report that of the two we’ve tried already, they were both well received and something we would make again.

We made our list of meals and did our grocery shopping, and I wrote out the recipes for the two new meals and stuck them on my kitchen cabinet. Both were recipes the kids had seen online and one was a video. I will link to them in the list below. There are other ones we are trying out that I will feature in a future post if they are voted into the rotation.

Here is our current list of meals.

meals-2Sunday: Italian Antipasto (a huge salad of sorts containing various meats and cheeses, tuna and hard-boiled eggs)

Monday: Two soups: Normally I don’t make more than one meal, but I made an exception here. We had planned our typical Chicken Escarole Soup with gluten free pasta, but Liz wanted to try out a new soup. I knew some of us would like it and some wouldn’t, but I didn’t want to eliminate it just because not everyone would eat it. I had a sick kid that could use the chicken soup, so I opted to make both. One was a crockpot soup, and I’d totally make it again. You can find the recipe for it here. A photo is shown above as well.

Tuesday: Mongolian Beef (this is a new recipe we have not tried yet).

Wednesday: Spaghetti with Tuna Sauce (see recipe here)

Thursday: Zucchini Shrimp Scampi: This was a great new recipe submitted by Caroline and again, everyone loved it. We got to use a new grating tool for the zucchini that made long spaghetti-like noodles. You can see this recipe here. A photo is shown below as well. We did add tomatoes to ours, and for a family of our size we would use six zucchini next time, instead of four. It was that good, with very little left over.

meals-3

Friday: Hamburgers and hotdogs, Quinoa Salad on the side as a request from Caroline, see the recipe here.

Saturday: Out for dinner

Sunday: Red Wine Crockpot Roast: We tried this recipe a few menu cycles ago, and absolutely loved it. Everyone loved it, which is often rare. We are adding it back in this time around.

Monday: MLK Day: Roasted Chicken Dinner

Tuesday: Paninis

Wednesday: Chicken/Broccoli/Pasta Saute (we usually make Wednesday a pasta night at this time of year because all three kids have a Wednesday night commitment and it allows us to cook early, eat early and eat quickly before we go our separate ways.

Thursday: Breakfast for dinner: Pancakes (another busy night meal we often rely on)

Friday: TBA

Hopefully this two-week schedule of meals will help to inspire your own menu planning. What’s on your menu for the upcoming weeks?

-Jen