Tag Archives: dairy free

What’s for Dinner Wednesday: Pandemic version

18 Mar

Planning meals for the next 14 days was particularly challenging this time around. No frozen veggies to be found.

Well. Here we are.

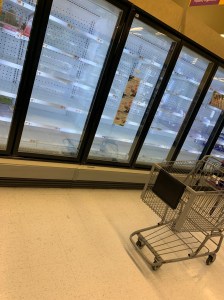
We are in the midst of a worldwide pandemic. The novel coronavirus, otherwise known as COVID-19, has made its way through the world, currently hitting the United States. Week by week, day by day panic has set in nationwide as people prep for the unknown, fearing potential lockdown or shelter in place rulings in cities and states, and in some places, they are already living under that ruling. Since we are not at that point yet in our city or state, many people here are planning and stocking up for the next 14 days at a minimum, and with everyone everywhere doing that, it’s made grocery shopping and meal planning quite challenging. To add to the challenge, two of our three kids are quarantined as they were potentially exposed to COVID-19 at school, while the rest of us are not.

As I began my shopping last week, I did not go in with a specific list of items I needed for definite meals because I had already heard of the difficulty people were having at the stores, with empty shelves everywhere. Instead, I went in hoping to find two weeks’ worth of things I could make meals out of and I planned my meals on the spot as I found items in each store I went to.

Therefore, the list of meals below is what I came up with using what we had on hand at home and what I found between Aldi, Shaw’s, Stop and Shop, Target, Dave’s Market (a local RI market) Price Rite, and Whole Foods over the span of about five days’ time.

Because we are just starting our two weeks of our pandemic menu, the first few days are laid out specifically while the next many are not assigned to certain days yet, but are on deck for any night during the next two weeks.

Sunday, March 15: Corned Beef in the Instant Pot:  (We had purchased the corned beef ahead of time, so we were ready for this and chose to do it as a Sunday dinner instead of on St. Patrick’s Day.

Monday, March 16: Chicken and Steak Fajitas: using this recipe for fajita seasoning from allrecipes.com. I chose this because one store had one package left of stir fry steak and we had a few frozen chicken tenderloins left. The same store with the steak also had beautiful looking peppers, and the inspiration for a meal was made on the spot.

This was a brand new recipe we tried thanks to a friend who shared it on social media that same day.

Tuesday, March 17: Pasta with Bolognese Sauce: This was completely unexpected. I found two, one-pound packages of ground beef at one store, and I had previously stocked up on pasta from another store a few days earlier. I hadn’t decided what to do with the ground beef yet, other than maybe tacos in week two since we’d already done fajitas in week one. A friend posted photos, saying that she was making this recipe (by Giada De Laurentiis) at her house and it looked amazing. I realized I had all the ingredients at home and decided to make it that same night.

Meal options from March 18 through March 29:

4) Barbecued Pork Chops

5) Pork tenderloin with homemade applesauce

6) Steaks (What kind of steaks? I don’t even know but there were two of them left and they looked like they would be enough for our family. I knew we could figure out what they were and what we could do with them later on.)
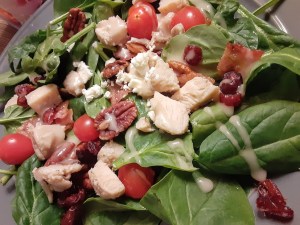
7) A “big salad”

8) Homemade soup, most likely chicken and rice.

9) Make your own pizzas

10) Teriyaki chicken wings and legs

11) Tacos

12) Hamburgers and french fries

13) Something With Stew Meat

14) Breakfast for dinner: french toast and sausage because we had the sausage already and I finally found a couple of loaves of bread.


As I look at the categories listed as options to tag this post, a few of the ones I often use were just out the window this time around, specifically “Eating on a Budget” and “Shopping on a Budget.” I determined early on that we were “Eating What the Store Sold” and “Shopping for Whatever We Could Find No Matter What it Cost Until We Had 14 Meals For 5 People,” for the most part. Everything we make is still allergy-friendly for those with gluten and dairy allergies and they’re all relatively healthy meals.

This meal was a keeper and it was very easy to make.

I hope that all of you are safe and sound, healthy and that you all remain so.  I hope that you have good luck shopping for your own household needs over the coming days and weeks and maybe if you’ve purchased any of the same things I did, you can find some meal inspiration in this post to keep you going.


Monday Musings: Carrying on a family tradition

9 Mar

To me, this photo means that nothing is impossible with a little extra effort, and a family tradition will be carried on.

Each year at Christmastime, my grandmother on my mom’s side would make her mini cherry cheesecake tarts. They were always a favorite dessert of mine, and for years even after she moved into an assisted living facility, she would still come to my mom’s house before Christmas and make them. Recently though, as she approaches her 100th birthday in May, it’s become impossible for her to make that trip and my mom had taken over making them. However, in recent years we’ve also been dealing with gluten and dairy food allergies at our house, so this year when my mom said she didn’t think she’d be able to make them, I told her not to worry, that I wanted to play with the recipe myself and make them gluten and dairy-free so that we could all enjoy them.

This past weekend my parents were coming over for dinner and I was thinking about what I could do for a dessert. I always like to make something special and I always like to make something with cherries at this time of year because it’s around the time that they had their first date more than 50 years ago, and my dad always says it was my mom’s homemade cherry pie with the perfect lattice top crust that made him fall in love with her. So as I thought about that, I remembered the cheesecake tarts and I decided now was the time. I’d attempt to make over the recipe.

The Enjoy Life brand has been a favorite and when I saw this new flavor cookie, I thought it would make a great crust for my tarts.

I searched online for a typical cheesecake tarts recipe to see what I was up against. The first one I found from Taste of Home called for vanilla wafers as a crust. I remembered that at the allergy-friendly bakery we go to often, they told me that they used Snickerdoodle cookies for their cheesecake crusts and that I’d done a raspberry swirl cheesecake last April for Easter and done just that, with great success. I decided to get some allergy-friendly vanilla wafers and follow the recipe. However, when I stopped at the store late last week, they didn’t have gf/df vanilla wafers, but I spotted a new flavor cookie I hadn’t seen before from one of my favorite brands, Enjoy Life. It was a crispy cookie, Vanilla Honey Graham, and it sounded like it could work. Since they were priced two for something, I bought four boxes, two to crush up and two to have on hand to eat later on.

I have used a couple of different kinds of dairy-free cream cheese for recipes in the past, and I had an unopened container of Tofutti on hand already. Any time I have cooked with dairy-free cream cheese I have had great results and most will say they can’t tell the difference between my finished product and ones they’ve had in the past. To me, that’s a sign of success.

When I’ve used dairy-free cream cheese in recipes in the past, I’ve been told that you can’t tell the difference.

On Friday afternoon I got to work on the recipe, putting the cookies into the blender and making crumbs out of them. I use a vegan buttery baking stick for butter when I bake since most dairy-free butter comes as a spread, which is fine to cook with but hard to bake with.

I keep several boxes of this on hand since I can only find it in one store near me.

I tasted the cookie crumbs and decided to throw some sugar in with them, so I threw in about 1/4 cup of sugar plus the butter it called for in the recipe, turned on the blender again and mixed it all in. My kids gave the final version a taste and said they were good to go.

From there, I followed the Taste of Home recipe below, and instead of following the recipe for the topping, I used canned cherries for the tops of the tarts, just as my grandmother always did.

When the tarts cooled, my daughter put the cherries on top and I put them in the fridge for the final chilling. We had a great dinner that my husband had cooked, and then it was time to bring up the dessert. I was so excited for the big reveal. I hadn’t told my mother that I was making them for dessert, only that I had a really good dessert on deck. I wish I had a camera to capture her expression when I came around the corner with the platter of cheesecakes. I had even chosen to use my grandmother’s platter to serve them on. That look alone made my day, but tasting the tarts, and having everyone declare them delicious made my night.

Oftentimes having food allergies can be challenging, but over time we’ve found that almost nothing is impossible. It takes some time and some research and planning, but most times it can be done. This dessert means a lot to me. It is a family tradition and it holds memories dating back to when we would eat that at my grandparents’ house and when they’d bring them to the Christmas Eve dinners for dessert. It’s something we only have this one time of year, so knowing that we are capable of carrying on tradition makes me happy. Further, I was able to combine that tradition with my nod to my parents’ more than 50 years of history that all started with that one cherry pie with the lattice topping that sealed the deal. Thank goodness for that or none of us would be here.

Below is the Taste of Home recipe just as it is found on their website before all of my modifications, and here are some photos of where my mini cheesecake tart recipe has come from, which stems from more than just an internet search.

Grandma Grello with our three daughters, just three of her many great-grandchildren.

Ingredients

  • 1 cup crushed vanilla wafers (about 30 wafers)
  • 3 tablespoons butter, melted
  • 1 package (8 ounces) cream cheese, softened
  • 1/3 cup sugar
  • 2 teaspoons lemon juice
  • 1-1/2 teaspoons vanilla extract
  • 1 large egg, room temperature, lightly beaten
  • TOPPING:
  • 1 pound pitted canned or frozen tart red cherries
  • 1/2 cup sugar
  • 1 tablespoon cornstarch
  • Red food coloring, optional

Directions

  • Preheat oven to 350°. Combine crumbs and butter; press gently onto bottoms of 12 foil-lined muffin cups. In another bowl, combine cream cheese, sugar, lemon juice and vanilla. Add egg; beat on low speed just until combined. Spoon over crusts.
  • Bake until centers are almost set, 12-15 minutes. Cool completely.
  • For topping, drain cherries, reserving 1/2 cup juice in a saucepan; discard remaining juice. To reserved juice, add cherries, sugar, cornstarch and, if desired, food coloring. Bring to a boil; cook until thickened, about 1 minute. Cool; spoon over cheesecakes. Refrigerate, covered, at least 2 hours.


  • My parents’ wedding day, which was 50 years ago this past October 18.

    My parents celebrating 50 years together on October 18, 2019.

    Two more of her great-grandchildren, my niece and nephew learned how to make the tarts at my mom’s house a few years back.

    My brother looks on as they learn the secret of putting just the right amount of cherries on top.


A new muffin recipe: Bakery Style Banana Bread Muffins

2 Mar

These were a perfect Saturday morning breakfast.

I was recently searching for an applesauce muffin recipe I’d posted a while back when I realized that I never posted the new banana bread muffins I tried in January. It had been an early Saturday morning when I was craving warm muffins straight from the oven. I decided to do a search to see if I could find a new gluten and dairy-free muffin recipe to try.

In my search, I stumbled across a new blog, The First Year Blog, and their Bakery Style Banana Bread Muffin recipe. I had all of the ingredients including the right number of frozen bananas, I didn’t need to do a ton of ingredient conversions to make it fit our needs, and I decided to make them and not mention the name of them. I wondered if they really would taste any different than other banana chocolate chip muffin recipes I’ve tried before.

Sure enough, the first person to taste them mentioned right away that these muffins tasted just like banana bread, which we actually make quite often. I was surprised that it was that evident, that quickly! I didn’t need to say anything. The muffins were definitely different and I do believe it was the tip about letting the batter rest before scooping it into the muffin tins. When you visit The First Year blog to see this recipe, you will notice that she provides lots of other great tips for freezing the muffins, for making them gluten-free, and for creating a high-domed muffin. Be sure to check it out and be sure to peruse the site for other recipes while you’re there!

Now that I’ve remembered this recipe, I’ll have to make it again soon! It was definitely one of my top favorite banana chocolate chip muffin recipes to date!

These were delicious! Thanks to The First Year blog for sharing!


Ingredients

  •  3 large ripe bananas, 1 cup mashed
  •  1/3 cup vegetable oil
  •  1/2 cup sugar
  •  1 egg
  •  
1 tsp vanilla
  •  1 & 1/2 cups all-purpose flour
  •  
1 tsp baking soda
  •  1/2 tsp cinnamon
  •  1/2 tsp salt
  •  optional: 1/2 cup mini chocolate chips

Instructions

  1. Mash the bananas in a blender, mixing bowl or with a potato masher.
  2. In a mixing bowl combine the mashed bananas, vegetable oil, sugar, egg and vanilla extract. Stir to combine with a spatula.
  3. Add in the flour, baking soda, cinnamon, and salt, stir together with a spatula.
  4. If adding chocolate chips, mix them in now.
  5. Cover the bowl with a towel and allow the batter to rest for 15 minutes. During this time, preheat the oven to 425ºF.
  6. Line a muffin pan with muffin liners. Fill the liners to the top with batter.
  7. Bake for 7 minutes at 425ºF, then keeping the muffins in the oven turn the temperature down to 375ºF and bake for 12-14 minutes or until a toothpick inserted in the center comes out clean.

They definitely lived up to their name!

What’s for Dinner Wednesday: Two weeks of meals

5 Feb

Beef Burgundy is a recipe I grew up on and it’s a favorite of mine.

It’s hard to believe that it’s already February. The month of January seemed forever long, mixed in with a couple of cases of the flu at our house, and I was more than happy to turn the calendar page over. Bye-bye January, nice to see you come, nice to see you go.

Now, it’s midweek and we’re about to wrap up our two-week menu, so I thought I’d share it here today to give you some meal inspiration for the weeks ahead. Whenever I can, I include the link to a recipe for you and I even treated you to a brand new recipe which you can find at the end.

Sunday: Chicken Parmesean and pasta

Monday: Sloppy Joe sandwiches and french fries (this is nothing fancy, and out of a can, usually slated for a night I’m not home for dinner.

Tuesday: Beef Burgundy

Wednesday: Teriyaki Chicken Thighs with baked potatoes and snap peas using this recipe for the sauce.

We buy boneless, skinless thighs to make them a little bit healthier.

Thursday: Creamy Avocado Pasta with chicken and grape tomatoes (This was a new recipe for us.  See recipe below.)

Friday: Homemade chicken burgers with salad

Saturday: College kid visit, dinner out

Sunday: Superbowl Sunday (Our contributions: potato skins, chicken wings, Buffalo chicken dip, and chili)

Monday: Soup and sandwiches

Tuesday: DIY Spinach salad (Toppings included chicken strips, pecan halves, Craisins, bacon, Feta cheese, grape tomatoes

Wednesday: Pizza dinner fundraiser night at Blaze Pizza (We love Blaze, it’s one of the only places nearby where we can get gluten-free crust AND vegan cheese on a pizza for our daughter.)

We put out all of the ingredients and everyone adds what they want to their salad.

Thursday: BBQ Ribs, oven-roasted baby bliss potatoes, and veggies

Friday: Pesto salmon (Salmon coated in pesto and baked in foil in the oven)


NEW RECIPE

        Here is the new recipe for the Creamy Avocado Pasta along with our minor modifications to the ingredients. We also added chicken to our recipe.  This recipe is a clean eating recipe and I found it here as part of a four-week meal plan. This recipe is from week three but you can find all four weeks here. Thanks so much to Homemade for Elle for the free recipes and meal plans. We have gotten a great deal of inspiration from them.


This recipe was new and it was given a thumbs up from all of us.

Ingredients:

`12 oz. whole wheat spaghetti (we used gluten-free and regular pasta)

2 avocados, ripe, halved, seeded and peeled

1/2 cup fresh basil leaves (we used dried basil)

3 cloves minced garlic

Juice from one lemon (we used bottled)

1/3 cup of olive oil

salt and pepper to taste

1 cup cherry tomatoes, halved

Directions

Bring pot of salted water to a boil. Add pasta and cook until al dente. Drain and transfer to a large bowl.

In a food processor, combine avocados, basil, garlic, and lemon juice. Turn food processor on and slowly drizzle in olive oil.

Season with salt and pepper to taste.

Add avocado mixture to your warm pasta and toss until mixed well.

Add in cherry tomatoes and serve warm.


Fun Friday: Baked Apple Oatmeal

31 Jan

This was so delicious on a cold winter day.

It’s the weekend and there’s something so great about having a nice, homemade warm breakfast on a weekend morning. Today’s recipe is a perfect one for this weekend or any day.

We originally had this for breakfast earlier this month on Martin Luther King Jr. Day. Being a Monday morning, I knew we could eat it that day and then have it leftover for breakfast or snacks after school during the week too. and baked oatmeal is something my family requests frequently so I knew they’d enjoy waking up to the smell of this baking in the oven on their day off from school.

My initial plan had been to make the same baked oatmeal recipe I always do, substituting in frozen blueberries for the strawberries. But, we were out of blueberries. Then I thought we had frozen peaches, but we didn’t have enough. So, I started searching for a baked apple oatmeal, since I knew we had a few apples on hand. I’m so glad that I did, as this recipe was completely different than the usual one and everyone loved it. I’d definitely do it again. I did one and one-half of this in order to make it fill a 9×13 baking dish and it was a perfect amount.

We opted to add whipped cream on top (we have both regular and dairy-free whipped cream on hand) and I also tried it with maple syrup on top and that was great too. The oats I used were gluten-free and we used soy milk to make it dairy-free but I’ve also used almond milk to make allergy-friendly oatmeal in the past as well. This recipe also calls for walnuts but we don’t usually keep nuts on hand so I didn’t put any in. I happen to also really like pecans and I think chopped pecans would’ve been a good addition to the recipe as well.

I found the recipe on this site, called Once Upon a Chef, and it’s described as a traditional Amish breakfast casserole, which was a perfect description. It was such a great comfort food and it took about an hour total to prep and bake. I encourage you to check out the site itself because it includes all of the nutrition information also, but the ingredients and instructions for a single recipe are copied here as well. I hope you’ll head on over and see some of their other recipes too.


I made one and one-half recipes in order to have enough for breakfast and for leftovers.

INGREDIENTS

  • 2 cups old-fashioned rolled oats (not instant)
  • 3/4 cup light brown sugar
  • 1 cup chopped walnuts or pecans, divided
  • 1/2 cup raisins
  • 1 teaspoon baking powder
  • 2 teaspoons cinnamon
  • 1/2 teaspoon salt
  • large eggs
  • 2 cups milk
  • 1 teaspoon vanilla extract
  • 4 tablespoons unsalted butter, melted, plus more for greasing the dish
  • 2 tart yet sweet baking apples, such as Honey Crisp, peeled and cut into 1/2-inch chunks (about 2 cups)

INSTRUCTIONS

  1. Preheat the oven to 325°F. Grease an 8 or 9-inch baking dish with butter.
  2. In a medium bowl, combine the oats, brown sugar, 1/2 cup of the nuts, raisins, baking powder, cinnamon and salt. Mix well.
  3. In another bowl, break up the eggs with a whisk; then whisk in the milk and vanilla until well combined.
  4. Add the milk mixture to the oat mixture, along with the melted butter.
  5. Scatter the apples evenly on the bottom of the prepared baking dish. Pour the oatmeal mixture over top and spread evenly. Sprinkle remaining 1/2 cup nuts on top. Bake for 40-45 minutes, until the top is golden and the oats are set. Serve warm or at room temperature.


What’s for Dinner Wednesday: Pizza-stuffed chicken from Clean Eating Magazine

22 Jan

This was a savory new recipe that we can’t wait to try again.

We have had the chance to try out lots of new recipes over the past year or so and this one was a family favorite. It’s somewhat similar to the one I posted a few weeks ago, in that it’s pizza-themed and it’s also one from Clean Eating Magazine, but it’s been on my mind so I wanted to share it. We actually have a whole binder of clean eating and gluten/dairy-free recipes we’ve ripped out of various magazine issues over the past year to try out, and this one is one we tried early in October.  It was particularly good as leftovers too, once all the flavors had really had a chance to set in for a couple of days. We’ve actually had success with just about all the new recipes we’ve tried and it’s nice to have new things to try.

The recipe was simple and had easy ingredients that we usually have on hand. It can also be tailored to the things you like or don’t like. We made a gluten-free/dairy-free version and a regular version so that we all could enjoy the new meal.

The magazine feature actually recommends prepping this meal on Sunday and then it’ll be ready to eat later in the week, and it recommends grilling the chicken. We baked ours in the oven.

Here is the recipe as found on the pages of Clean Eating Magazine.


Ingredients

  • 4 6-oz boneless, skinless chicken breasts, patted dry
  • 1¼ cups marinara sauce, divided
  •  mozzarella cheese, shredded
  • 12 slices uncured pepperoni
  • 2 tsp dried basil
  • 1 tbsp dried oregano, divided

Preparation

Prep Ahead

1. Cut each breast through the middle to form a 2- to 3-inch pocket, taking care not to cut all the way through. Spread 1 tbsp sauce on inside of each pocket. Divide mozzarella, pepperoni, basil and ½ tbsp oregano among pockets. Close pocket and use a toothpick to secure. Cover and refrigerate for up to 2 days.

The Day Of

2. When ready to cook, preheat grill to medium-high. Pat chicken dry. Brush chicken with oil; season all over with salt, pepper and remaining ½ tbsp oregano.

3. Place remaining 1 cup marinara sauce in a small pan; warm over medium-low heat. Grill chicken until cheese has melted and chicken is cooked through (a thermometer inserted into thickest part of a breast should read 165ºF), 4 to 6 minutes per side. Transfer chicken to a cutting board; tent with foil and let rest for 5 minutes. Serve chicken with warmed marinara on the side.

Fun Friday: Cranberry Chocolate Chip Cookies

17 Jan

These cookies were so delicious and contain one of my favorite combinations.

Happy Friday! I love a long weekend because it gives us more time to cook up something extra special, like cookies.

I found this recipe in Gluten-Free Living Magazine back in October and it was actually featured in a holiday cookie recipe spread in the magazine, in anticipation of the upcoming holiday baking season. However, I love the combination of chocolate and cranberries. In fact, it’s January now and I have a pumpkin-cranberry-chocolate-chip bread in the oven as I write.

Being gluten-free, the recipe calls for a one-to-one all-purpose gluten-free flour, (which means you can take a typical recipe and substitute the one-to-one GF flour for the regular all-purpose flour with no other substitutions or extra ingredients needed) and we do use their recommended brand below. However, I believe you could substitute back the other way too, and instead of using the GF one-to-one flour, you should be able to also use regular all-purpose baking flour in this recipe.

I always use a Pampered Chef small scoop to scoop out the batter, so oftentimes my cookies are particularly round if I don’t think to flatten them out a bit after I scoop them onto the tray. That’s why they are seen this way in my photo above.

This was a quick and easy recipe and it would make a great treat with coffee, tea, milk or whatever your favorite beverage. They also made a great school day or after school snack.

Ingredients:

1 1/2 cups gluten-free all-purpose flour (Bob’s Red Mill Gluten Free 1:1 Baking Flour is recommended by Gluten-Free Living Magazine)

1/2 tsp baking soda

1/4 tsp salt

8 tablespoons butter, melted and cooled slightly (to also make this dairy-free I used Earth Balance baking sticks)

1/2 cup packed dark brown sugar

1/4 cup granulated sugar

1 tsp vanilla extract

1 large egg

3/4 cup dark chocolate chips (to make this dairy-free I used Enjoy Life brand allergy-friendly mini semi-sweet chocolate chips)

3/4 cup dried cranberries

Directions:

Preheat oven to 350 degrees. Line two baking sheets with parchment paper.

Whisk together the gluten-free flour, baking soda and salt together in a medium bowl.

In a large bowl, [using a mixer], combine the melted butter, dark brown sugar, granulated sugar, and vanilla extract. Mix until smooth.

Add the egg and mix until combined. The mixture should look like thick caramel sauce. Stop the mixer and add the flour mixture. Mix on medium speed until a thick dough forms. Add the chocolate chips and dried cranberries. Stir until incorporated.

Drop dough, about two tablespoons each, onto prepared cookie sheet. Space cookies about two inches apart.

Bake until golden brown, about ten minutes. Rotate the baking sheets halfway through baking.

Allow the cookies to cool for five minutes and then transfer to a wire rack to cool.

What’s for dinner Wednesday? Instant Pot Beef Stew

20 Nov

Sunday was busy. It was also cold, rainy, and we even saw flurries. Beef Stew was a perfect meal for such a day.

I’m on a roll! Two posts in one week.

Today’s post brings back the often requested “What’s for Dinner Wednesday” posts. I am going to share the meal we had on Sunday night, which was the night we were finishing up our weekend of bathroom renovation painting, I worked during the day, and my husband planned the meals while I worked and did the week’s grocery shopping. It was a super-busy day and it was cold.

While I was at work I got a text asking if he could plan Beef Stew for dinner for that night. He wasn’t sure if anyone besides him actually liked it. I said to go for it, and he found a recipe for the Instantpot, which would help us cook while we painted right up through dinnertime.

The recipe was from a site we had never visited before, The Salty Marshmallow. They boast having quick and easy recipes for the everyday cook. That’s us. We are everyday cooks and we needed quick and easy. You can find the recipe here

The Salty Marshmallow said their recipe was “the best ever” Beef Stew recipe, and I think they were right. This was the best, most tender, most flavorful Beef Stew I have had. I am not a huge fan of cooked carrots (unless they’re cooked in honey and butter and raisins and brown sugar, but that’s a whole different recipe) so we also threw in a bag of frozen whole green beans as well. As this meal cooked, our house smelled so delicious. Our mouths were watering by the time it was finished.

This was the most delicious Beef Stew I have ever had.

Because this recipe calls for cornstarch at the end, it was gluten-free and that made it something that all of us could eat. My youngest who not only has food allergies but also doesn’t love meat, ate an entire bowl of stew (minus the actual meat itself). That was huge. The stew was incredibly flavorful and the meat, for those of us who did eat it, was tender and delicious.

This was a meal we’d most definitely make again and I think we were all wishing we’d made it sooner.  Over at The Salty Marshmallow, there are some tips for success when making this stew and I hope you’ll check them out before making the recipe.

Have a great day and enjoy the stew!

Welcome back recipe: Chocolate Banana Oatmeal Blender Muffins

17 Nov

These muffins made me want to do a blog post asap!

It’s me…

I know it’s been a very.long.time since I did a blog post in January. I’ve been super busy. Everyone is busy, I know, but I’ve been busy enough that I didn’t have any time or even any blog-writing mojo enough to do a blog post.

Last year I had taken on a one-year position working for our state’s Department of Education as a Communications Ambassador in addition to my regular freelance education reporter position. The position ran from the start of August 2018 to the end of July 2019 and it reached its busiest time last winter in January around the time I did my last blog post and lasted thru the end of the position. That busy time ran right into my reporter job’s busy time in April/May/June and I was just swamped. It was a wonderful job though, and I loved it, but between the two jobs and my other family responsibilities, I just couldn’t find the time or energy to do any more writing than I was already doing.

That job, however, gave me the extra experiences that I needed to apply for a new job that our school district posted in July 2019 for a Communications Specialist. The first week of August I got that job and I jumped right in, while still writing for the paper on occasion and doing my usual Mom jobs as well. So I’m finally feeling like I’m getting my feet back on solid ground and I am getting that itch to start blogging again. I’ve recently had some of my readers asking me when I thought I might start writing blog posts again. It was time.

This weekend has been super busy because we’ve been redoing our spare bathroom and I had to work at a school department event this afternoon, but when I came home from that I was starving, so I decided to make some muffins that I had been wanting to try out before I jumped back into helping out with continuing to paint the bathroom. I had seen these muffins come across social media and emailed the link to myself. They were gluten-free and didn’t contain any sugar or added oils, but they did contain things that everyone here loves: peanut butter, chocolate, and oatmeal. Most importantly they contained chocolate chips. What better way to jump back into my Whole Bag of Chips blog than with chocolate-chocolate chip recipe?

Today’s recipe was from a site I’ve never visited before, but I know I’ll definitely be going back. The name of the site is Dinner, Dishes, and Desserts and you can visit her site by clicking here. I highly recommend it, as all the recipes she described in her post sounded great to me! The recipe caught my eye not only for the ingredients but also because it’s all done in a blender. I thought that sounded easy. When I checked my kitchen I had all of the needed ingredients. I haven’t made muffins in a long time, so I was excited to try this out.

Here are the ingredients just as she’s listed them on her site. Other than the chocolate chips, you throw it all into a blender and blend it up!

  • 2 large ripe bananas
  • 2 whole eggs
  • 1 cup peanut butter
  • 3/4 cup old fashion oats
  • 1/2 cup honey
  • 1/2 cup cocoa powder
  • 2 tsp vanilla extract
  • 1 tsp baking powder
  • 1/2 tsp salt
  • chocolate chips

To make this dairy-free I used Enjoy Life mini chocolate chips and I used Bob’s Red Mill gluten-free oats.


Her directions are super easy and the recipe went as directed. I got 17 muffins in total and I cooked them for about 15 minutes. I did check them at 13 minutes but they weren’t done yet.

  1. Preheat oven to 350 degrees. Spray a 12 cup muffin tin with non-stick spray.
  2. To a blender add banana, eggs, peanut butter, oats, honey, cocoa powder, vanilla, baking powder, and salt. Blend until smooth and well mixed.
  3. Scoop batter into prepared muffin tin, filling about 2/3rd of the way.
  4. Sprinkle the top with chocolate chips.
  5. Bake for 13-15 minutes or until a tester comes out clean.
  6. Remove from the oven and let cool for 5 minutes before removing from the pan to cool.

Everyone voted that this recipe was a keeper. I tried to get a photo of how moist and delicious these were but I don’t think it does them justice. I’m sharing it anyway. The recipe recommended doubling the recipe, which I would plan on next time so that I have extras for the freezer. I didn’t have enough of everything on hand to do it this time.

Moist, healthy, allergy-friendly and delicious! A win-win for us!

Enjoy, and welcome back to the Whole Bag of Chips!

Jen

Fun Friday: Dairy-free cream cheese filling for crepes

11 Jan

This was a great new option for our crepe fillings!

TGIF! It’s Friday and it was our first full week back to school. For me personally, it wasn’t a bad week, but for the kids, it was exhausting to be full-on, back at it again after the break.

For today’s Fun Friday post, I thought I’d share a cream cheese filling that I made for our New Year’s Day brunch here at home. We don’t entertain guests that morning, but we generally do a very special breakfast just for our own little family to celebrate the new year. This year we opted to do crepes. We usually put out a variety of fillings including eggs/ham/cheese, bacon, berries, Nutella, peanut butter, bananas, and sometimes we’ll make a hot compote of apples and raisins. This year we also made a chocolate fondue on New Year’s Eve night while we waited for the ball to drop, so we were strategic when shopping for our dipping items for that treat so we’d have some fruits leftover for the next morning’s fillings.

This was a brand I’d already come to trust with a few other products, so that’s how I chose the cream cheese for my recipes.

When I made our Christmas cookies this year, I had one cookie I was particularly nervous about because it had a cream cheese filling and I had yet to try out a dairy-free option for cream cheese. When I bought my cookie-baking ingredients I had yet to do a “trial run” of these cookies, so I just purchased a cream cheese substitute that came from a brand whose products I already liked, and I crossed my fingers, hoping the filling would come out well, and it did. Everyone raved about these cookies, and I was just thrilled. And, relieved.

The cream cheese filling came out so well in fact, that I thought that I would try making a new filling for our crepes, since Nutella is not dairy-free and therefore, it eliminated one of the filling options for some of us.

I went back to the store and I picked up another package of the Daiya cream cheese spread, and I looked up a recipe online for a cream cheese filling for crepes. I assumed it would be pretty similar to the cookie filling, and it was. I found the recipe here, which included the recipe for the crepes themselves as well, and I used just the filling ingredients as my guide, not including berries, although I did have them ready to go:

For the Filling:
  • 1/2 cup granulated sugar
  • 8 ounces cream cheese
  • 1/2 cup powdered sugar
  • 1/2 teaspoon vanilla extract

    When the time came, we had a lot of filling options for our crepes.

    That morning’s brunch was delicious, and I was so pleased with the filling. It worked out very well, and I’d definitely use it again. I am happy with the Daiya cream cheese substitute. They also have a flavored one that I would consider using in my recipes as well, which replaces a staple for one of our favorite chicken recipes over the years, and it’s a recipe I haven’t made in the past year or so.

    I hope you’ll give this cream cheese filling a try too. If you’re not in need of a cream cheese replacement, the recipe is one that ordinarily uses regular cream cheese, so you don’t need to do anything different.

    Have a wonderful weekend and I hope you too, have a Fun Friday!

    You can add a little whipped cream to the top of your crepes, dairy-free or not, and you’ll have quite the treat!