Archive | rv cooking RSS feed for this section

Cooking with our newest Cave Tool: Stainless Steel Vegetable Grill Basket

27 Nov

The latest and greatest new Cave Tools product for our collection.

If you’re a long-time reader of The Whole Bag of Chips, you know by now how much we enjoy the cooking tools that Cave Tools sends us to try out. Last week we had the opportunity to give a new one a try and it might just be our very favorite one yet, the Stainless Steel Vegetable Grill Basket.

Cave Tools products can’t be beat when it comes to durability and quality and it’s one of the things we like best about them, especially because we cook at home on a grill and on a campfire when we are camping away from home with our camper. Their products are great for both. We also love that their tools are affordable and budget-friendly for consumers because those things are important to us too.

For our latest product trial, we opted to grill some fresh zucchini, squash, red onion and eggplant to go along with some grilled salmon and pesto that we were having for dinner. Coincidentally, the salmon was being grilled utilizing a Cave Tools product too, the small fish basket, and we were able to fit them side-by-side on our grill, which was so convenient. Even though we were using our vegetable basket to grill vegetables, it could also be used to grill other foods as well, such as shrimp or chicken, as well as other vegetables, fruits and meats. The fact that this tool is truly a basket, vented to let the grilled taste in, made for more flavorful veggies than if we’d tried grilling them in a foil pack. They were easily contained thanks to the depth of the basket, nothing fell out, no ripped foil packet, and no veggies dropping through our grill grates.

We loved being able to grill all of our veggies at the same time, in the same basket and on the same grill as our fish. No need to try to cook indoors and outdoors at the same time.

The Vegetable Grill Basket is a great size, at 13.5 x 11 x 2.5 inches, has great depth and is able to fit a good amount of vegetables in it, more than enough for all of us to eat, and even enough for leftovers too. One of the best things about the basket was the handles on the sides that were angled and a good size for being able to carefully lift the basket off the grill with our pot-holders.

The Vegetable Grill Basket is available for purchase both on Amazon.com and on the Cave Tools website. To purchase on Amazon, visit this link. To purchase it on the Cave Tools website, visit this link and be sure to utilize their special discount code to receive 15% Off: VEGGIE15  while you’re there.

As always, this Cave Tools product has a Lifetime Warranty with 100% of your money back, even if you’re not satisfied with your product at some point down the road. Although we’ve never needed to use this warranty, we love a company that stands behind its products forever.

I’m craving these all over again!

**Thanks to Cave Tools for sharing their product with us.

Although I was given the product in exchange for this review, all thoughts and opinions are my own.**

Cave Tools Pigtail Food Flipper: a great new tool for summer grilling

30 Jun

We’ll be taking these with us to the campground this summer!

It’s officially summer! Summer means so many things, but one thing it means for us is grilling. Another thing it means for us is camping.When we camp, we grill! Therefore, I was very excited when Cave Tools asked me to try out another one of their fabulous products. I have reviewed several of their other grilling tools and have yet to be disappointed.

The Pigtail Food Flippers arrived on our doorstep just as we were creating our menu for a week’s worth of meals, and we put steaks right on the menu so we could try out our new tool. We would be grilling at home, but soon we will be camping and we’ll be grilling over a campfire. These new tools, a pair of two-one longer and one shorter-seemed to be perfect for all the grilling we do. Although we were doing steaks on this particular night, the tools are great for so many other things, including bacon, chicken, hot dogs and ribs, just to name a few ideas.

The Pigtail Food Flipper was great for grilling steaks, but it has many other uses as well.

When I asked my husband what he liked about the new Pigtail Food Flippers versus using a spatula, a fork or tongs, he said that the shape of the hook which made for easy flipping.

“I liked the way the hook was shaped,” he said. “All you had to do was hook the meat and flip it rather than trying to get a spatula underneath. I also liked that it came in two sizes, I didn’t have to use a big one for a small piece of meat and I won’t have to use a small one for a big piece.”

The tool was super-easy to clean because they’re dishwasher safe, and to store, which is a big plus for a small kitchen. Additionally, the handles fit well into the palm of your hand, much more comfortable than the flat form of a spatula.

You can find this great new tool set in two places and it’s very affordable. It’s on Amazon here, and on the Cave Tools website here. If you choose to order from the Cave Tools site, there is a great 15% off discount available by entering the coupon code PIGTAIL15 at checkout.

As we pack up for camping, we’ll be including our Pigtail Flippers, and I encourage you to check them out too!


***I was given a free product in order to do this review. However, all thoughts and opinions are my own.***


Budget-friendly camping tips from The Penny Hoarder

24 May

Camping on a budget can make you a very happy camper!

It’s the end of May, Memorial Day weekend is just days away. I can almost taste the summertime…if it would just stop raining! We had some hot, 100 degree days last week, and the flip flops and tank tops were out, the sun shining, kids playing in the yard, I could see the lazy days of summer just ahead.

If summertime includes camping for you, as it does for us, you’ll be happy to read the most recent post from The Penny Hoarder’s site, “Get the Vacation You’ve Been Craving on a Budget: Go Camping.” The post contains six tips for budget-friendly travel through camping.

If you’ve been a fan of The Whole Bag of Chips recently, then you know that we purchased a new-to-us camper in 2015 and used it to travel in a budget-friendly manner over the past couple of years, touring the country in 2015 and touring NYC this past spring. We also traveled to Mystic, CT and to Meredith, NH as well as hanging out by the beaches here in the Ocean State in 2015, 2016 and again this coming summer in 2017. Having our own camper is thousands of dollars cheaper than renting a beach house in New England for a week every summer.

I was so thrilled when Lisa Rowan, writer for The Penny Hoarder, reached out to me for some tips to include in their camping post. The only thing that makes me happier than being able to do things because of the fact that we budget, is to be able to help others achieve their own goals by doing things on a budget as well. Stretching a dollar has helped us to achieve so many things, including all of the recent travel that we’ve been doing.

So if you are wishing you could do more traveling, but just don’t have the means, be sure to read the above post, or check out my travel pages #crosscountryadventure2015 and #thecowartstakemanhattan2017 for some tips and tricks for traveling and camping on a budget.

Fun Friday: “The Cowarts take Manhattan” and what was for dinner

5 May

April was incredibly busy, and here is the rest of why!

Last week in my What’s for Dinner Wednesday post, I promised you that I would share more of what had been keeping me from posting recently and I also promised you some weekly meal inspiration with a twist. Today’s Fun Friday post is all of those things wrapped in one.

As you’ll see in this week’s Cranston Herald feature article, we took a whirlwind trip to New York City and the surrounding areas, including Jersey City, Hoboken and Brooklyn, just to name a few. It started out as a college tours trip primarily, but because we had never taken any of the kids to NYC, and because they all wanted to visit so badly, we decided to try to make it a mini family vacation, on the cheap rather than one adult taking one child to New York and everyone else staying home.

Super cheap.

We accomplished that goal by using our camper, although very early in the camping season, and despite the fact that we wouldn’t have a ton of time for prepping for the trip due to work obligations and the Easter weekend. One of the ways that we made it work was by eating many of our meals in and only eating a few special things out, as we visited the city. We had extra money and we could’ve spent it all on eating out, but we didn’t want to. We opted instead to choose a couple of extra-special eating adventures and to choose a couple of extra-special sightseeing adventures too, giving ourselves the best of both worlds.

Our camper has a full kitchen with a microwave, oven and stove as well as a refrigerator, freezer and pantry. Therefore, we could plan meals as extensive or as simple as we wished. We decided to go simple. We knew we’d be out a great deal of the time and the last thing we wanted to do was come home and spend an hour and a half cooking. We also knew that simple meant cheap, and if our meals were inexpensive, that was more money we could throw into our travel budget from our normal grocery budget.

Because the weekend before the trip was Easter (an expensive, busy weekend in itself), we did have some leeway in our meals leading up to the trip and we were not eating at home on Easter Sunday. Therefore, my list of meals starts with Monday, the first night we arrived at Liberty Harbor RV Park and Marina. Here’s what we ate while we were away:

TWO WEEKS OF MEALS

Monday: Quesadillas (extras became lunch the next day) with Spanish rice and corn. We also had chips and salsa for appetizers when we arrived because it had been a five hour ride and we’d eaten lunch in the car earlier in the day.

Tuesday: Chicken burgers and hot dogs, fresh sugar snap peas, sauteed.

Wednesday: Macaroni with Chicken Parmesan, (chicken cooked in the cast iron skillet). Today we also used some of our spending money to have treats at Carlo’s Bakery in Hoboken, the original bake shop featured on the TV show, “Cake Boss.”

Breakfast on Wednesday morning: Carlo’s Bakery sweet treats


Very inexpensive, delicious and a fun end to our trip to NYC!

Thursday: We opted to eat out that night, experiencing NY Style Pizza, $1 a slice, in Times Square at 2 Bros. Pizza. DELICIOUS.

Friday: We were home again by Friday night and we had French Toast for dinner. Breakfast for dinner is fast and easy and a good meal to make when you get home. It was a breakfast option we never used on the trip so we had all the ingredients ready to go.

For the second week of our two week cycle, we tried to choose meals that were still inexpensive and that used some things we had at home already

Saturday: Homemade chicken and rice soup (perfect for what ended up being a cold, rainy, raw day)

Sunday: Pork Chops and homemade applesauce (I brought applesauce to dinner on Easter Sunday, so I made a triple batch that day, freezing one batch for our trip. We never used that meal on the trip, so we had it Sunday night instead.)

Monday: Zucchini shrimp Scampi (recently featured in this blog post)

Tuesday: Taco Bake (recipe here)

Wednesday: Chicken, Broccoli and Pasta

Thursday: Leftovers

Friday: Pizza

Fun Friday: Ideas for a fun camping-themed birthday party

31 Mar

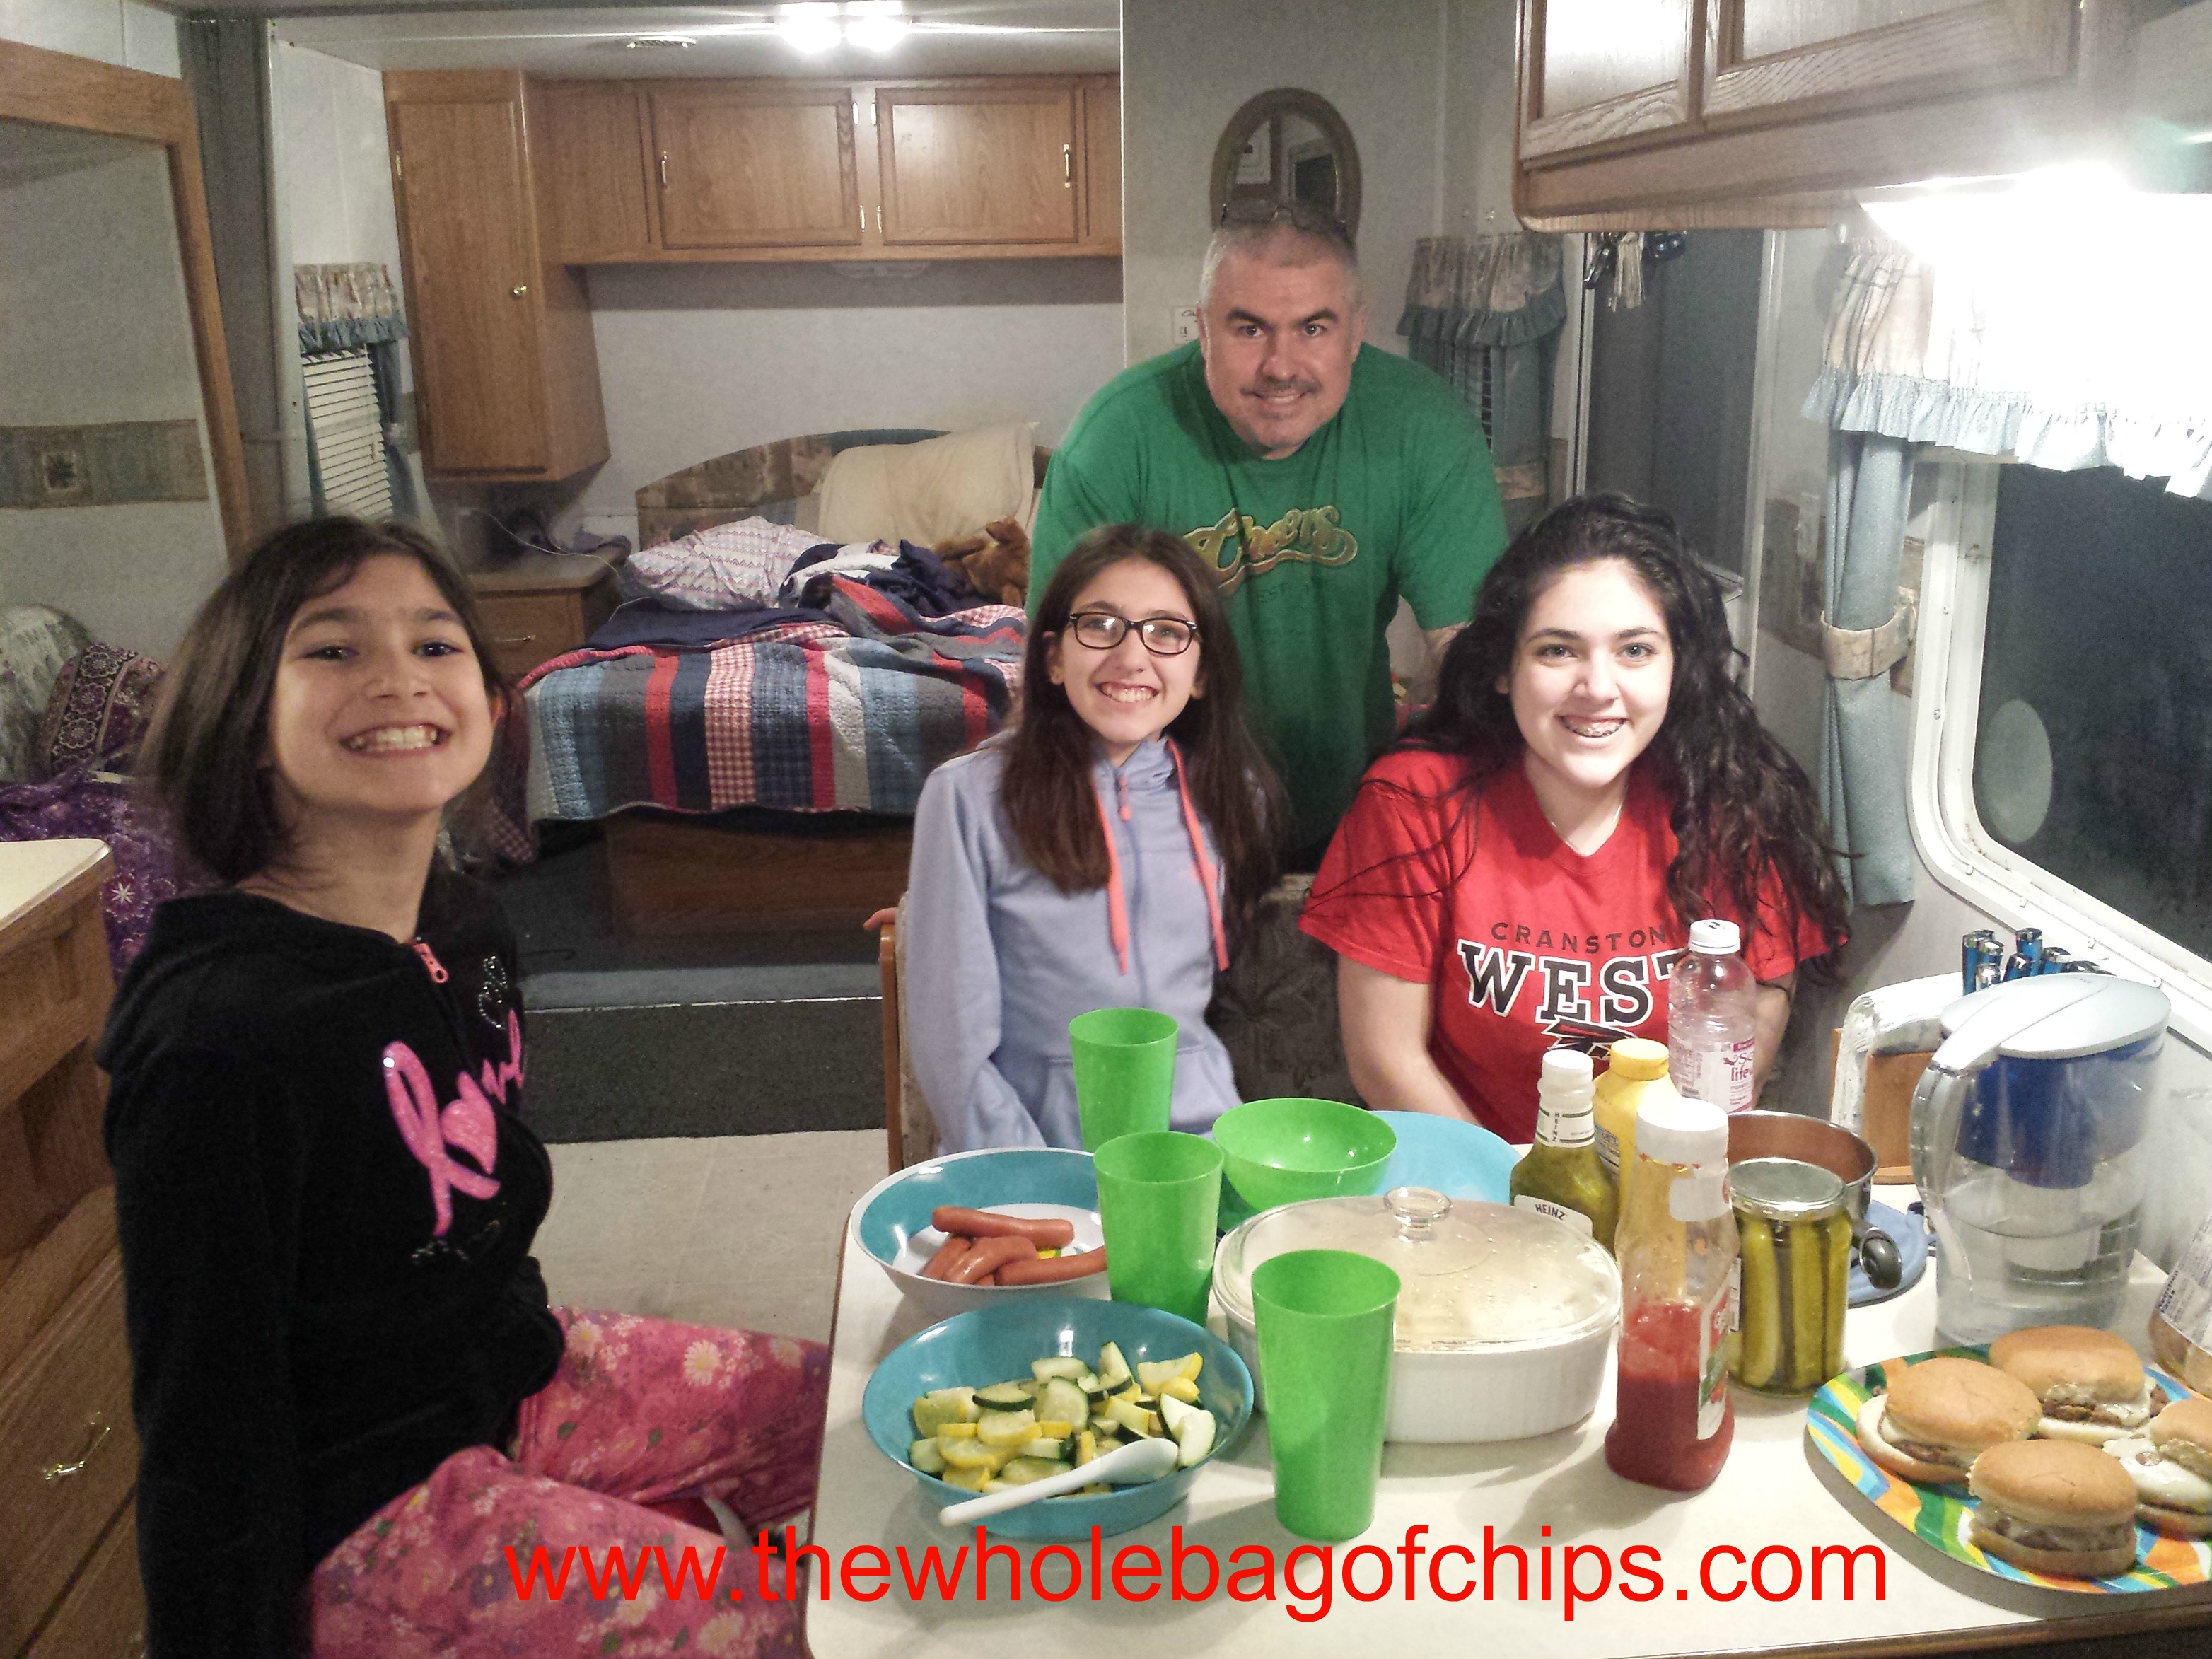
My daughter started planning her camping-themed party months ago and this shirt was a gift from one of her sisters to wear that night.

We are campers.

We have camped across the country for weeks on end, we are one Eagle Scout and four Girl Scouts. We definitely know camping and we love it. Therefore, many months ago during the winter, when my youngest daughter asked for a camping-themed birthday for her party this spring, I was excited. It was something we hadn’t done before as a birthday party theme, and although as our kids get older their parties get much smaller, it was a fun theme for any sized party, and one that was relatively easy and very inexpensive to plan, especially for a small group.

The Taco in a Bag meal even includes some veggies, if they choose to take the lettuce and tomatoes as their toppings.

This daughter also happens to be the daughter that has to follow a gluten free diet, so that makes planning meals somewhat more challenging, but for this party, it was relatively easy. As Girl Scouts, one of the favorite camping meals is Tacos in a Bag. As a family, we have a favorite summer taco salad which is similar to this one from Tasty Points. Tacos in a Bag is the best of both worlds if you’re a kid. To make them, you take individual packs of Doritos (which are now gluten free), the kids crush them up while they are in the bag, and then they layer their desired taco fixings in the order in which they want them, eating them right out of the bag. Be sure to either use a homemade taco seasoning mix or one that is gluten free. The brand we used was McCormick and was gluten free, and we prefer to use ground turkey rather than ground beef. To be on the safe side, I also grabbed a regular-sized bag of Doritos to have on hand for extras in case I needed them. I did not, so we have them to use here at home when needed.

I already had these on hand, so the recipe I found was perfect!

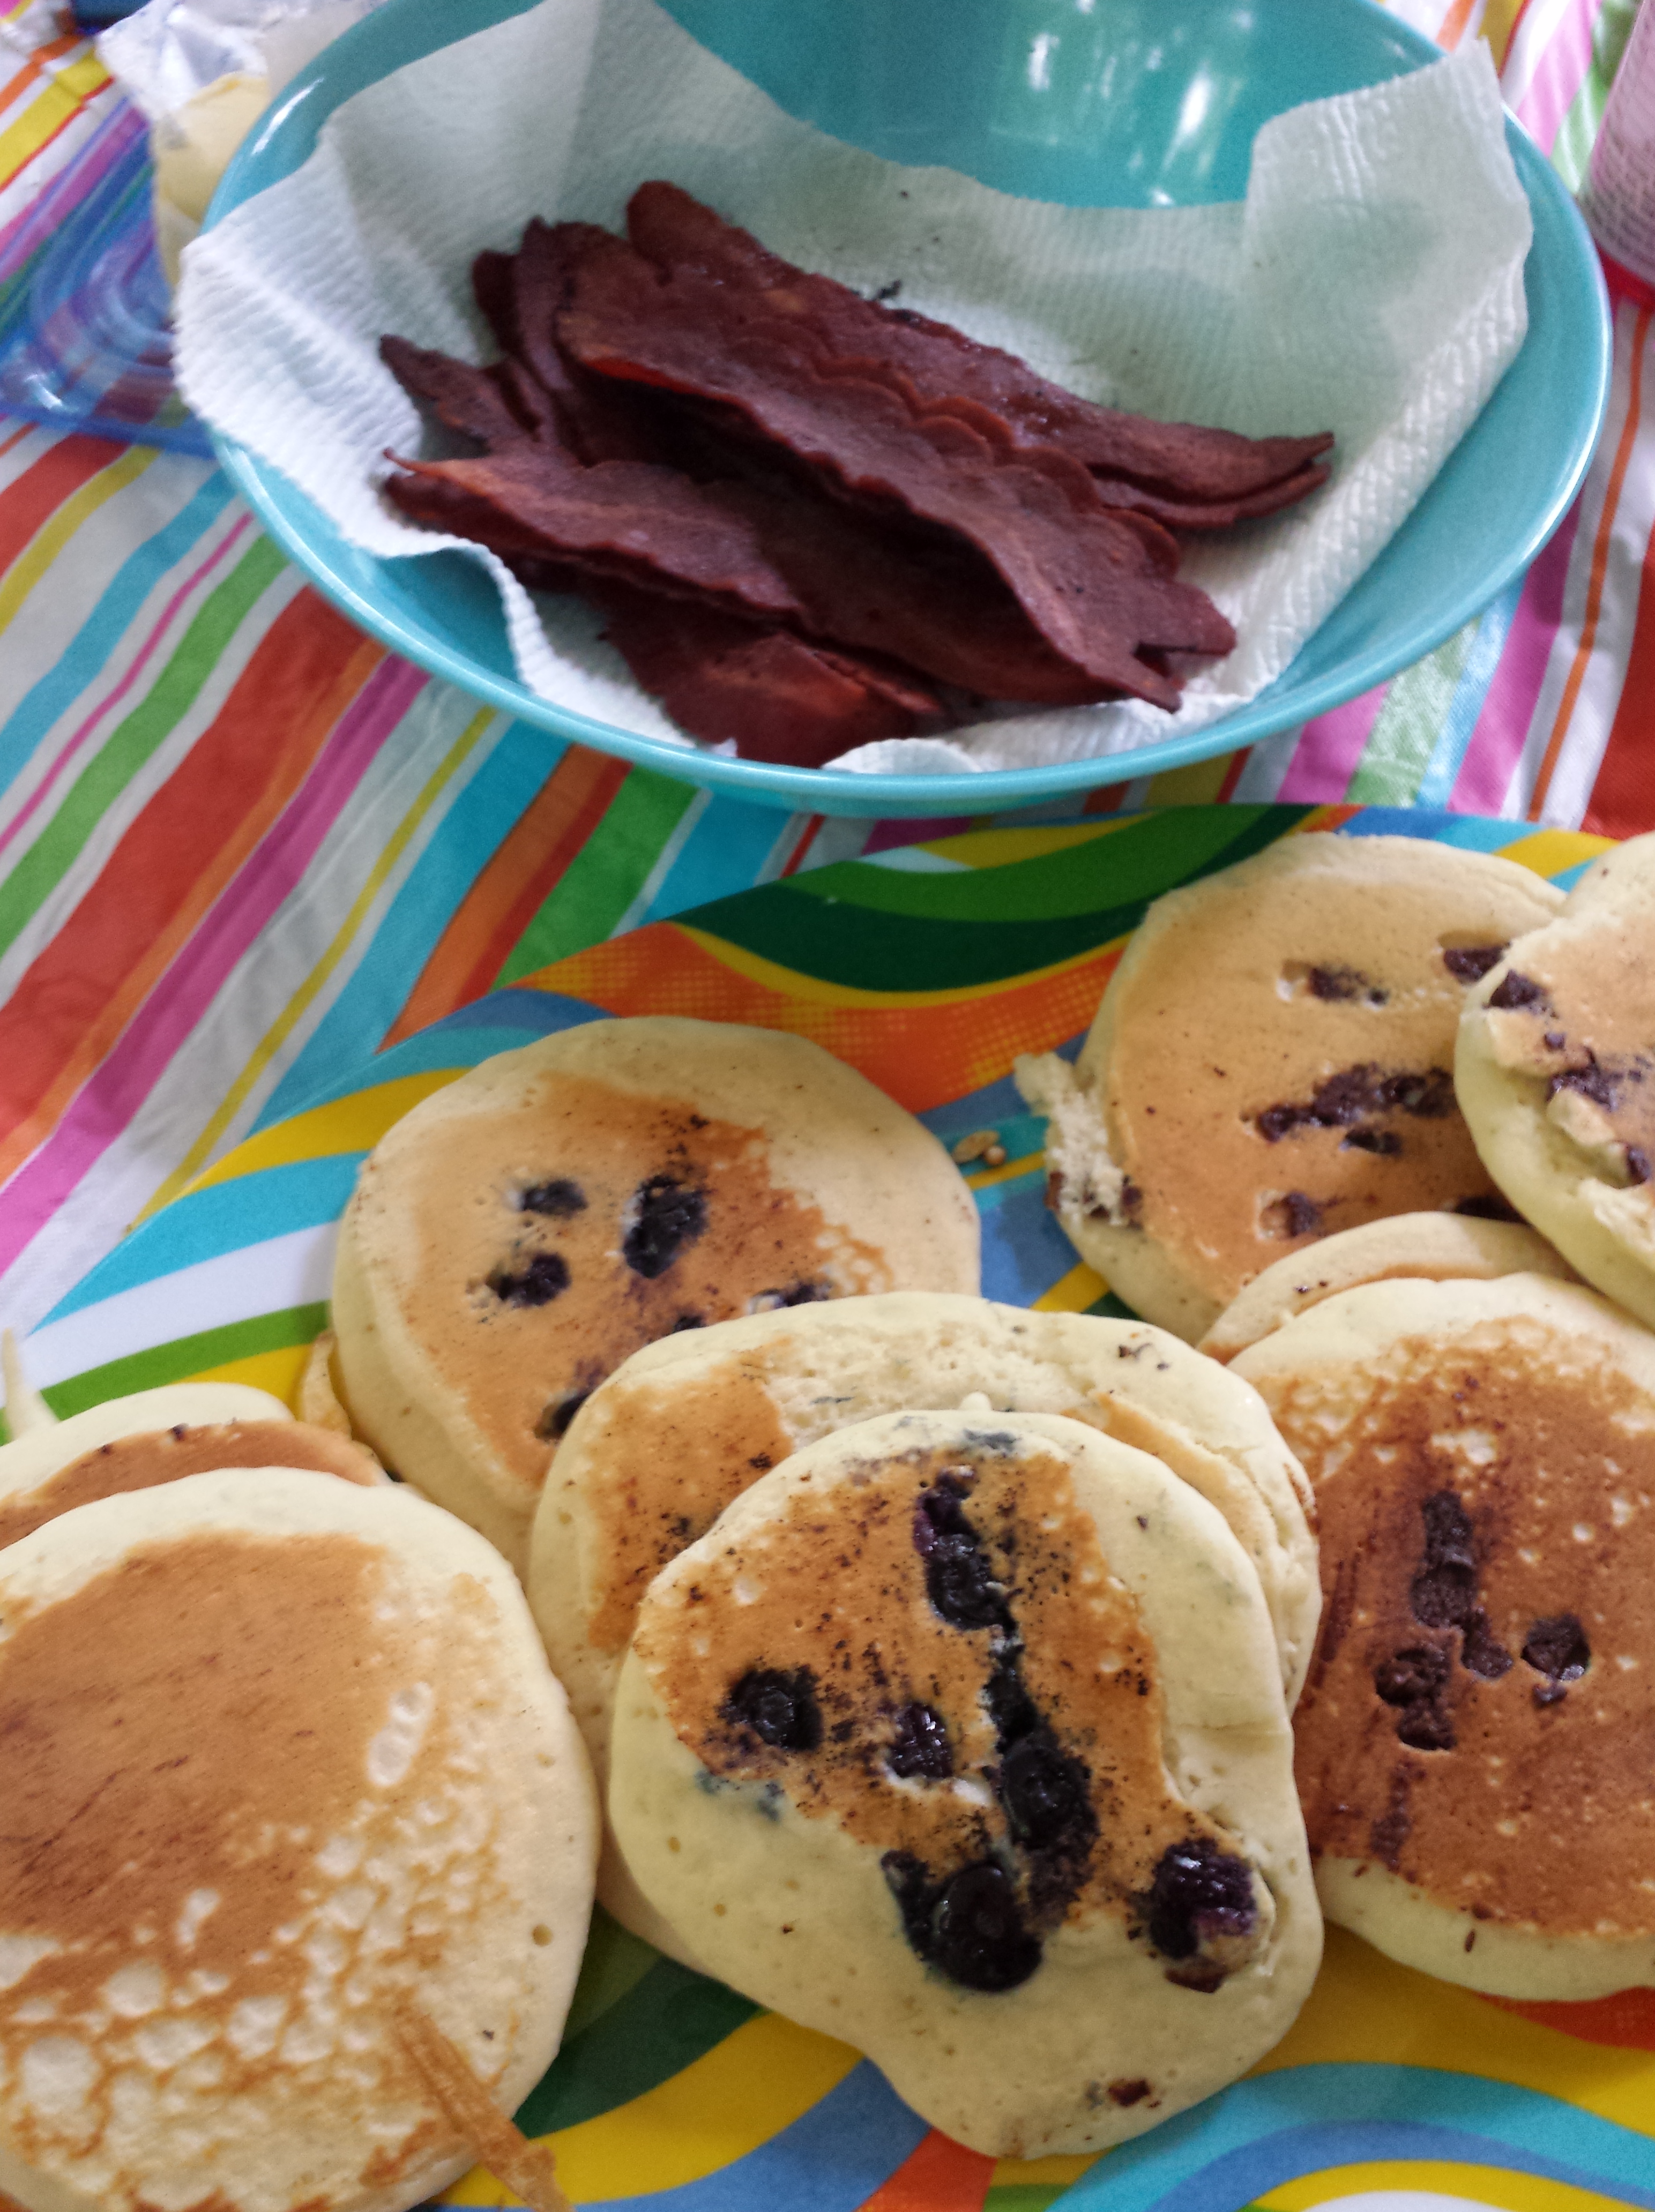
Initially, she thought of S’mores as her dessert of choice, but I hesitated, as I was recently having some trouble finding gluten-free graham crackers, even though I knew we’d had them before. I needed a different plan in case I couldn’t find them again in time for the party. Oddly enough, one afternoon, a recipe came across my Facebook newsfeed for this vegan, gluten free recipe for S’Mores cupcakes. Although we are not vegan, this recipe from Pickles and Honey provided me with just the inspiration I needed to formulate a plan to make my own S’Mores cupcakes for the party.

I already had graham cracker crumbs on hand that were gluten free and I had plenty left. To create my cupcakes, I filled two muffin trays with paper liners and sprayed the liners with nonstick cooking spray. I put about a teaspoon of the crumbs in the bottom of half the paper liners and left half without, in case anyone didn’t think they liked the graham cracker crumb idea. I used a gluten free Funfetti cake mix to fill the liners with batter and cooked them according to the package directions. To keep track of which were which, I used two different patterns of liners, one for each kind of cupcake. The white liners had crumbs at the bottom and the green did not.

My most favorite camping party idea. Thanks to Pickles and Honey for the initial inspiration!!

Although I normally make my own frosting, and I had one in mind that I had planned to use for the party, the day of the party came quickly and it was a busy one. When I was out picking up last minute things for that night, I saw a container of pre-made frosting, realized I could save myself some unnecessary stress and some time by just using that for the kids. I had planned on letting them frost their own cupcakes (sharing one little bowl of frosting between two kids) while I got ready to roast their marshmallows over my gas stove burner. The pre-made frosting would be just fine for our purposes.

When it came time for dessert, these cupcakes were a huge hit and I was so excited as to how they came out. I used a low, back burner and skewers to roast one marshmallow at a time, and I did them myself, rather than letting the kids do them for this first time around. The cupcakes went quickly, both varieties, and at the end of the night there were just a few left over and a little bit of frosting to keep in the fridge for them.

When your sister gives you glue, glue and more glue for your birthday, you have plenty to spare for a little party slime-making.

For the rest of the party, we had two crafts. First off, they made the currently very popular DIY slime, since my oldest daughter had given her sister several bottles of glue as part of her gift, and I’d been sure to restock all the food coloring, baking soda and corn starch we might need, depending on the DIY recipe they used.

I had also asked a summer camping friend who was going to be at the party if she wouldn’t mind teaching all of the kids to make friendship bracelets. While we were together this past summer at the local campground, she’d done a really great job teaching all our kids how to make the bracelets, and we had all the materials here. We just needed her expertise. I even picked up safety pins so that they could pin them to their sleeping bags or pillows and work on them while they were camped out in our living room watching a movie.

For our movie choice, we opted to show the old 1960’s version of “The Parent Trap,” which has some summer camp and family camping scenes in it. We had found it on Netflix ahead of time. We also had the remake recorded here at home, but we felt that the older version was one that the kids might not have seen before. We thought that if there was time the next morning, or if they wanted to at night, they could watch the newer version instead of or in addition to the older one, but they never did. They got a kick out of the older movie and had not seen it before.

All in all, it was a great night, with a fun group of kids and this is a party theme I’d highly recommend for those who are camping fans. It got us looking ahead to our camping days this coming summer, which will be here before we know it, and we’ll be having S’mores and campfires outside, and making friendship bracelets all summer long.


Fun Friday: Crazy for Crust’s Homemade Brownie Mix

21 Aug

Today’s post is one that started out as something we were using for our cross country trip, but we’ve used since returning home also, and I plan to continue to use it at home, especially during the crazy school year weeks.

I had been looking for a pre-made brownie mix that I could duplicate to take along with us on our trip so that I would have an easy to make dessert on hand all the time. We were bringing five mugs with us so that we could make Nutella mug cakes, and I had the ingredients for that, but I didn’t want to have to have a lot of other ingredients on hand because our pantry was small. As I searched, I came across a homemade brownie mix that could be made up ahead of time, stored in an airtight (mouse tight and ant tight) container and only the wet ingredients would need to be added. I decided to make a double batch of the mix. I wasn’t sure we’d even use it, but I thought it would be good to have on hand. Our oven in the RV was tiny, so I brought a 9×9 square baking dish, as it was an option for the recipe as were 9×13 and loaf pan sizes.

brownies 2The recipe I chose was from the Crazy for Crust website, and you can visit it here to take a look around. We made up our double batch of the mix before we left and put it in an easy to store container that would fit into our pantry. I made sure to print out the recipe which contained the details for adding in the wet ingredients as well as the dish size options and the bake times. I put the directions into an envelope with the flap cut off and taped it to the top of the container for future reference.

brownies 1While we were on the trip, we decided to try out our oven. We’d gone many nights without dessert, and on other nights we’d had mug cakes, we’d had ice cream, but now I wanted to give baking a try, and we were really craving something good.

I found the recipe very easy to use, very quick to prep because we’d done the dry mix ahead of time, and as I mixed it all together, it looked thick and fudgy, just as a brownie mix should. We put everything in the pan, put it in the oven and I crossed my fingers.

Brownies 5A little over 20 minutes later, our brownies were done! They looked and smelled delicious, and we were thrilled that they tasted delicious also! Our first-ever baking experiment in our camper’s oven was a success, but more than that, I’d found a perfect brownie mix to keep on hand at home for future use. So often we need a last minute dessert and don’t have a mix on hand to throw together. I recently used this mix to make another couple of batches of brownies at home: a 9×13 and 9×9 batch at the same time, and there is still a little bit of dry mix left over!

I can’t wait to make another batch of this homemade brownie mix, and I can’t thank Crazy for Crust enough for sharing their recipe with us! I hope you’ll pay their site a visit so that you too can have the best homemade brownie mix ever. It’s a great, user-friendly recipe for kids and adults alike. You can see some amazing photos of their own freshly baked brownies while you’re there checking out the recipe!

20150728_202955

#crosscountryadventure2015: Tips for planning your own trip

27 Jul

So many people have said to us that they would love to take a trip like this one at some point in the future. I thought I’d share some tips with you, including things we’ve done or learned along the way.
trip wall1) Get everyone involved: If you’re bringing kids along and they are school aged, get them involved in the route planning by asking them what they’d love to see. We kept a large map and blank poster board on our wall and asked our kids to tell us what they hoped we could see. We let them know that just because it went on the list didn’t mean we could absolutely do it, but we’d do our best to make it happen. We tried to hit at least one place each person had requested, but many of the requests overlapped, like the Grand Canyon. We all wanted to see that. Our family and friend visits were worked in as well.
2) Be flexible: We had our calendar, we knew the date when we had to be in California, so we had a deadline, but my husband cautioned me against planning where we’d stay at every single stop because we might get delayed along the way or arrive earlier than planned along the way. I took his word for it, the planner that I am, and we only made our reservations for Virginia, for Fourth of July weekend, and for Los Angeles. As it turned out, we did modify our schedule a bit, and picked up an extra day along the way, which we were able to spend in Arizona with our friends, and another extra day which then allowed us to arrive a day earlier in Los Angeles than we’d initially planned. We struggled with finding a spot to stay overnight for three nights in Yellowstone National Park, so many campgrounds were now full, but had we booked it a month ago or more, our dates would not have been correct, so having a reservation would not have helped us. We opted to just stay two nights instead because that’s what we could find. So ultimately, he was right.
20150707_2329213) Be spontaneous, and be aware of your family’s habits: We knew several things we definitely wanted to do, like visiting the Alamo and the Grand Canyon, and we had specific plans for days when we were with our family, but we couldn’t possibly plan out every single minute of every single day ahead of time for the entire five weeks. It was nice to be able to wake up and do nothing some days or to wake up and say, “What should we do today,” making that decision as a family. We tend to be later risers and night owls, so we never planned to be up and out at the crack of dawn, because that wasn’t realistic for us. There’s a lot of us also, and one bathroom, so it takes us some time to get organized and out the door. We are much better at later arrivals for things whenever possible, and with the pressure to rush out the door off, it kept everyone happy, at least for the most part.
4) Divide and conquer: With an undertaking such as a trip like this one, there was no way we could make any one person responsible for the entire thing. We did sit many nights and plan out some of it together, but we also split up the responsibilities. I took on the bulk of the organizing of the camper inside as well as the family’s needs, while he took on the bulk of organizing the route (since he’d done this trip before) and finding the campsites, as well as taking on figuring out the hardware and equipment needs for the truck and camper. Working as a team is much easier than one person doing everything or both of you trying to do every single task together. Our kids were old enough to be involved in the organizing and setting up of the camper as well, so our team was more than just the two of us.
20150629_1242495) Remember that it’s camping: Yes, you have all the comforts of home in an RV, but you also have the potential for ants, a mouse, beetles, and the like. It’s not the Four Seasons, and we didn’t want it to be, but don’t be shocked if you see a bug, or if there’s dirt on the floor or if you shower in your flip flops at the campground’s showers. If you don’t like those types of things, this type of camping across the country trip isn’t for you. Our group consists of an Eagle Scout and four Girl Scouts. We’ve all tent camped and hiked before, and we like meeting and greeting new and different wildlife. We knew we’d be okay on a trip like this.
6) Be patient: Close quarters, long hours driving, tight spaces, many weeks away from home. There will be short tempers and meltdowns and frustrating situations. It’s important to be as patient as possible as often as possible. They say patience is a virtue, and this trip is a great way to practice it. Nothing will go 100% perfectly and you deal with things as they come, just as you would at home.
7) This is a driving trip: You’re going to spend a lot of time in the car, you’re going to spend a lot of money on gas. To think of the trip without knowing those things going into it would be silly. We saved lots of money in other ways, but we were up front with knowing gas would cost money and even a great deal of money in some places, and we’d be using a lot of gas because we would be spending five weeks on the road. We also knew going into the trip that we’d be pulling a camper and driving a large vehicle, so we knew our gas mileage wouldn’t be fantastic, but again, these were all known facts way ahead of time, so no surprises there and we took it all into consideration.
8) Camping is cheap: Although gas is expensive at times, lodging is very inexpensive. Campsites varied in price from as little as $15 a night to as much as $75 a night, depending on where we stayed, with an average price of $25-$30 a night, usually. We ate out on occasion as we do at home, but we ate in much more often, just as we would at home. Had we stayed in hotels, we would not have had such inexpensive lodging and not have had the ability to cook such great meals as we do now. At $3900 to own outright, our camper was our hotel and our ability to cook meals for five people a dog and a frog, for five weeks all wrapped in one, without having to spend money on airline tickets which would not allow us to experience the entire country from East to West and South to North as we have. And when we get home, we have the ability to go anywhere else we want to go with our camper from here on in, because we own it. Who knows what adventures lie ahead for us?

Adventure is all part of the fun!

Adventure is all part of the fun!

#crosscountryadventure2015: What we’re eating and how we’re cooking it

21 Jul

20150711_192859Traveling in an RV is ultra-convenient for eating in because you have everything you need right at your fingertips, as long as you’ve stocked it beforehand with all of the things you use on a day-to-day basis. Over the three months before we took our trip, I kept a specific list of kitchen supplies we’d need to make any meals we cooked in the camper go off without a hitch. We made sure we had our go-to pots and pans, cast iron skillets, a toaster, and our counter-top griddle, which can be used inside or out. With those items, the needed utensils like spatulas, whisks, wooden spoons, and serving utensils, we were in good shape and able to make most of our favorites. We had a full kitchen setup, including a stove-top, oven, and microwave; just in a smaller space. We could do whatever we needed to do.

20150707_173725
20150630_103212Although we have eaten out a number of times over the three weeks, we make an effort to eat in if there is nothing special going on, or if we’re not in any unusual place where we’d want to try out a local eatery or food item. Our goal was to not have to eat out every single meal, every single day and we are doing a good job of keeping to that goal. We can even eat out of the camper at a rest stop on driving days, although we alternate between doing that and grabbing something to go, depending on what we have in stock in the camper. We also try very hard to utilize all our leftovers, whether we have cooked them ourselves or eaten out and taken something home. Our very first night’s meal back at Pohick Campground in Va., was leftovers that we’d taken right out of our fridge at home and taken with us so we’d be prepared that first night with something to eat.
20150720_201702This post contains some photos I’ve taken along the way, and a modified version of my usual “Two weeks of meals” post that I often do for you when we’re home. These meals were either cooked indoors or if we had outdoor cooking facilities, on a campfire.

20150422_193326
Dinners we’ve enjoyed:
Pulled pork sandwiches, with tomato/cucumber salad
Macaroni and Meatballs
Tacos and quesadillas
Hamburgers, hot dogs (see my previous post about our BBQ bacon, cheddar, turkey burgers) and Caesar Salad
Chicken breast with BBQ, bacon, tomato and cheddar with sautéed vegetables
Grilled cheese with soup
Chicken Parmesan and pasta

20150707_171330

20150712_095837Breakfasts we’ve enjoyed:
Eggs and bagels or English muffins (grilled or toasted)
Pancakes (plain, chocolate chip, banana)
French toast
Cereal, instant oatmeal, grits
Yogurt and fruit
Sides of ham, bacon, sausage

20150712_100644