Archive | healthy RSS feed for this section

What’s for Dinner Wednesday: Two weeks of meals

5 Feb

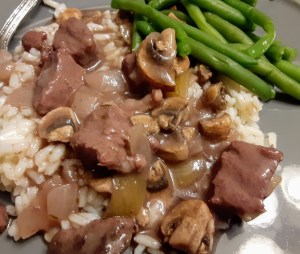
Beef Burgundy is a recipe I grew up on and it’s a favorite of mine.

It’s hard to believe that it’s already February. The month of January seemed forever long, mixed in with a couple of cases of the flu at our house, and I was more than happy to turn the calendar page over. Bye-bye January, nice to see you come, nice to see you go.

Now, it’s midweek and we’re about to wrap up our two-week menu, so I thought I’d share it here today to give you some meal inspiration for the weeks ahead. Whenever I can, I include the link to a recipe for you and I even treated you to a brand new recipe which you can find at the end.

Sunday: Chicken Parmesean and pasta

Monday: Sloppy Joe sandwiches and french fries (this is nothing fancy, and out of a can, usually slated for a night I’m not home for dinner.

Tuesday: Beef Burgundy

Wednesday: Teriyaki Chicken Thighs with baked potatoes and snap peas using this recipe for the sauce.

We buy boneless, skinless thighs to make them a little bit healthier.

Thursday: Creamy Avocado Pasta with chicken and grape tomatoes (This was a new recipe for us.  See recipe below.)

Friday: Homemade chicken burgers with salad

Saturday: College kid visit, dinner out

Sunday: Superbowl Sunday (Our contributions: potato skins, chicken wings, Buffalo chicken dip, and chili)

Monday: Soup and sandwiches

Tuesday: DIY Spinach salad (Toppings included chicken strips, pecan halves, Craisins, bacon, Feta cheese, grape tomatoes

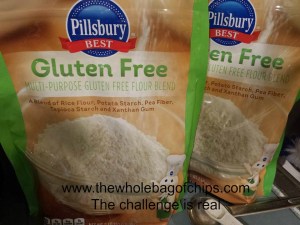
Wednesday: Pizza dinner fundraiser night at Blaze Pizza (We love Blaze, it’s one of the only places nearby where we can get gluten-free crust AND vegan cheese on a pizza for our daughter.)

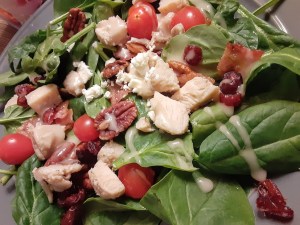
We put out all of the ingredients and everyone adds what they want to their salad.

Thursday: BBQ Ribs, oven-roasted baby bliss potatoes, and veggies

Friday: Pesto salmon (Salmon coated in pesto and baked in foil in the oven)


NEW RECIPE

        Here is the new recipe for the Creamy Avocado Pasta along with our minor modifications to the ingredients. We also added chicken to our recipe.  This recipe is a clean eating recipe and I found it here as part of a four-week meal plan. This recipe is from week three but you can find all four weeks here. Thanks so much to Homemade for Elle for the free recipes and meal plans. We have gotten a great deal of inspiration from them.


This recipe was new and it was given a thumbs up from all of us.

Ingredients:

`12 oz. whole wheat spaghetti (we used gluten-free and regular pasta)

2 avocados, ripe, halved, seeded and peeled

1/2 cup fresh basil leaves (we used dried basil)

3 cloves minced garlic

Juice from one lemon (we used bottled)

1/3 cup of olive oil

salt and pepper to taste

1 cup cherry tomatoes, halved

Directions

Bring pot of salted water to a boil. Add pasta and cook until al dente. Drain and transfer to a large bowl.

In a food processor, combine avocados, basil, garlic, and lemon juice. Turn food processor on and slowly drizzle in olive oil.

Season with salt and pepper to taste.

Add avocado mixture to your warm pasta and toss until mixed well.

Add in cherry tomatoes and serve warm.


Fun Friday: Baked Apple Oatmeal

31 Jan

This was so delicious on a cold winter day.

It’s the weekend and there’s something so great about having a nice, homemade warm breakfast on a weekend morning. Today’s recipe is a perfect one for this weekend or any day.

We originally had this for breakfast earlier this month on Martin Luther King Jr. Day. Being a Monday morning, I knew we could eat it that day and then have it leftover for breakfast or snacks after school during the week too. and baked oatmeal is something my family requests frequently so I knew they’d enjoy waking up to the smell of this baking in the oven on their day off from school.

My initial plan had been to make the same baked oatmeal recipe I always do, substituting in frozen blueberries for the strawberries. But, we were out of blueberries. Then I thought we had frozen peaches, but we didn’t have enough. So, I started searching for a baked apple oatmeal, since I knew we had a few apples on hand. I’m so glad that I did, as this recipe was completely different than the usual one and everyone loved it. I’d definitely do it again. I did one and one-half of this in order to make it fill a 9×13 baking dish and it was a perfect amount.

We opted to add whipped cream on top (we have both regular and dairy-free whipped cream on hand) and I also tried it with maple syrup on top and that was great too. The oats I used were gluten-free and we used soy milk to make it dairy-free but I’ve also used almond milk to make allergy-friendly oatmeal in the past as well. This recipe also calls for walnuts but we don’t usually keep nuts on hand so I didn’t put any in. I happen to also really like pecans and I think chopped pecans would’ve been a good addition to the recipe as well.

I found the recipe on this site, called Once Upon a Chef, and it’s described as a traditional Amish breakfast casserole, which was a perfect description. It was such a great comfort food and it took about an hour total to prep and bake. I encourage you to check out the site itself because it includes all of the nutrition information also, but the ingredients and instructions for a single recipe are copied here as well. I hope you’ll head on over and see some of their other recipes too.


I made one and one-half recipes in order to have enough for breakfast and for leftovers.

INGREDIENTS

  • 2 cups old-fashioned rolled oats (not instant)
  • 3/4 cup light brown sugar
  • 1 cup chopped walnuts or pecans, divided
  • 1/2 cup raisins
  • 1 teaspoon baking powder
  • 2 teaspoons cinnamon
  • 1/2 teaspoon salt
  • large eggs
  • 2 cups milk
  • 1 teaspoon vanilla extract
  • 4 tablespoons unsalted butter, melted, plus more for greasing the dish
  • 2 tart yet sweet baking apples, such as Honey Crisp, peeled and cut into 1/2-inch chunks (about 2 cups)

INSTRUCTIONS

  1. Preheat the oven to 325°F. Grease an 8 or 9-inch baking dish with butter.
  2. In a medium bowl, combine the oats, brown sugar, 1/2 cup of the nuts, raisins, baking powder, cinnamon and salt. Mix well.
  3. In another bowl, break up the eggs with a whisk; then whisk in the milk and vanilla until well combined.
  4. Add the milk mixture to the oat mixture, along with the melted butter.
  5. Scatter the apples evenly on the bottom of the prepared baking dish. Pour the oatmeal mixture over top and spread evenly. Sprinkle remaining 1/2 cup nuts on top. Bake for 40-45 minutes, until the top is golden and the oats are set. Serve warm or at room temperature.


New year, new recipe: Eggplant Pizzas from Clean Eating Magazine

6 Jan

These have been a delicious new addition to our menus.

Happy New Year!

We are five days into 2020 already. Are you used to writing the new year on everything yet? I’m slowly getting there.

I have a brand new recipe for you this week since it’s a new year. It’s one we tried out last year and loved and we’ve made it a couple of times, so it’s worth sharing out.

Last year our middle daughter subscribed to Clean Eating Magazine. We already receive Gluten-Free Living Magazine and we get a lot of recipe inspiration from them, in addition to all the things we see and try online, we’ve tried many recipes from these two magazines as well.

Today’s recipe for Eggplant Pizzas is from Clean Eating Magazine and you click right through to see it. It’s relatively simple to make and it’s definitely a healthier option than regular pizza. It’s also not expensive to make, making it budget-friendly. As with any kind of pizza recipe, this one allows you to tailor your pizzas to how you like them so if you don’t like pepperoni or roasted red peppers, you can skip them. It’s easy to switch up the ingredients as you wish. I like artichoke hearts, pepperoni, olives and roasted red peppers on mine.

You can tailor the ingredients to include the ones you like and leave off the ones you don’t.

Done and ready to eat!

Your Tray or Mine: Grinch Crinkle Cookies

21 Dec
Red and green crinkle cookies were new for me this year and I wanted everyone to be able to enjoy them.

Red and green crinkle cookies were new for me this year and I wanted everyone to be able to enjoy them.

ORIGINALLY POSTED DECEMBER 22, 2015

It seems to me that our family often has their “ah ha moment” in regards to what’s been bothering their stomachs *right* before the holidays, whether it’s Thanksgiving, Christmas or New Year’s.

Although I’m always so happy we’ve figured it out and can help them, I always find it totally and completely overwhelming trying to figure out our traditional holiday meals versus their new health and wellness needs. I want everyone to feel good, and yet I want everyone to be able to partake in our usual favorites, whether it’s grilling and eating pumpkin bread in our pjs in front of the television on Thanksgiving morning, or whether it’s making and eating all our favorite Christmas cookies from recipes we’ve held near and dear through the years.

It’s very challenging.

Very.

With our new gluten free needs, I found myself completely overwhelmed, trying to immediately figure out what we needed for Thanksgiving, but while doing so, knowing that Christmas was literally right around the corner, and that holiday for us, had visions of flour and gluten dancing in my head. We normally bake dozens and dozens of our favorite Christmas cookies every year, and it’s a tradition I have held near and dear to my heart since growing up baking with my mother and it’s something I’ve passed on to my children as well. In addition to our old favorites, each year I also will often try out a new recipe and with that, I’ve added a few new favorites to our traditional list as well.

As I searched, scrolled and pinned, I tried to make heads or tails of what I was going to do. I saw many holiday cookie recipes online, and although they looked good enough, they weren’t *our* holiday cookie recipes and I knew that no matter how good they might be, it wouldn’t be good enough for us. I wanted everyone to be able to enjoy our old favorites and any new favorites we might find this year.

Winner, winner! This was the flour blend I decided to try for our cookies this year.

Winner, winner! This was the flour blend I decided to try for our cookies this year. I measured cup for cup as I would have in my regular recipes, as it said you could.

Finally, after avoiding the thought process for a while between Thanksgiving and Christmas, last week I decided to attempt to make our own recipes using gluten free flour. Specifically, I opted to use the Pillsbury gluten free flour blend which already included the various types of flour I’d seen in from-scratch recipes as well as the needed amounts of xanthan gum that is needed to hold the flours together.

I tried a new recipe for Grinch Crinkle cookies that I thought were adorable. I opted to use them for a cookie swap and instead of doing just green, I split the batter, which is made with a vanilla cake mix, and make red AND green. How cute is that??? Very, very cute. They were a big hit.

We'd already successfully used this for cupcakes, so I was willing to give it a go for Grinch Crinkle cookies too.

We’d already successfully used this for cupcakes, so I was willing to give it a go for Grinch Crinkle cookies too.

Luckily, I could make the red and green batch above to take with me Saturday night and use a gluten free cake mix from Betty Crocker for another set. Purple and sparkles were requested but I stayed with the Grinch Green theme. This time.

The cake mix worked out great, and these will be a keeper in our yearly baking for sure. I even see them as being red and blue with white chocolate chips around July 4. Wouldn’t that be adorable? It would. I’m sure of it.

These gluten free Grinch Crinkles were not mixed in with the red and green cookies above. They stayed at our house and got all thumbs up from everyone!

These gluten free Grinch Crinkles were not mixed in with the red and green cookies above. They stayed at our house and got all thumbs up from everyone!

And so, here it is, two days before Christmas Eve, and I’m on a roll. I’ve made a totally gluten free set of Grinch Crinkles, Snickerdoodles, Chocolate Chip Butterballs, Chocolate Thumbprints, Holiday Chex Mix, and I have more to come. A few more, anyway. You can find all the recipes by clicking on the titles and see if any of them work for your dietary needs! I use I Can’t Believe It’s Not Butter to reduce the fat also, so they’re not too bad in that department either. Overall I find that the batters are coming out almost the same. Maybe a bit more crumbly but not awful by any means, and definitely workable 100% of the time. The cookies taste the same, I’ve made sure to taste plenty of them just to deliver a valid verdict for you!

I wish everyone who celebrates the upcoming holidays this week a Merry Christmas and a Happy New Year! Blessings to you and yours for health and happiness always!


A quick and easy holiday side dish: Roasted Brussels Sprouts with Butternut Squash, Pecans and Cranberries

30 Nov

This was a delicious new roasted vegetable recipe we tried this Thanksgiving. It would also be great for Christmas!

There is an old saying that you never try out a new recipe for company, but generally, that’s when we always do. This new recipe came across my virtual desktop on social media a few weeks ago, and I saved it to try out on Thanksgiving. If you like all of the veggies that are on the ingredients list and you enjoy a desserty side dish, this is a great one to try out.

I had never visited the Julia’s Album site before, it’s another new one for me, but this recipe intrigued me. I was not only drawn to it by its ingredients which were all my favorites (butternut squash, cranberries, and Brussels Sprouts) but also the fact that the recipe seemed quick and easy. I cheated and bought my squash already peeled, cut, and cubed, so I only had to trim the ends off the Brussels and cut them in half. You could roast both sets of veggies in the oven at the same time and after everything is roasted you toss it all together and it’s done.

Because Julia shared that she likes to post easy-to-make weeknight dinner recipes, I think I’ll be visiting her blog often. I hope you’ll head over and check it out too.

I’ve linked to the recipe twice above, rather than listing out all of the ingredients and directions here because she has some good tips and tricks for prepping (like cooking both sets of veggies at the same time) and some substitution ideas as well. You can see it all at once by clicking on the links above.

Additionally, a reminder to use your leftover turkey! We made turkey noodle soup from scratch last night with some, and I plan to make open-faced turkey pot pie this week using this recipe from years ago. I plan to use the ingredients for the filling and skip the crust, and we’ll put it on top of our leftover mashed potatoes with a side of veggies.

Next week I’ll start reposting my “Your Tray or Mine” Christmas Cookie recipes. I will do a few a week for three weeks until they’re all reposted. Before we know it, I’ll be wishing you a Happy New Year!

Enjoy the rest of this long weekend,
Jen

Welcome back recipe: Chocolate Banana Oatmeal Blender Muffins

17 Nov

These muffins made me want to do a blog post asap!

It’s me…

I know it’s been a very.long.time since I did a blog post in January. I’ve been super busy. Everyone is busy, I know, but I’ve been busy enough that I didn’t have any time or even any blog-writing mojo enough to do a blog post.

Last year I had taken on a one-year position working for our state’s Department of Education as a Communications Ambassador in addition to my regular freelance education reporter position. The position ran from the start of August 2018 to the end of July 2019 and it reached its busiest time last winter in January around the time I did my last blog post and lasted thru the end of the position. That busy time ran right into my reporter job’s busy time in April/May/June and I was just swamped. It was a wonderful job though, and I loved it, but between the two jobs and my other family responsibilities, I just couldn’t find the time or energy to do any more writing than I was already doing.

That job, however, gave me the extra experiences that I needed to apply for a new job that our school district posted in July 2019 for a Communications Specialist. The first week of August I got that job and I jumped right in, while still writing for the paper on occasion and doing my usual Mom jobs as well. So I’m finally feeling like I’m getting my feet back on solid ground and I am getting that itch to start blogging again. I’ve recently had some of my readers asking me when I thought I might start writing blog posts again. It was time.

This weekend has been super busy because we’ve been redoing our spare bathroom and I had to work at a school department event this afternoon, but when I came home from that I was starving, so I decided to make some muffins that I had been wanting to try out before I jumped back into helping out with continuing to paint the bathroom. I had seen these muffins come across social media and emailed the link to myself. They were gluten-free and didn’t contain any sugar or added oils, but they did contain things that everyone here loves: peanut butter, chocolate, and oatmeal. Most importantly they contained chocolate chips. What better way to jump back into my Whole Bag of Chips blog than with chocolate-chocolate chip recipe?

Today’s recipe was from a site I’ve never visited before, but I know I’ll definitely be going back. The name of the site is Dinner, Dishes, and Desserts and you can visit her site by clicking here. I highly recommend it, as all the recipes she described in her post sounded great to me! The recipe caught my eye not only for the ingredients but also because it’s all done in a blender. I thought that sounded easy. When I checked my kitchen I had all of the needed ingredients. I haven’t made muffins in a long time, so I was excited to try this out.

Here are the ingredients just as she’s listed them on her site. Other than the chocolate chips, you throw it all into a blender and blend it up!

  • 2 large ripe bananas
  • 2 whole eggs
  • 1 cup peanut butter
  • 3/4 cup old fashion oats
  • 1/2 cup honey
  • 1/2 cup cocoa powder
  • 2 tsp vanilla extract
  • 1 tsp baking powder
  • 1/2 tsp salt
  • chocolate chips

To make this dairy-free I used Enjoy Life mini chocolate chips and I used Bob’s Red Mill gluten-free oats.


Her directions are super easy and the recipe went as directed. I got 17 muffins in total and I cooked them for about 15 minutes. I did check them at 13 minutes but they weren’t done yet.

  1. Preheat oven to 350 degrees. Spray a 12 cup muffin tin with non-stick spray.
  2. To a blender add banana, eggs, peanut butter, oats, honey, cocoa powder, vanilla, baking powder, and salt. Blend until smooth and well mixed.
  3. Scoop batter into prepared muffin tin, filling about 2/3rd of the way.
  4. Sprinkle the top with chocolate chips.
  5. Bake for 13-15 minutes or until a tester comes out clean.
  6. Remove from the oven and let cool for 5 minutes before removing from the pan to cool.

Everyone voted that this recipe was a keeper. I tried to get a photo of how moist and delicious these were but I don’t think it does them justice. I’m sharing it anyway. The recipe recommended doubling the recipe, which I would plan on next time so that I have extras for the freezer. I didn’t have enough of everything on hand to do it this time.

Moist, healthy, allergy-friendly and delicious! A win-win for us!

Enjoy, and welcome back to the Whole Bag of Chips!

Jen

Meal Inspiration: Where do you find yours?

16 Jan

This salad wasn’t even on our radar until I saw a similar one pictured in a magazine.

Do you ever find you’re stuck in a meal-planning rut? I know that I easily tire of planning “the same old thing” week after week, and we try to mix it up every two-week meal menu. Therefore, I’m always looking for inspiration for our menus. We love cooking, we love eating and we love trying new things all the time.

Recently, I was thumbing through an issue of the Gluten-Free Living Magazine that had come in over the vacation week or sometime in that mad rush of weeks and I came across an advertisement for their newsletter.

It wasn’t the idea of the newsletter that struck me, however, but more so the salad pictured on the page in front of me. We love a good salad at our house and often times we will schedule a grilled chicken Caesar salad or a taco salad as one of our meals. Recently though, we’ve been loving fresh spinach, so when I saw it pictured in the advertisement, I stopped and paid attention.

I quickly ripped this ad out of the magazine and started to plan our next meal.

I am definitely a person who is drawn to food photos and videos, and I get a lot of my inspiration in this way. I took a long look at the salad in the picture, checked out what was in it and then made a note at the top of the page of the ingredients and what else we could add to it to make it even better and more to our family’s liking. When I showed the page to my family four out of five of us thought it looked great, so we planned it for a night the fifth one of us was not going to be home.

The original ingredients were spinach, craisins, pomegranate seeds, crumbled cheese, quinoa, and nuts. To that list, I also added in grilled chicken and crumbled bacon. During our most recent shopping trip we bought it all and on Monday night we laid it all out in a make-your-own salad bar style.

Initially, we forgot to put the quinoa out, but when I pulled out the original magazine photo to compare pictures, I quickly realized it and we added it in after the photos had been taken.

The good thing about this meal besides the flavor and the fact that it’s a healthy choice is that it was fast and had a simple cleanup. The nuts were pre-crumbled, the chicken was Perdue Shortcuts, and the bacon was pre-cooked. Quinoa is easy to cook and I cooked it ahead of time that afternoon so it could chill. The hardest thing was cutting and seeding the pomegranate, and although I know that they come already done for you, the store we were at didn’t have them that way at the time we were there, so we grabbed a whole one and enjoyed figuring that process out. Otherwise, it was quick and easy. There were almost no leftovers and everyone had two bowls. For dressings, we put out a bottle of Panera Fuji Apple that my parents recently introduced us to and which is gluten and dairy free, and a Balsamic Vinaigrette which is also gluten and dairy free. I had the apple, but either would have been good.

This was a completely different salad than what we normally would’ve thought of on our own, and we all raved about it. We’d definitely make it again and it’ll be a staple in our menu cycles going forward. It looked pretty, tasted great and cleaned up well. All in all, a successful meal.

Spinach salad has quickly become a favorite of ours.


What’s for dinner Wednesday: two weeks of meals and a new recipe

3 Oct

Tis’ the season!

As they say… Happy Fall Y’all!

It’s fall in New England and that means two things: apples and pumpkins. We’ve been doing the apple thing in September, saving the pumpkins for October. Therefore, today’s post will be all apple, all day long.

It’s been a while since I posted a two-week menu, so I thought I’d do that today as well as share a new recipe that we tried and liked, apple-related, of course.

Where I have them, I have included the links to the recipes I have shared before so that hopefully makes it easier for you.

When you come home with so many apples, it’s time to get cooking.

TWO WEEKS OF MEALS

Sunday: Shepherd’s Pie (Although we’ve been having this for years with the recipe I’ve linked here, we now make it a new way, courtesy of a trip last spring to visit my mother in-law, MaryLou. Our meat now contains both creamed corn and cut green beans and has tomato sauce mixed in. We also took the cheese out of the mashed potatoes on top, since we can’t all eat it. This new recipe is a little bit healthier and it combines the recipes of both our mothers. It has been a hit with our whole family.)

Monday: Tacos

If you’ve never made homemade applesauce, it’s so delicious and makes your house smell wonderful.

Tuesday: Pork tenderloin (pre-marinated in the package), homemade applesauce

Wednesday: Marinated steaks

Thursday: BBQ Ribs (prepackaged, pre-bbq’d, just cook and eat)

Friday: Cast iron skillet fajitas- both chicken and steak (homemade fajita seasoning recipe from Allrecipes.com)

This was a delicious new way to have kielbasa and very fall-ish. Thanks to A Spicy Perspective for the recipe!

Saturday: Light apple onion kielbasa skillet from A Spicy Perspective

Sunday: Eggplant Parmesan

Monday: Cranberry Chicken

Tuesday: Hot Dogs/Hamburgers

Wednesday: Chicken Pot Pie (sometimes homemade using this recipe, but this time not and we have one that is a separate gluten free, dairy free pie which we buy pre-made and pre-frozen at our local bakery.)

Thursday: Homemade Pizzas

Friday: Chicken/Broccoli/Pasta

A great new meal to add to our fall menu!


Fun Friday: Mini Strawberry Cheesecakes

9 Jun

If you’re looking for a new summertime dessert, this one comes highly recommended!

We don’t entertain often, but when we do, I like to try out new things. We are generally among friends and family so the “never try out new things for guests” rule gets bent a little bit, if I think it’s a new thing that I can pull off relatively easily.

Last Wednesday I shared our Burger Bar post from the previous Sunday’s get-together and I promised I’d share two other recipes. Today’s is one and I’ll still have another one for you coming up in a future post as well.

I was looking for a summery dessert to serve that Sunday, something different than brownies or cookies. I came across this recipe by Life, Love and Sugar and thought it would be different and something I could make gluten free, which is always a consideration. My grandmother has always made mini cherry cheesecakes which are my absolute favorite, and this reminded me of those. Additionally, they were summery and a little bit patriotic looking, which was an added bonus.

I had gluten free graham cracker crumbs on hand and I also had gluten free graham crackers in the freezer if I had needed to use them to make my own crumbs, which I didn’t need to do. I had enough left in my box to make a set of gluten free cheesecakes and a regular box to make a set of non-gluten free. I had colored cupcake liners in red, pink, orange and green in my cabinet too, so I made the red and pink liners the gluten free cheesecakes and the orange and green the non-gluten free cheesecakes so everyone could easily tell which was which.

These cheesecakes have multiple layers of deliciousness, and they’re able to be made gluten free to boot!

What I loved about this recipe was that it had layers to it: a layer of crumbs, a layer of fresh strawberries, a layer of cheesecake, more strawberries and some whipped cream. They were mini, but they were fancy and multi-faceted.

The thing to pay attention to in the recipe is the baking and cooling times. You need to pre-bake the crumbs for a few minutes, and the temperature for baking changes. The time and locations for cooling are specific as well. It’s not hard, but if you’re someone who doesn’t read a recipe all the way through to start, or who just skims and will wing it along the way, I encourage you to take the time to read it through first.

The entire recipe is easy, and the dessert was delicious, well-received by everyone and I would most definitely do it again. I like that it fed so many people. I had two trays of mini cheesecakes, minus just a couple. For my ingredients, I chose to substitute low fat sour cream instead of full fat and 1/3 fat cream cheese instead of full fat, and to use I Can’t Believe It’s Not Butter for my butter, which we always do. I also increased the recipe slightly, in order to make more mini cheesecakes, and increased my ingredients all accordingly. I also cheated and used a squirty whipped cream instead of making it homemade, given our time constraints.

I hope you’ll give this recipe from Life, Love and Sugar a try, and many thanks to them for sharing it!

*Tip: If you’re looking for gluten free graham cracker crumbs, I found these at a Super Walmart, but you can also make your own by using a blender or food processor to grind whole gluten free graham crackers into crumbs.*

Fun Friday: Three ingredient cookies

10 Mar

I added a fourth ingredient…can you guess what it is?

Good morning and TGIF!

Happy Friday to you all. It’s been a little bit since I did a Fun Friday post, so I thought I’d share a fun one with you this week.

My whole “after school snack” routine has gotten a bit derailed lately, mostly because many days no one is coming right home after school, which makes me really the only one who is home and hungry and means I’m always throwing an extra snack into everyone’s backpack to get them through the day. They eat lunch so early in the morning at school that they are starving by 3:00.

Additionally, since my youngest has had to go gluten free a little more than a year ago, one of the things she often takes for lunch is muffins (gluten free, obviously). That knocks off a good 3/4 of my go-to after school snack ideas. I love muffins and I loved making them to eat after school because then we have them for breakfast the next day, if there are any left. Now, out of convenience, I buy six packs of freshly made muffins, four varieties at a time every couple of weeks, at our local gluten free bakery, A&J’s, and I freeze them. By the time she eats lunch they have thawed.

I try to make my snacks healthy as often as I can, and so in going gluten free, I’ve relied on many dips (like this one from 2012 or this one from 2013), cheese and apples, fruit platters and the like. However, I did find a go-to cookie recipe that is fast, easy, healthy and gluten free, as long as you have gluten free oats, which I always do (thanks Bob’s Red Mill!). I have seen this recipe on several sites, and the one I am sharing today is from Recipe Diaries. I have seen versions of these cooked in the oven and I have even seen some that are microwaved. I have only ever cooked mine in the oven.

This week when I made these, I used 3 bananas and 1 1/2 cups of oats to make more cookies. I am also partial to Craisins over raisins, so I used a box of Craisins that is the lunchbox snack size (mostly because that’s what I had on hand) and it was the perfect amount. I’m also VERY partial to chocolate chips, so I threw some of those in too. In the past I have subbed dried pomegranates for the fruit and they were tasty too. Almost anything goes.

I have always tried to make my kids aware of serving sizes when it comes to food, and they always ask me how many or how much of something they are allowed to have, especially when it comes to something like muffins or cookies. With these, it’s nice to know that although they still can’t have an unlimited amount, at least the ones they are having are really pretty healthy, overall. They make a great snack and they satisfy my craving for a little something sweet.

I encourage you to try out the recipe at Recipe Diaries, and have a great weekend!