Archive | chocolate chips RSS feed for this section

A new muffin recipe: Bakery Style Banana Bread Muffins

2 Mar

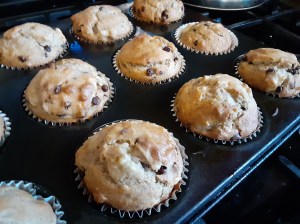
These were a perfect Saturday morning breakfast.

I was recently searching for an applesauce muffin recipe I’d posted a while back when I realized that I never posted the new banana bread muffins I tried in January. It had been an early Saturday morning when I was craving warm muffins straight from the oven. I decided to do a search to see if I could find a new gluten and dairy-free muffin recipe to try.

In my search, I stumbled across a new blog, The First Year Blog, and their Bakery Style Banana Bread Muffin recipe. I had all of the ingredients including the right number of frozen bananas, I didn’t need to do a ton of ingredient conversions to make it fit our needs, and I decided to make them and not mention the name of them. I wondered if they really would taste any different than other banana chocolate chip muffin recipes I’ve tried before.

Sure enough, the first person to taste them mentioned right away that these muffins tasted just like banana bread, which we actually make quite often. I was surprised that it was that evident, that quickly! I didn’t need to say anything. The muffins were definitely different and I do believe it was the tip about letting the batter rest before scooping it into the muffin tins. When you visit The First Year blog to see this recipe, you will notice that she provides lots of other great tips for freezing the muffins, for making them gluten-free, and for creating a high-domed muffin. Be sure to check it out and be sure to peruse the site for other recipes while you’re there!

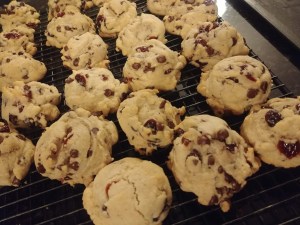
Now that I’ve remembered this recipe, I’ll have to make it again soon! It was definitely one of my top favorite banana chocolate chip muffin recipes to date!

These were delicious! Thanks to The First Year blog for sharing!


Ingredients

  •  3 large ripe bananas, 1 cup mashed
  •  1/3 cup vegetable oil
  •  1/2 cup sugar
  •  1 egg
  •  
1 tsp vanilla
  •  1 & 1/2 cups all-purpose flour
  •  
1 tsp baking soda
  •  1/2 tsp cinnamon
  •  1/2 tsp salt
  •  optional: 1/2 cup mini chocolate chips

Instructions

  1. Mash the bananas in a blender, mixing bowl or with a potato masher.
  2. In a mixing bowl combine the mashed bananas, vegetable oil, sugar, egg and vanilla extract. Stir to combine with a spatula.
  3. Add in the flour, baking soda, cinnamon, and salt, stir together with a spatula.
  4. If adding chocolate chips, mix them in now.
  5. Cover the bowl with a towel and allow the batter to rest for 15 minutes. During this time, preheat the oven to 425ºF.
  6. Line a muffin pan with muffin liners. Fill the liners to the top with batter.
  7. Bake for 7 minutes at 425ºF, then keeping the muffins in the oven turn the temperature down to 375ºF and bake for 12-14 minutes or until a toothpick inserted in the center comes out clean.

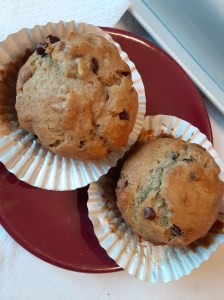
They definitely lived up to their name!

Fun Friday: Cranberry Chocolate Chip Cookies

17 Jan

These cookies were so delicious and contain one of my favorite combinations.

Happy Friday! I love a long weekend because it gives us more time to cook up something extra special, like cookies.

I found this recipe in Gluten-Free Living Magazine back in October and it was actually featured in a holiday cookie recipe spread in the magazine, in anticipation of the upcoming holiday baking season. However, I love the combination of chocolate and cranberries. In fact, it’s January now and I have a pumpkin-cranberry-chocolate-chip bread in the oven as I write.

Being gluten-free, the recipe calls for a one-to-one all-purpose gluten-free flour, (which means you can take a typical recipe and substitute the one-to-one GF flour for the regular all-purpose flour with no other substitutions or extra ingredients needed) and we do use their recommended brand below. However, I believe you could substitute back the other way too, and instead of using the GF one-to-one flour, you should be able to also use regular all-purpose baking flour in this recipe.

I always use a Pampered Chef small scoop to scoop out the batter, so oftentimes my cookies are particularly round if I don’t think to flatten them out a bit after I scoop them onto the tray. That’s why they are seen this way in my photo above.

This was a quick and easy recipe and it would make a great treat with coffee, tea, milk or whatever your favorite beverage. They also made a great school day or after school snack.

Ingredients:

1 1/2 cups gluten-free all-purpose flour (Bob’s Red Mill Gluten Free 1:1 Baking Flour is recommended by Gluten-Free Living Magazine)

1/2 tsp baking soda

1/4 tsp salt

8 tablespoons butter, melted and cooled slightly (to also make this dairy-free I used Earth Balance baking sticks)

1/2 cup packed dark brown sugar

1/4 cup granulated sugar

1 tsp vanilla extract

1 large egg

3/4 cup dark chocolate chips (to make this dairy-free I used Enjoy Life brand allergy-friendly mini semi-sweet chocolate chips)

3/4 cup dried cranberries

Directions:

Preheat oven to 350 degrees. Line two baking sheets with parchment paper.

Whisk together the gluten-free flour, baking soda and salt together in a medium bowl.

In a large bowl, [using a mixer], combine the melted butter, dark brown sugar, granulated sugar, and vanilla extract. Mix until smooth.

Add the egg and mix until combined. The mixture should look like thick caramel sauce. Stop the mixer and add the flour mixture. Mix on medium speed until a thick dough forms. Add the chocolate chips and dried cranberries. Stir until incorporated.

Drop dough, about two tablespoons each, onto prepared cookie sheet. Space cookies about two inches apart.

Bake until golden brown, about ten minutes. Rotate the baking sheets halfway through baking.

Allow the cookies to cool for five minutes and then transfer to a wire rack to cool.

Your Tray or Mine Recipe of the Day: Chocolate Crinkles

22 Dec
Betty Crocker's Cooky Book

Can you spot the Chocolate Crinkle cookie on the cover of our cookbook?

ORIGINALLY POSTED DECEMBER 15, 2011

This recipe is an original to our cookie trays and I like it because it makes a lot of cookies, so it’s not a cookie that you have to ration one per tray or anything like that. You can be generous when you give them out.

I also think these are such pretty cookies, like snowflakes, which is funny for a chocolate based cookie.

They’re easy to make but you do need to make sure you make the batter ahead of time and chill it, so take that into account when you’re doing your planning.

CHOCOLATE CRINKLES

INGREDIENTS

1/2 cup vegetable oil

4 sq. unsweetened chocolate (4 oz.) melted

2 cups granulated sugar

4 eggs

2 tsp vanilla

2 cups all purpose flour

2 tsp. baking powder

1/2 tsp salt

1 cup Confectioner’s Sugar

Chocolate Crinkles on baking sheet

Chocolate Crinkles fresh out of the oven

DIRECTIONS

Mix oil, chocolate and granulated sugar.

Blend in one egg at a time until well mixed.

Add vanilla.

Measure flour by dipping method or by sifting (I really just measure. I’m not sure what either of those methods are, although it says See p. 5 to find out what the dipping method is.)

Stir flour, baking powder and salt into oil mixture.

Chill several hours or overnight.

Heat oven to 350 degrees.

Drop teaspoonfuls of dough into confectioner’s sugar BEFORE rolling into balls. Roll in sugar, shape into balls. (This is how you get the snowflake look when they bake.)

Place about 2″ apart on greased baking sheet.

Bake 10-12 minutes. Do not overbake. Makes about six dozen cookies.

Three tiered cookie rack with crinkles

This recipe is the whole reason why I wanted this three tiered cooling rack this year. It makes a ton of cookies!

Baking with the kids

Many hands make light work. Messy work, but light work. Powdered sugar everywhere!

Your Tray or Mine: Grinch Crinkle Cookies

21 Dec
Red and green crinkle cookies were new for me this year and I wanted everyone to be able to enjoy them.

Red and green crinkle cookies were new for me this year and I wanted everyone to be able to enjoy them.

ORIGINALLY POSTED DECEMBER 22, 2015

It seems to me that our family often has their “ah ha moment” in regards to what’s been bothering their stomachs *right* before the holidays, whether it’s Thanksgiving, Christmas or New Year’s.

Although I’m always so happy we’ve figured it out and can help them, I always find it totally and completely overwhelming trying to figure out our traditional holiday meals versus their new health and wellness needs. I want everyone to feel good, and yet I want everyone to be able to partake in our usual favorites, whether it’s grilling and eating pumpkin bread in our pjs in front of the television on Thanksgiving morning, or whether it’s making and eating all our favorite Christmas cookies from recipes we’ve held near and dear through the years.

It’s very challenging.

Very.

With our new gluten free needs, I found myself completely overwhelmed, trying to immediately figure out what we needed for Thanksgiving, but while doing so, knowing that Christmas was literally right around the corner, and that holiday for us, had visions of flour and gluten dancing in my head. We normally bake dozens and dozens of our favorite Christmas cookies every year, and it’s a tradition I have held near and dear to my heart since growing up baking with my mother and it’s something I’ve passed on to my children as well. In addition to our old favorites, each year I also will often try out a new recipe and with that, I’ve added a few new favorites to our traditional list as well.

As I searched, scrolled and pinned, I tried to make heads or tails of what I was going to do. I saw many holiday cookie recipes online, and although they looked good enough, they weren’t *our* holiday cookie recipes and I knew that no matter how good they might be, it wouldn’t be good enough for us. I wanted everyone to be able to enjoy our old favorites and any new favorites we might find this year.

Winner, winner! This was the flour blend I decided to try for our cookies this year.

Winner, winner! This was the flour blend I decided to try for our cookies this year. I measured cup for cup as I would have in my regular recipes, as it said you could.

Finally, after avoiding the thought process for a while between Thanksgiving and Christmas, last week I decided to attempt to make our own recipes using gluten free flour. Specifically, I opted to use the Pillsbury gluten free flour blend which already included the various types of flour I’d seen in from-scratch recipes as well as the needed amounts of xanthan gum that is needed to hold the flours together.

I tried a new recipe for Grinch Crinkle cookies that I thought were adorable. I opted to use them for a cookie swap and instead of doing just green, I split the batter, which is made with a vanilla cake mix, and make red AND green. How cute is that??? Very, very cute. They were a big hit.

We'd already successfully used this for cupcakes, so I was willing to give it a go for Grinch Crinkle cookies too.

We’d already successfully used this for cupcakes, so I was willing to give it a go for Grinch Crinkle cookies too.

Luckily, I could make the red and green batch above to take with me Saturday night and use a gluten free cake mix from Betty Crocker for another set. Purple and sparkles were requested but I stayed with the Grinch Green theme. This time.

The cake mix worked out great, and these will be a keeper in our yearly baking for sure. I even see them as being red and blue with white chocolate chips around July 4. Wouldn’t that be adorable? It would. I’m sure of it.

These gluten free Grinch Crinkles were not mixed in with the red and green cookies above. They stayed at our house and got all thumbs up from everyone!

These gluten free Grinch Crinkles were not mixed in with the red and green cookies above. They stayed at our house and got all thumbs up from everyone!

And so, here it is, two days before Christmas Eve, and I’m on a roll. I’ve made a totally gluten free set of Grinch Crinkles, Snickerdoodles, Chocolate Chip Butterballs, Chocolate Thumbprints, Holiday Chex Mix, and I have more to come. A few more, anyway. You can find all the recipes by clicking on the titles and see if any of them work for your dietary needs! I use I Can’t Believe It’s Not Butter to reduce the fat also, so they’re not too bad in that department either. Overall I find that the batters are coming out almost the same. Maybe a bit more crumbly but not awful by any means, and definitely workable 100% of the time. The cookies taste the same, I’ve made sure to taste plenty of them just to deliver a valid verdict for you!

I wish everyone who celebrates the upcoming holidays this week a Merry Christmas and a Happy New Year! Blessings to you and yours for health and happiness always!


Your Tray or Mine Recipe of the Day: Brown Eyed Susans, a Family Favorite

16 Dec

ORIGINALLY POSTED DECEMBER 7, 2011

When I posted my first recipe last week for Chocolate Thumbprint Cookies, I mentioned that it was one of my top two favorite cookies on our trays each year (I’ll let you know what my other favorite is when I post it.) However, the thing about cookie trays is that everyone has their own favorites. Mine tend to be all the ones that are heavily chocolate chip based, but not everyone’s are.

Brown Eyed Susans for Christmas Cookie Trays

I had a near meltdown when I realized we were totally out of any sprinkles for the tops of the cookies. I recovered when I found red and green stars instead.

Today’s recipe is for Brown Eyed Susans, which are my brother’s favorites. I might have one each year, but he *loves* them. They’re good and easy to make. I hope you’ll try them!

BROWN EYED SUSANS

INGREDIENTS

Cream together the following:

1 cup butter

3 TBL. sugar

1 tsp vanilla

2 cups flour

1/2 tsp. salt

CHILL FOR TWO HOURS.

Rolled and flattened cookie dough

Here’s what the cookies look like as they are rolled and then as they are flattened.

DIRECTIONS

Roll into about 1 level tablespoon ball and place on greased cookie sheet.

Flatten slightly using your fingers. (This is a good place to have your kids help out.)

Bake at 400 degrees for 8-10 minutes.

Frost while warm. (You can make these ahead, freeze cookies and then frost them when thawed.)

I find that if you fill all your baking sheets with the rolled and flattened cookies first, you can use the baking time to make up the frosting so that it’s ready for you to frost them while they’re warm.

Brown Eyed Susans

These look pretty with any sort of decorations on top, but we normally use sprinkes as shown here.

FROSTING INGEDIENTS

1 cup Confectioner’s Sugar

2 TBL Baking Cocoa

2 TBL hot water

1/2 tsp vanilla

Use about 1/2 tsp on top of each cookie (yes the frosting does drip off the cookies, so put wax paper underneath.)
**I found that the 1/2 tsp measure on top of each cookie is important. If you use just any spoon to frost them you run out of frosting because too much goes onto the cookies and then drips off the cookies onto the wax paper and then you have to make another batch of frosting.

Sprinkle colored sprinkles or chocolate sprinkles (or place an almond, or whatever you’d like,) on top. This is also a good “job” for kids to do, decorating the tops of the frosted cookies, that and running their fingers all over the waxed paper where the chocolate has dripped once the cookies are safely removed!

**In Rhode Island, the sprinkles are called Jimmies. My dad is Jimmy and my mom is Pat so we call our colored ones Patsies. Just a random fact for you…

A single recipe makes about 36 cookies.

Your Tray or Mine? Cookie Tray Recipe of the Day: “Krispie” Chocolate Chip Cookies

14 Dec

The most recent time I made these, I used a mix of both chocolate Rice Krispies and the plain Rice Krispies. they were delicious!

The following recipe is a newer recipe to my collection, not one that I grew up on as we did our cookie trays when I was growing up. But, I like this recipe because it’s fast and easy, and it’s not “just” another chocolate chip cookie recipe, the cereal gives it an added crunch. I often double this recipe, it makes a lot and it’s a good filler on the trays. I have yet to have someone say they didn’t like these cookies!

I got the recipe from a cookbook I’ve had since before I was married. I always find the best recipes in it! It’s called “Favorite Brand Name Cookie Collection.” I did add the word “Krispie” to the title myself though.

“Krispie” Chocolate Chip Cookies

INGREDIENTS

1 1/4 cups all purpose flour
1/2 tsp baking soda
1/4 tsp salt

1/2 cup butter or margarine softened
1 cup sugar

1 egg
1 tsp vanilla

2 cups Rice Krispies (I have used the plain  Rice Krispies as well as the chocolate flavored Rice Krispies. Either works well.)
1 cup semisweet chocolate chips

There’s lots of measuring, pouring and mixing in this recipe. Great opportunities for kids to help out in the kitchen, and for them to learn by doing.

DIRECTIONS

Stir together flour, baking soda, salt in a medium bowl. Set aside.

In a large mixing bowl beat margarine and sugar until well combined.

Add egg and vanilla. Beat well.

Add flour mixture. Mix thoroughly.

Stir in Rice Krispies cereal and chocolate chips.

Drop by level tablespoonfuls (I use the Pampered Chef small scoop) onto greased cookie sheets. (I did not grease. But my cookie sheets are pretty well seasoned and there’s butter in the recipe too.)

Bake at 350 degrees for about 12 minutes or until lightly browned.

Remove immediately from cookie sheets and cool on wire wracks.

Makes about 3 1/2 dozen cookies (and mine did make exactly 42 cookies.)

Your Tray or Mine Bar Recipe of the Day: Double Delicious Bars

12 Dec
Double Delcious Bars

Hot out of the oven, this peanut butter-chocolate chip dessert is one of our favorites!

ORIGINALLY PUBLISHED DECEMBER 18, 2011

This recipe incorporates peanut butter, so if you have allergies…please take note.

I love this one, it’s super fast and easy and as the title says: delicious. Kids can totally help out with this one too, it’s literally just layering of ingredients, dumping bags of chips into a baking pan.

INGREDIENTS

1 stick butter

One package Nabisco “Famous” Chocolate wafer cookies

One 14 oz. can Sweetened Condensed Milk

2/3 of a 12 oz. package semisweet chocolate chips (I totally use the whole package. No 2/3 for me!)

2/3 of a 12 oz. package peanut butter chips (again I use the whole bag, and if it’s a 10 oz. bag you definitely use the whole thing.)

Chocolate wafer crumbs

First layers: melted butter and chocolate wafer crumbs

DIRECTIONS

Preheat oven to 350 degrees or 325 for a glass dish.

In 13×9 pan, melt one stick of butter in the heated oven.

Crush one package of Nabisco “Famous” chocolate wafer cookies (or if you can find crushed chocolate cookie crumbs, use 1 1/2 cups of those.)

Spread 1 1/2 cups of the crushed wafers into the melted butter.

Pour 1 can (14 oz) of Sweetened Condensed Milk evenly over crumbs.

Top with 2/3 of a 12 oz. bag of semisweet chocolate chips and 2/3 of a 12 oz. bag of peanut butter chips. (If the peanut butter chips are 10 oz, use the whole bag. Depends on the brand you buy.)

Press down slightly to set.

Bake 25-30 minutes or until lightly browned.

Double Delicious Bars before going into the oven

You don’t even need a mixing bowl for this recipe. You just layer it all in the baking dish.

Cool and cut into bars.

A Your Tray or Mine Recipe and an Online Cookie Swap: Chocolate Buttersweets

8 Dec
Chocolate Buttersweets

These are my other top favorite cookie from our trays!

ORIGINALLY POSTED DECEMBER 19, 2014

This week I was invited to participate in such a fun activity: a digital cookie exchange! Now, you know how much I love cookies, and what a fun idea to do an online recipe swap! I was invited by Patience Brewster, a company that offers a unique line of handmade, hand painted ornaments and gifts for holiday and every day decor.  Their products are so beautiful! Every piece in the collection is based on original artwork by artist/designer Patience Brewster and is filled with intricate details and fanciful designs. You can read more about the company here.

As I was going through my favorite cookie recipes, trying to decide which one to choose for today’s online cookie exchange with Patience Brewster, I had such a hard time deciding! Not just any cookie would do. Ultimately I decided to run the recipe for one of my top two favorite Christmas cookies, the Chocolate Buttersweets. These cookies were the ultimate equivalent of a beautiful Patience Brewster ornament, in a cookie. Hand-glazed, multi-step, multi-layer, delectable cookies, beautiful confections….it’s a perfect fit.

Below you’ll find the step-by-step instructions for this cookie. I hope you’ll give it a try, and I certainly hope that you’ll go on over to the Patience Brewster site and and take a look at their beautiful creations.

In the meantime, I’d like to tag my friend Paula over at My Soup for You and invite her to join in on our online cookie exchange! Paula is a wonderful cook and baker, and I know she’ll be doing some baking this weekend, too! In fact, I’d like to challenge all of my readers and fellow bloggers. Link up a great cookie recipe in the comments here, blog about a good cookie recipe on your own blog, or share a cookie recipe wherever you share, and tag us all!

*************************************************************************************************************

ORIGINALLY POSTED DECEMBER 19, 2011

When I first began the Your Tray or Mine series of recipes earlier this month, I began with the Chocolate Thumbprints, which I said were one of my top two favorite cookie recipes from the trays my mom and I do. Today’s cookie, the Chocolate Buttersweets, are my other top favorite cookie on the tray.

This recipe is not complicated, although it does have three distinct steps: the cookie, the filling and the frosting. Because the cookie should be frosted when it’s warm (but not hot) I recommend prepping the filling first, so that it’s ready. Then make your cookies, and after they are filled, make your frosting and frost the filled cookies.

INGREDIENTS

Cookie base for chocolate buttersweets

If you have a wooden spoon with a round handle, you can use it to poke the holes in the tops of the cookies before baking.

Cookies:
1 cup margarine or butter
1 cup confectioners sugar
1/2 tsp salt
2 tsp vanilla
2 cups all purpose flour (we also make these gluten free, using Bob’s Red Mill 1 to 1 flour)

**Filling:
6 oz cream cheese, softened
2 cups confectioners sugar
4 TBL flour
2 tsp vanilla

Frosting:
1 cup semisweet chocolate chips
4 TBL butter or margarine
4 TBL water
1 cup confectioners sugar

DIRECTIONS:
**Prepare the filling first. The cookies, when done, need to be filled while warm. Have the filling ready to go.

Preheat oven to 350 degrees.

FOR COOKIES:
1) In large bowl cream together butter, confectioners sugar, salt and vanilla.
2) Gradually add flour to creamed mixture, mix well.
3) Roll dough into 1″ balls, placing them 2″ apart on ungreased cookie sheets.
4) Press hole in center of each cookie with finger or the handle end of wooden spoon (if handle is round, not flat.)
5) Bake at 350 for 12-15 minutes until edges are lightly brown.
6) Fill while warm
7) Frost

Filled Chocolate Buttersweets

Step two: fill the cookies while warm.

FOR FILLING:
Soften cream cheese. Blend in sugar, flour, vanilla. Cream well. Fill cookies.

FOR FROSTING:
In small saucepan melt chocolate chips, butter, and water over low heat. Stir constantly. Stir in confectioners sugar and mix well. Will be lumpy at first until the sugar melts. Spoon a little frosting onto each cookie.

Your Tray or Mine? Cookie Tray Recipe of the Day: Chocolate Thumbprints

4 Dec

ORIGINALLY POSTED DECEMBER 1, 2011

I first posted this recipe on my FB page on December 5, 2008!! It’s a cookie recipe my mom and I make every year, and if I had to pick a top favorite, this would be in my top two. I LOVE these cookies. They’re easy to make and easy to just POP into your mouth!! And, they’re chocolate on chocolate. I mean really…how much better can you get than that?

This is a rolled cookie, so your kids can help you if you’d like them to. They can also use their thumbs to make the indentation in the cookies for the filling.

***As of 2013, I’ve added some modifications to the recipe to go with our dietary restrictions. You can either stick to the original recipe or try the healthified version.***

Chocolate Thumbprint Cookies
Makes six dozen
Preheat oven to 375 degrees

Thumbprints before baking

Almost ready to go in the oven!

Alex making thumbprint batter

Alex did almost all the measuring and mixing for the thumbprints herself, with very little help from me.

INGREDIENTS FOR COOKIES

1 cup margarine or butter, soft (We now use I Can’t Believe It’s Not Butter)
1 cup granulated sugar
1 tsp vanilla extract
2 oz (2 sq.) unsweetened chocolate, melted and cooled
1 egg
2 1/2 cups all purpose flour (you can sneak in some wheat flour, mixing half wheat and half white)

DIRECTIONS FOR COOKIES

In large bowl, cream margarine and sugar until light and fluffy.
Blend in vanilla, chocolate and egg.
Lightly spoon flour into measuring cup, level off. Gradually add flour to creamed mixture, mix well.
Chill dough 30 minutes for easier handling.

Shape dough into 1″ balls, place 2″ apart on ungreased cookie sheets or parchment lined sheets. With thumb, make imprint in center of each cookie.

Bake at 375 degrees 8-10 minutes. Let cool one minute before removing from cookie sheets. Fill with chocolate cream filling.

Thumbprints ready to fill

Thumbprints are ready to be filled!

INGREDIENTS FOR CHOCOLATE CREAM FILLING

6 oz. (1 cup) semisweet chocolate chips
2 Tablespoons corn syrup
1 Tablespoon water
1 Tablespoon margarine or butter
1 teaspoon vanilla extract

In small saucepan melt chocoalte chips with corn syup, water and margarine over low heat, stirring constantly. Stir in vanilla.
Spoon 1 tsp into each cookie.

Your Tray or Mine? Cookie Tray Recipe of the Day: Chocolate Chip Butterballs

2 Dec

These cookies could be made with nuts instead of chocolate chips if you prefer!

ORIGINALLY POSTED DECEMBER 5, 2011

Today’s recipe is another one of my favorite cookie recipes, one we’ve made for years and years. Way back when I was a Girl Scout, I used to participate in the Girl Scout Bake Off each year and one of the years I earned second place with these cookies! That’s how long my family has been making them.

We call them Chocolate Chip Butterballs, but they have many other names: Snowballs, Mexican Wedding Balls, Hazelnut Balls and probably other names I don’t even know about.

Traditionally they are made with nuts. I don’t like nuts, my family never baked with nuts growing up and I don’t either We all really love Chocolate Chips though, so my mom has always subbed in the chocolate chips for nuts. You can choose either mini chips or the regular sized chips. Personally, I prefer the big ones, but if you don’t, switch them for the minis instead. If you’re into tasting batter, this one is safe to eat, there are no eggs in this recipe. I’m always pretty sure I’d come out with about six more cookies in each batch if I ate less batter!

This recipe can be made fast and easy if you have extra set(s) of hands to help you roll the batter into balls! This is one I often let my kids help with. I don’t usually have them roll the hot ones in the sugar though, even though I use a spoon for that. Their “part” is the cold batter getting rolled into the balls for baking.

Be sure to check back tomorrow to see what the coordinating kids’ activities are for this recipe!

Enjoy!

Chocolate Chip Butterball Cookies

INGREDIENTS

2 cups flour **for a healthier version, I have used one cup of wheat flour mixed with one cup of white flour**
1 cup butter or margarine  **for a healthier version I have substituted “I Can’t Believe It’s Not Butter” for regular**
4 TBL granulated sugar
1/4 tsp salt
2 tsp vanilla

one 12 oz. package chocolate chips

Bowl of confectioner’s sugar

DIRECTIONS

Combine flour, butter, granulated sugar, salt, vanilla in bowl of electric mixer. Mix well.

Add in chocolate chips, mix them into the batter.

Refrigerate dough 30 minutes (or longer.)

Form into 1″ balls, place on cookie sheet. These don’t spread, so you can put a lot on a sheet, no need to spread them out a ton.

Bake at 375 for 15-20 minutes.

Cool only slightly, maybe a minute or so, and then roll each one in a bowl of confectioner’s sugar.

Roll a second time in confectioner’s sugar before serving.