Tag Archives: shopping on a budget

What’s for Dinner Wednesday: Tracey’s Muffin Tin Mini Lasagnas

27 Mar
A new favorite meal for us!

A new favorite healthy meal for us!

My mom found me a new blog and I really like it. It’s called Tracey’s Culinary Adventures and the very first link she forwarded to me was today’s recipe. She sent it to me last Thursday, saying she thought we’d like these,  and I wrote back and said, “I am going to make them tonight, they sound so good!”

Then I realized I’d eaten all the ricotta cheese as my chocolate fix the night before, so I had to go out and get that. And the wonton wrappers. But other than that, I had everything on hand and this sounded really good to me!

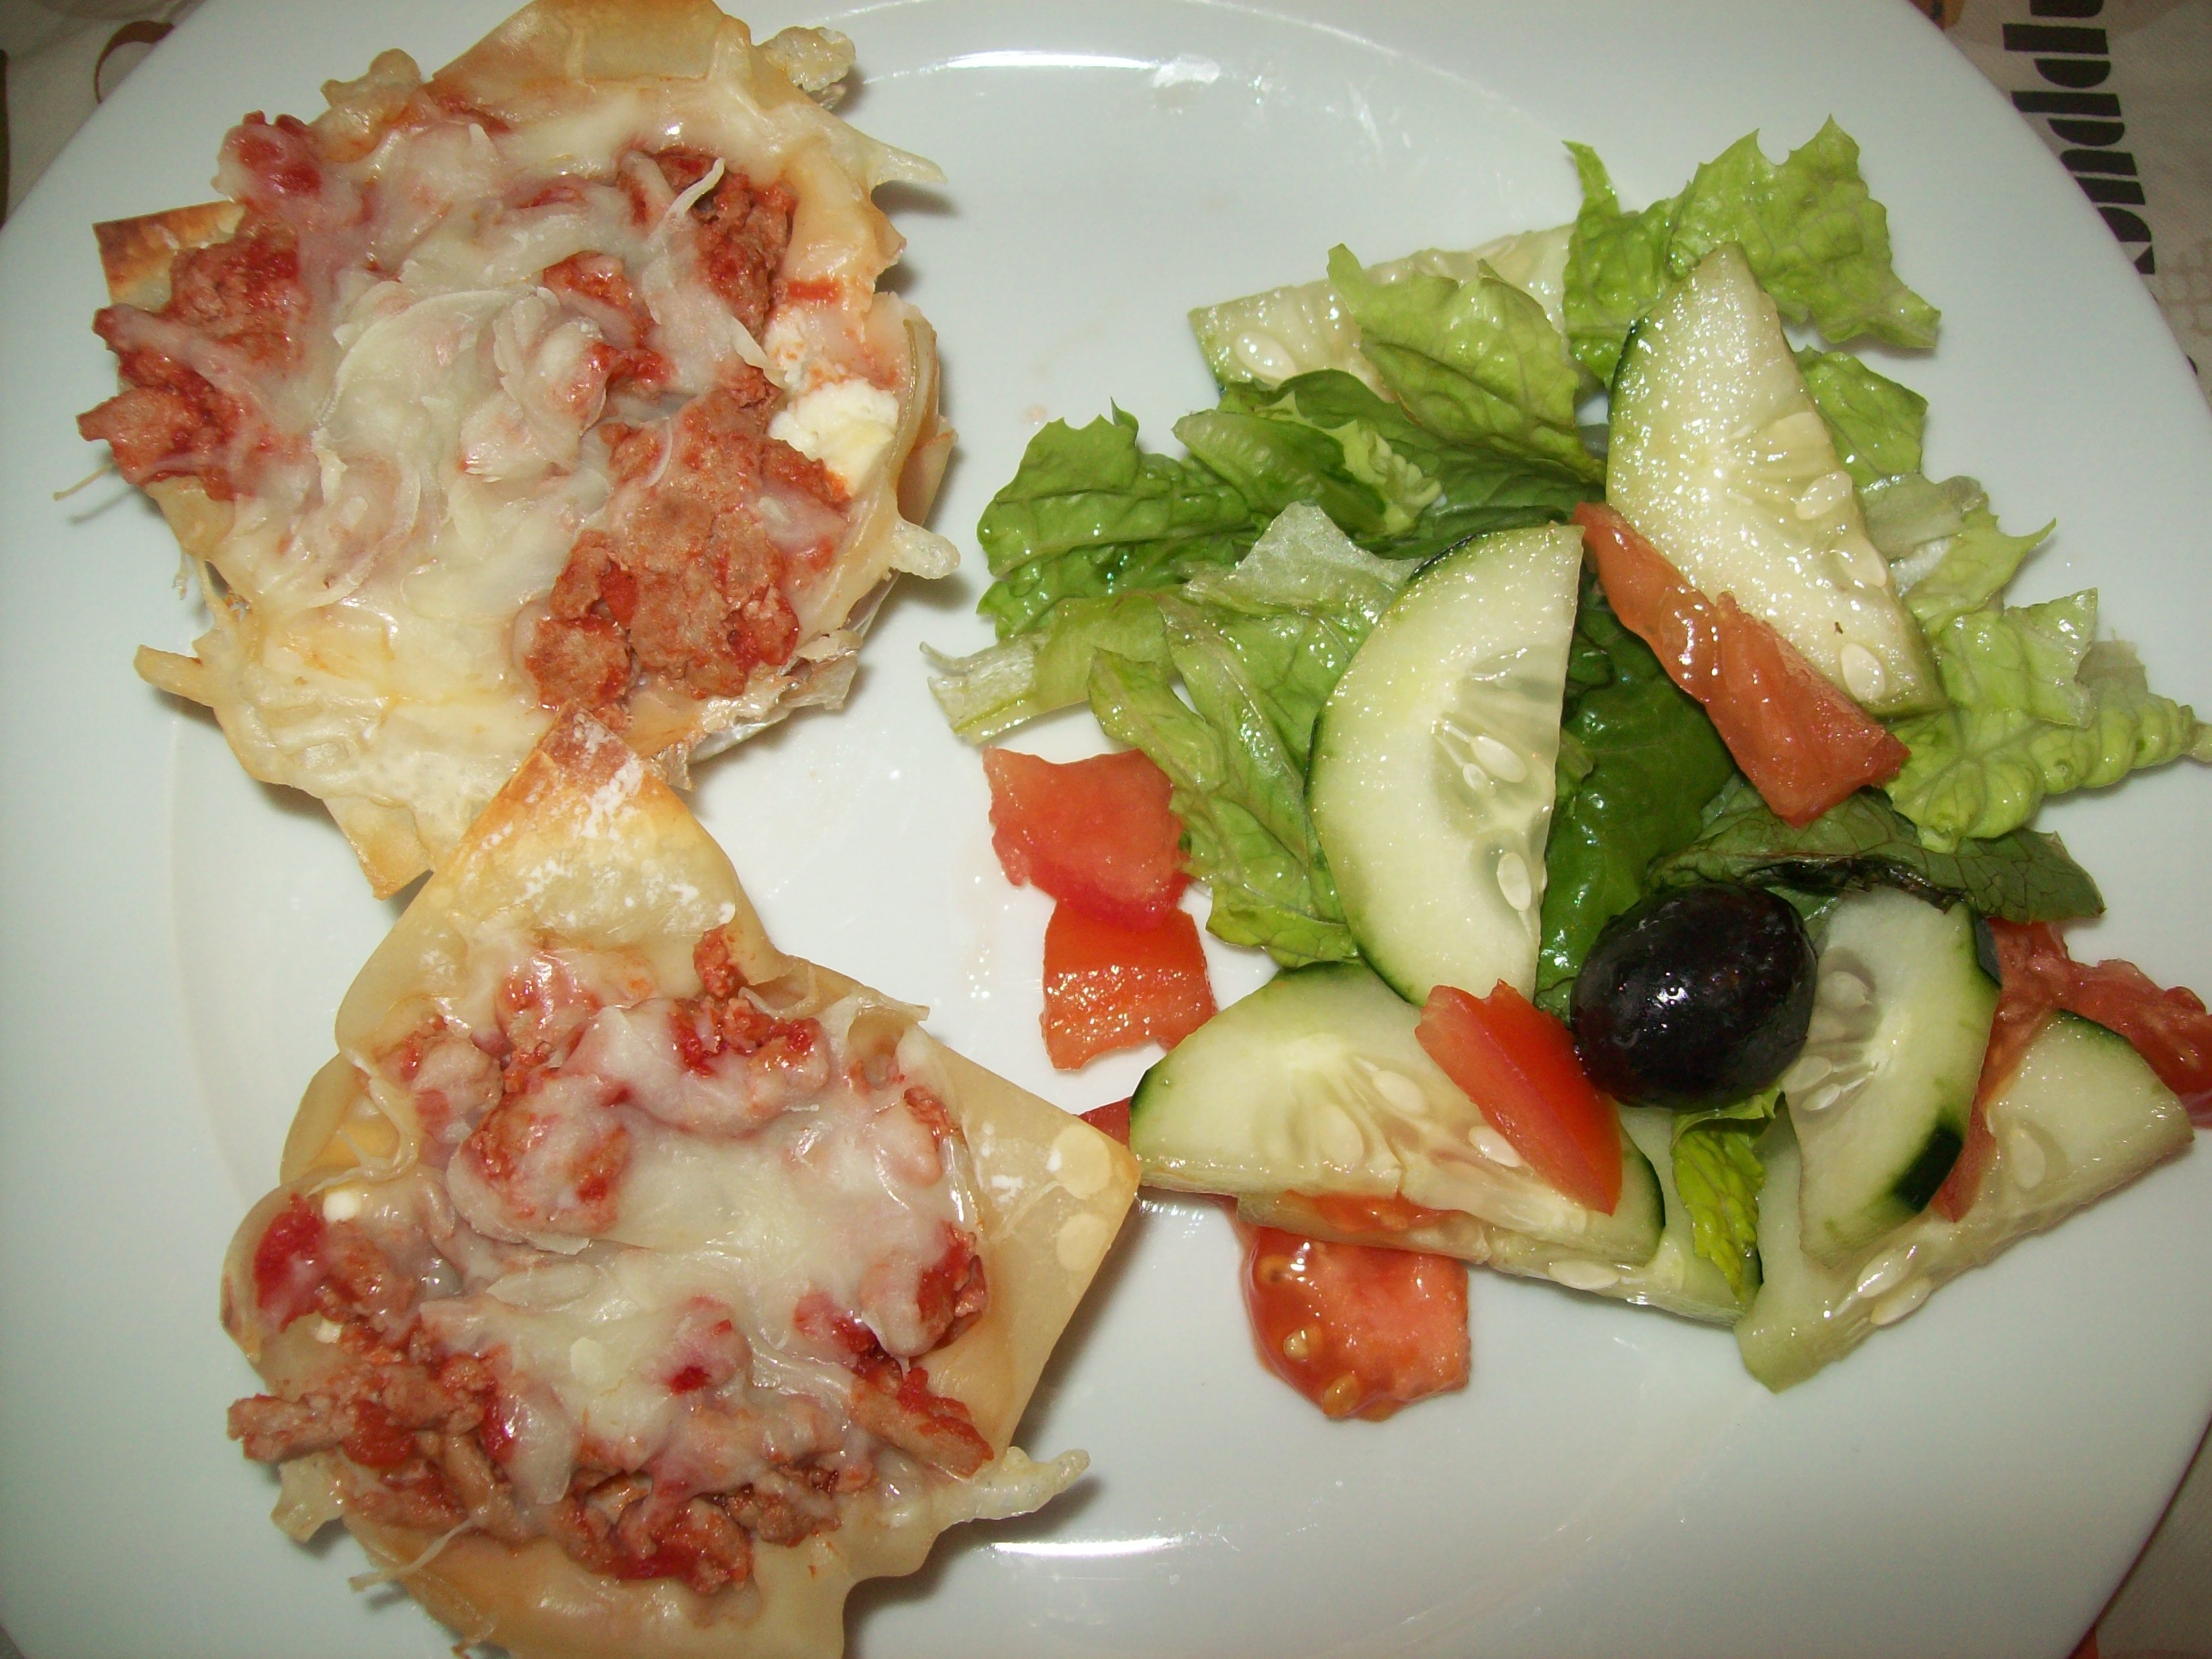
The recipe is a simple, easy one, and although it does have a few steps they are not hard steps and they are much easier than making a “real” lasagna. I liked that these were multi-layered, just as a lasagna would be, and I loved even more that they baked in ten minutes. They got four out of five thumbs up at our house, with only Alex not liking them. She liked the inside but not the wrappers. But overall, they were very well received and I’d most definitely make them again.

I am going to post Tracey’s recipe here, and any modifications I made, there weren’t many, but I encourage you to visit her blog because she really goes step by step in her description and it’s really well laid out. Additionally, she has some fabulous recipes on there, so check it out! My lasagnas were slightly more plain than hers as my family doesn’t love a lot of “stuff” in their meat layer, but you can really throw in anything that you like just as you would a regular lasagna.

TRACEY’S MUFFIN TIN MINI LASAGNAS

Dinner prep time often coincides with homework help time. On this night, I was listening to Alex read aloud, everything I always wanted to know about the state of Hawaii. Thank goodness for simple recipes!

Dinner prep time often coincides with homework help time. On this night, I was listening to Alex read aloud, everything I always wanted to know about the state of Hawaii. Thank goodness for simple recipes!

INGREDIENTS

12 oz ground turkey
1 medium onion, chopped (I skipped this.)
1/2 cup chopped mushrooms (I skipped this.)
1/4 teaspoon salt
1/4 teaspoon pepper
1 (15 oz) can tomato sauce
2 garlic cloves, minced
1 1/2 teaspoons dried oregano, divided
pinch red pepper flakes (I skipped this.)
1 1/2 cups part-skim ricotta cheese (I used fat free.)
1/2 teaspoon dried basil
24 wonton wrappers
1 1/2 cups shredded part-skim mozzarella cheese (I used fat free.)

DIRECTIONS
Preheat oven to 375 F. Spray a 12-cup muffin tin generously with nonstick cooking spray.

Add the ground turkey, onions, mushrooms, salt, and pepper to a large skillet set over medium to medium-high heat. Using a wooden spoon, break the turkey up into small crumbles and cook for about 10 minutes, or until the turkey has browned. Stir in the garlic and cook for 30 seconds to 1 minute, just until fragrant. Add the tomato sauce, 1 teaspoon of the oregano, and the red pepper flakes, and stir to combine. Taste and season with additional salt and pepper if desired. Bring the sauce to a gentle boil, then reduce the heat and simmer for 10 minutes. Remove from the heat and set aside.

In a medium bowl, stir together the ricotta, the remaining 1/2 teaspoon of oregano, the basil, and a pinch each of salt and pepper.

To assemble: Press 1 wonton wrapper into each well of the muffin pan – be sure to press them into the bottom and sides of the pan. Working with half of the ricotta mixture, divide it among the wells of the pan evenly, pressing the ricotta into an even layer. Working with half of the tomato sauce, divide it among the wells of the pan, spreading in an even layer rather than mounding. Sprinkle 2 teaspoons of the mozzarella over the top of each mini lasagna. Press a second wonton wrapper onto each mini lasagna then repeat the process of layering using the second half of the ricotta mixture, the remaining half of the tomato sauce and finally two more teaspoons of the mozzarella per cup.

Bake the mini lasagnas for 10 minutes, or until the cheese is melted and bubbly. Remove the muffin pan to a wire rack and let the mini lasagnas cool for a few minutes before removing them. Garnish with fresh basil before serving, if desired.

Makes 12

Two apiece were plenty for us. I did find these softened up when they were left over, but they still tasted good.

Two apiece were plenty for us. I did find these softened up when they were left over, but they still tasted good.

Strawberry Compote for your next breakfast or brunch

22 Mar
We've made this twice already since finding the recipe in a magazine.

We’ve made this twice already since finding the recipe in a magazine.

Being a breakfast/brunch fanatic, when I saw this compote in a FamilyFun magazine recently, I knew I had to try it.  I love compotes of all kinds.  We already have a great recipe for a blueberry compote and one for a peach compote, but I’d yet to try a strawberry compote.

It was shown over crepes, which we love, but right away I could picture it over homemade waffles, over pancakes, french toast and even as a topping for our healthy mini cheesecakes.

The first time I made it, it was a hit right away. I served it with the mini cheesecakes as a dessert, but I spotted a cute little girl who shall remain nameless to protect her identity, eating it right out of a bowl with whipped topping, spoon in hand, no cheesecake in sight.

It was that good.

The second time we made it, it was for crepes, which we are actually having for dinner. We put out a variety of fillings and toppings, (remember our crepes buffet from a past post?) and this strawberry compote was a perfect topper and even a perfect filler, for strawberry banana crepes. I had a combination of fresh strawberries and bananas along with the compote in mine.

Heavenly.

So, with many people choosing the brunch option for the upcoming Easter holiday meal, I thought I’d post this recipe today, in case you decide to include it in your menu. The recipe is delicious, fast and easy, a check plus in my book. I keep a variety of frozen fruits on hand so we used a one pound bag of frozen strawberries from Aldi’s for this recipe.

STRAWBERRY COMPOTE *from FamilyFun, February 2013
INGREDIENTS

1 pound fresh or frozen strawberries, quartered plus more for garnish if desired. (I did not quarter them, as they were frozen.)

1/4 cup sugar

1 tablespoon cornstarch

1 tablespoon lemon juice

Super-easy directions make this a great recipe for a busy day.

Super-easy directions make this a great recipe for a busy day.

DIRECTIONS

1.) In a medium saucepan, stir the strawberries and sugar together. Let the mixture stand until the fruit’s juices release, about 30 minutes. (If you are using frozen strawberries, heat them with the sugar over medium heat until they’re defrosted, about 2 minutes *mine took longer.*)

2.) In a small bowl, whisk together the cornstarch and lemon juice. Combine them with the strawberry mixture. Simmer the sauce on medium-low until it thickens, about 10 minutes, then set aside.

See what kinds of things you can think of to serve this with!

Again, mine took a little longer to thicken, but here is what it looks like when it's done, so cook until it is thickened. You'll be able to tell.

Again, mine took a little longer to thicken, but here is what it looks like when it’s getting thicker, so cook until it is thickened. You’ll be able to tell.

What’s For Dinner Wednesday: Light Vegetable Fried Rice

20 Mar
This Vegetable Fried Rice was a huge hit!

This Vegetable Fried Rice was a huge hit!

We all love Chinese food, but it’s not something we get very often. I was thrilled when I recently found a recipe on the Red Barn Blog for a homemade version that was healthy. I actually believe the post was a guest post on the Red Barn Blog by the Budget Gourmet Mom, a blog I also follow.

I decided to try it a couple of weeks ago, although not following the recipe exactly, but rather using it as a guide when making ours. It was such a huge hit, I’ve already made it again. Five thumbs up, both times.

I like this recipe because you can use whatever vegetables you have on hand and throw them in. I can foresee using sugar snap peas or pea pods when I have them next, or throwing in zucchini when I make it again.

Here is the recipe as it’s written by the Budget Gourmet Mom on the Red Barn Blog. I’ve made a note of any changes I made. This was great served with Duck Sauce or with Sweet and Sour Sauce on the side, both of which are nonfat.

This Chinese Fried Rice is great as a side dish for any meal. We last used it when we had pork chops.

This Chinese Fried Rice is great as a side dish for any meal. We last used it when we had pork chops.

INGREDIENTS

  • 2 cups cooked cold white or brown rice
  • 1 tablespoon canola oil  (We used olive oil.)
  • 1 small onion, diced
  • 2 cups fresh vegetables, I used broccoli and carrots
  • 2 large eggs, lightly beaten (We used egg substitute.)
  • 3 tablespoons soy sauce
  • DIRECTIONS
  1. In a large skillet preheat oil over medium-high heat.
  2. Add in the rice and fry, tossing carefully with wooden spoon. Add the vegetables and continue to cook for 7 minutes, stirring occasionally.
  3. Push the rice off to the side of the pan and place the beaten eggs next to the rice. Cook, stirring the eggs until firm. Fold into the rice.  (I cooked my eggs in a separate frying pan.)
  4. Add the soy sauce, toss, and serve.

Thanks to the Red Barn Blog and the Budget Gourmet Mom for sharing this delicious dish!

Springtime Smoothies

15 Mar
A healthy springtime snack!

A healthy springtime snack!

Just the other day I wrote about some of the signs of spring’s arrival that I look forward to: things like the weather changing, longer days and the chance to play outside.

Another thing that happens when the seasons change is that our menu changes a bit too. As the weather warms up our snacks are often cool and refreshing rather than warm and toasty.  Our dinners are often cooked outside and then eaten outside too.

One snack in particular that my kids love is smoothies. I make them at home in the blender all the time, but most especially as the weather gets warmer.

Just the other day I got a request to go through the McDonalds drive through for one of their Shamrock Shakes. Unfortunately, that request had to be denied. However, I knew that at home, I could recreate the same sort of shake in the form of a green smoothie, and it’d be much cheaper and much healthier.

With some Aldi’s Nonfat Vanilla Yogurt, skim milk, ice and some green food coloring, (you could also add in some mint extract for flavoring if you wanted) I was able to create a snack that was lower in fat, calories, sugar and carbs than what the original request had been.

A quick couple of minutes in the blender and you've got your healthy after school snack!

A quick couple of minutes in the blender and you’ve got your healthy after school snack!

To give you some quick comparisons:

One cup of Aldi’s nonfat Vanilla yogurt:

140 calories

0 Fat
0 Saturated Fat

0 Trans Fat

1% cholesterol (5mg)

9% carbohydrates (27g)

22g sugar

13% protein (7g)

(don’t forget to add in your skim milk and if you’d like, some mint flavored extract and fat free whipped cream!)

One McDonald’s Shamrock Shake 11.3 oz. (nutrition information taken from Livestrong.com)

416 calories

15%  Total Fat (9.8 g)

30% Saturated Fat (6g)

12% cholesterol (38 mg)

24% carbohydrates (72.4 g)

18% Protein (9.4 g)

61.5 g sugar

So next time you get a request for that special fast food shake, see if you can recreate something similar at home too! It’s cheaper (especially times three or four people) and it’s better for you!

New cookie recipe: I consider these “Superfoods”

8 Mar

I have a new chocolate cookbook that I received from Caroline for Christmas this year. IMG_0115

It’s fantastic.

I already went through it and tabbed a bunch of recipes, and we’ve already made two of them so far, both were delicious. One of them I am going to share with you today. Elizabeth and I made it together last weekend as a surprise for the rest of the family when they were out.

Overall, many of the recipes in this cookbook are already “healthified,” made with some healthier options. Today’s recipe is one of those healthier option recipes.

In fact, it’s so healthy, I might consider these cookies a “Superfood!”

You laugh (I can hear you) but just look at the ingredients in this recipe, read my post about super foods from last week and read the following blurb that I just read *today* in the March 13 issue of Better Homes and Gardens magazine, that supports my superfood cookie claim:

“When you think ‘superfood,’ you probably picture kale or blueberries. But potent plant goodness comes in liquid form, too. Coffee is the nation’s number one source of antioxidants, accounting for 40% of our overall intake, according to research from the University of Scranton.”

Elizabeth was so excited to be the kid in the kitchen this time around!

Elizabeth was so excited to be the kid in the kitchen this time around!

First, let me just say that reading this thrilled me. I think I probably get more like 50% of my antioxident intake from coffee!

And second, although I’m being humorous, this recipe actually has coffee in it, which is why I drew your attention to that fact.

The cookies were a hard, crunchy cookie, which is the kind I prefer. Everyone here loved them, all thumbs up, and I didn’t think twice about offering them dessert, knowing that I was really providing them with daily doses of antioxidants!!

Below is the recipe. Now keep your eye open for all the healthier choices and you’ll see why these cookies were a superfood in my house!

My new superfood cookies

My new superfood cookies

CHOCOLATE & COFFEE WHOLE WHEAT COOKIES
INGREDIENTS

3/4 cup unsalted butter or margarine (we used I Can’t Believe It’s Not Butter.)

1 cup brown sugar

1 egg (we used egg substitute)

1/2 cup all-purpose flour

1 tsp. baking soda

pinch of salt

scant 1/2 cup whole wheat flour

1 tablespoon bran (We took bran flakes and crushed them up in a ziploc bag and took 1 tablespoon from there.)

1 1/3 cups semisweet chocolate chips

2 cups rolled oats

1 tablespoon strong coffee (I used decaf!)

2/3 cup hazelnuts toasted and coarsely chopped (I skipped this ingredient.)

Using the larger of my two Pampered Chef scoops makes our cookies more uniform.

Using the larger of my two Pampered Chef scoops makes our cookies more uniform.

DIRECTIONS

Preheat the oven to 375 degrees.

Grease two large cookie sheets (I don’t grease, mine are fine.)

Cream the butter and sugar together in a bowl. Add the egg and beat well.

In a separate bowl, sift together the all-purpose flour, baking soda, and salt. Then add in the whole wheat flour and bran.

Mix in the egg mixture, then stir in the chocolate chips, oats, coffee, and hazelnuts.

Mix well.

Put 24 rounded tablespoonfuls of the mixture onto the prepared cookie sheets.

Bake 16-18 minutes or until golden brown. (Ours took less, around 15 minutes.)

Remove from oven, then transfer to a cooling rack and let cool before serving.

Enjoy!!

What’s For Dinner Wednesday: Easy Orzo with Broccoli and Chicken

6 Mar
This meal is a much healthier option for us!

This meal is a much healthier option for us!

As we’ve been going through the process of redesigning our various meals to be a better fit for our diet restrictions, there are some meals that I’ve really been missing.

Sometimes I don’t miss them because I loved them as much as I loved the ease of preparing them on a busy night. Others, I miss because I just loved them.

One of the easy-to-prepare meals that I missed was this one because everyone liked it and it was fast. But, it’s not a good fit any longer.

Since chicken, broccoli and pasta is still one of our favorite combinations, I was looking for a healthier option to make instead.

Recently I’ve seen dishes which use orzo popping up on various blogs, recipe emails and even on Pinterest. We use orzo in our chicken soup, but I never think to use it as a side dish or a main dish, ever. Last night I decided to try. I had half a package left from the last soup Don made, and I had broccoli, chicken tenderloins and chicken broth all on hand.

I did something I don’t often do: I winged the recipe myself. No set measurements, although I used a broccoli orzo recipe from Skinnytaste.com as a guide, along with another orzo recipe on My Soup For You as my inspiration.

That said, here is what I did for a fast, mostly one-pot meal that got all thumbs up:

I keep a lot of the Aldi's Fit and Active chicken broth on hand. They also sell vegetable broth.

I keep a lot of the Aldi’s Fit and Active chicken broth on hand. They also sell vegetable broth.

I started out by thawing six tenderloins.  I cut them up into bite sized pieces and sauteed them in a frying pan with a little bit of chicken broth and garlic.

While that was going, I cooked my orzo, about four ounces of it, in chicken broth instead of water. I cooked it according to the package directions, about 7 minutes, and drained out the broth when done.

I took a steam-fresh pack of frozen broccoli florets out of the freezer and put it in the microwave for about 5 minutes.

Quick, easy and delicious. Love that!

Quick, easy and delicious. Love that!

That whole scenario took about 10 minutes total. The longest part of the meal was thawing the chicken beforehand.

Once the orzo, broccoli and chicken were each done, I put them all into the one frying pan that held the chicken, together, and cooked a few minutes, adding more chicken broth, until it was to my liking.

I served the meal in bowls with the option of adding a sprinkle of Parmesan Cheese on top, and my fans at the dinner table went wild. They loved it. I’d definitely make it again, but I’d make more. There was not a drop left.

This recipe was fast, easy and good for you! Give it a try and see if you agree!

What’s for Dinner Wednesday: Nicoise Salad

27 Feb
This old favorite has made several recent appearances on our menu.

This old favorite has made several recent appearances on our menu.

About 15 years ago when we lived in New Jersey, our friends Max and Jamie introduced us to Nicoise salad (pronounced Knee-Swah). I remember Jamie telling us that it was kind of a “poor man’s meal” in France when she was studying abroad, and that she and her friends ate it often because as students they pretty much fit into that income bracket.

Poor man or not, we loved this salad, and for the longest time we had it often. It reminded me of the Italian Antipasto salad that we have on big holidays because it has a few of the same items on it, but yet it’s very different.

Then, it seemed like we didn’t have it at all for months and months and months. I guess we just kind of forgot about it! I recently remembered it when I came across another version of it somewhere, and we’ve since had it several times.

The thing I like about it as a meal option is that it’s got many components to it, so you can pick and choose what you do or do not like and leave the rest on the platter. I like every part of it, but my kids each have at least one part they don’t like.

And, being that it’s Lent, this makes a great, meatless meal for those who do not eat meat on Fridays.

Traditionally, at least as we know it, the components to the salad are:

Boiled string beans

Hard boiled eggs

Quartered, boiled red skinned potatoes (*see note below)

Black olives

Tuna

There’s a dressing that you toss on the green beans and potatoes before adding the eggs and olives on the top, and then you can add more dressing to the rest as you like.

This time we grilled the tofu on the countertop griddle, but in the past we have used a frying pan.

This time we grilled the tofu on the countertop griddle, but in the past we have used a frying pan.

*Recently however, we have changed out the potatoes and subbed in sauteed tofu. The reason is two-fold: the first is that my kids don’t eat potatoes hardly ever, so this was not a popular item in the salad. I don’t know why, and it still shocks me that they don’t like potatoes hardly at all, especially since I love them. The second reason is that we’ve been doing our very best to stay as far away from carbs as possible, and white potatoes aren’t the greatest for you. On the flip side, they love the tofu. It made me wonder the other day why we didn’t try tofu sooner, since they all love it. (Except Alex. Shocker.)

I’ve found tofu to be like a cameleon, in that it takes on the flavors of whatever you cook it with. That makes it very adaptable and very delicious. When you cook it til it’s crispy, it’s like eating homefries, but healthier.

See, I’m all about potatoes.

So anyway, the photo at the top is the salad with tofu instead of potatoes. You can try it out either way, or try it both ways and see which one you prefer! It’s really a very good-for-you type of meal and it’s light, especially with the tofu. On a day when you might have a big lunch somewhere, this is a nice, light dinner.

Dressing

3 to 1: Olive Oil to Balsamic Vinegar (You can increase this to however much you’d like.)

Equal parts honey and Dijon mustard. (We do about a teaspoon of each.)

Season to taste with salt, pepper, garlic powder and basil.

New friends, new recipe!

25 Feb
An exciting Kids' State Dinner reunion took place on Sunday afternoon at our house!

An exciting Kids’ State Dinner reunion took place on Sunday afternoon at our house!

Yesterday was a very exciting day!

Our new friend Debra, one of the moms from the Kids’ State Dinner, visited us at our house! She was traveling from her home in Virginia to see family in nearby Massachusetts so we were able to reconnect for a couple of hours.

Debra stopped by in time for lunch, so Don cooked up some of his yummy pizzas and a meatball calzone, and I made a new dessert.

I know that in general you shouldn’t try out a new recipe on new guests, but I thought that Debra would be okay with it, being someone herself who cooks and experiments with recipes.

Until about an hour before she arrived and I realized I was going to have to make a change to the recipe, and then at that point I got a little nervous.

But, luckily it all worked out great. We had a wonderful visit, which flew by, and before we knew it, it was time for dessert.

Debra brought us this pretty trivet, which makes a pretty backdrop for our Fudge Meltaways!

Debra brought us this pretty trivet, which makes a pretty backdrop for our pretty Fudge Meltaways!

That too, was wonderful as well.

It all ended much too soon, but luckily Debra has family here, and we have family in Virginia, so we know we’ll get to reconnect again and again.

In the meantime, here is the new dessert recipe for you. I got it from one of my cookbooks and as I write it for you I’ll explain what happened partway through and how I solved it.

Lately, I often go to the internet when I’m looking for something new to cook, but this time I grabbed a cookbook off my rack, opened up to any random page and moved a page or so beyond it, and found one to try. It ended up being a no bake recipe too, which was a bonus.

There were three layers to the recipe, so I’ll write it out and explain it layer by layer for you.

FUDGE MELTAWAYS (from the Betty Crocker Cooky Book)
INGREDIENTS

First layer.....

First layer…..

First layer:

1/2 cup butter (We used I Can’t Believe It’s Not Butter)

1 sq. unsweetened chocolate (one ounce)

1/4 cup granulated sugar

1 tsp. vanilla

1 beaten egg

2 cups graham cracker crumbs

(We did not use the next two ingredients: 1 cup coconut, 1/2 cup chopped nuts)

Second layer....

Second layer….

Second layer:

1/4 cup butter (We used I Can’t Believe It’s Not Butter)

1 tablespoon milk or cream (We used skim milk)

2 cups sifted confectioner’s sugar

1 tsp. vanilla

Third (top) layer....

Third (top) layer….

Third Layer:

This was our issue. The third layer was supposed to be 1 and  1/2 squares of unsweetened chocolate, melted and spread over the top of the second layer. However, the unsweetened chocolate tastes terrible by itself and we couldn’t guarantee it’d taste any better on top of the dessert. At Caroline’s suggestion, I made a half-batch of Chocolate Butter Cream Frosting from my Better Homes and Gardens cookbook instead, and spread that across the top. It was delicious. Essentially it was almost the same as the second layer, but chocolate, but it worked.

So here is the recipe for the top layer, , so for a full recipe, double this one:

2 1/4 cups confectioners sugar

1/8 cup milk (add more as needed)

1/4 cup cocoa powder

3/4 tsp vanilla

DIRECTIONS FOR FUDGE MELTAWAYS

1) Melt 1/2 cup butter and 1 sq. chocolate in saucepan.

2) Blend in granulated sugar, 1 tsp. vanilla, eggs, crumbs (and coconut and nuts if you choose to use them).

3) Mix well and press into 11×7 or 9×9 dish.

4) Refrigerate.

5) Mix 1/4 cup butter, milk, confectioners sugar, and 1 tsp. vanilla. Spread over crumb mixture.

6) Chill.

(I left this overnight before completing the top layer. )

7) Using the Better Homes and Gardens frosting recipe above, combine and spread across second layer.

8) Refrigerate and later serve.

Enjoy, but tell me, what would you have done with that third layer? Would you have served it as is? Or, would you have changed it too?

What’s For Dinner Wednesday: Cream of Broccoli Soup

20 Feb
This soup is perfect for a cold winter day!

This soup is perfect for a cold winter day!

We have had some pretty chilly days this winter. Some days there’s nothing that hits the spot like a hot bowl of soup, and I’m a huge fan of creamy soups, which is why today’s post is a favorite of mine.

The other reason it’s a favorite is that it brings back memories, and I love recipes that remind me of the past.

This recipe is from my college roommate Karen, from the cookbook she made for me when we graduated.  The thing is, I can distinctly remember a time when we were roommates that I had a terrible sore throat and laryngitis.

Karen made me this soup. I can picture myself sitting at our kitchen table that day, eating her soup. Every time I eat broccoli soup actually, I think of that day.

And a few weeks ago when I made the soup, I thought once again, of that day.

This was the first time I actually made the soup. I’ve never been very brave with soups before, I’ve mostly left them to Don other than a basic chicken soup. But since my friend Paula’s My Soup For You blog has been in existence, I’ve gotten very brave and I’ve since made several soups. In fact, she and I each made a version of a cream of broccoli soup within a day of each other and we didn’t even know it.

As far as my family goes, Caroline and I loved this soup the most. Between the two of us, we enjoyed it over several days’ time, and she liked coming home and having a mug of it after school on cold afternoons.

Here is the recipe for Karen’s Cream of Broccoli Soup. I hope it warms you up on a cold winter’s day!

I used fresh broccoli for my soup.

I used fresh broccoli for my soup.

CREAM OF BROCCOLI SOUP
INGREDIENTS

6 cups chopped broccoli

3 and 1/2 cups chicken broth

1/4 cup chopped onion

1/4 cup chopped celery

1/4 cup flour

2 cups skim milk

1 tsp. butter

8 oz. cheddar cheese, cubed (I used fat free cheddar, shredded.)

Although I used a blender for this, it was definitely more of a food processor recipe, and I didn't use ours!

Although I used a blender for this, it was definitely more of a food processor recipe, and I didn’t use ours!

DIRECTIONS

Simmer broccoli in chicken broth until tender.

Remove bulk of broccoli and in blender or food processor, process the broccoli, onion and celery until smooth. Set aside.

Combine milk and flour in a separate container until dissolved.

Slowly add to broth, stirring until it begins to thicken.

Add puree, butter, salt and pepper to taste.

Stir until it begins to simmer.

Add cheese and stir until melted.

What’s For Dinner Wednesday: Choose-Your-Own Chicken

13 Feb
They say life is like a box of chocolates.

They say life is like a box of chocolates.

It’s the day before Valentine’s Day and do I have a gift for you!

It’s not a recipe, per se, but rather an idea that might save you some frustration at dinner time in your house too.

A few weeks back, maybe a month ago, we came up with Choose-Your-Own-Chicken for dinner.

Here’s what it is and here’s how it happened:

One night, we were contemplating our dinner plans and Don and I really wanted what we call “California Chicken,” which is a grilled chicken with melted cheese and avocado. It’s a meal we really enjoy. (By the way, you can add sprouts to the top if you’d like.)

We’re the only ones who really enjoy it. If given the opportunity, I’d eat an entire avocado myself, but I think I might be the only one who loves avocado that much.

Back to my story.

We wanted California Chicken for dinner and no one else did. I came up with a plan: let’s make it for us and then cook up a bunch of plain chicken tenderloins without the cheese and avocado and put out some other toppings and dips to choose from.

Kind of like a chicken buffet.

Or, like a box of chocolates on Valentine’s Day. Everyone chooses the one they like the best and then everyone is happy.

So that’s what we did.

Our toppings included barbeque sauce, duck sauce, and ketchup. If one so desired, they could opt for nothing at all on their chicken and just eat it plain.

It’s nothing so amazing, but it really worked out well for us. We were happy, everyone was happy.

In general we won’t make five separate dinners, but we found a way to make one dinner work for five people’s tastes.

So that my friends and loyal readers, is my Valentine’s gift to you: Choose-Your-Own-Chicken.

Enjoy!