Archive | Kids RSS feed for this section

Gluten Free Chocolate Chip Muffins

9 Dec
I was temporarily lost without one of the staples in my menu: muffins.

I was temporarily lost without one of the staples in my menu: muffins.

Muffins.

If you are a long-time reader of The Whole Bag of Chips, you know how much I love a good homemade muffin. I like the versatility of being able to serve them after school, for breakfast, for a lunchbox item or for a late night snack.

Going with a gluten free menu for my youngest just before Thanksgiving has led me on a search for all kinds of staples and pantry items as well as for some good recipes to try. The staples and pantry items were immediate needs, as were items for each meal. One Sunday morning rolled around, and I realized my go-to plan for Sunday morning breakfast might be in jeopardy if I couldn’t make muffins.

This ended up being a lifesaver for one of our Sunday mornings

This ended up being a lifesaver for one of our Sunday mornings

Luckily, I’d visited our local Trader Joe’s earlier that week and picked up two bags of an all-purpose flour. I had grabbed two because I don’t often get to Trader Joe’s, and because I am learning quickly that there’s often only enough for one batch of something when it comes to buying gluten free items.

I noticed that the back of this package of flour contained several recipes, and one of them was for an apple cinnamon muffin. I was thrilled. Muffins are a staple here, and I hadn’t yet thought about what to do about that for Alex. When Sunday morning rolled around, I remembered the flour and the recipe on the back side.

As I examined the recipe at home in my kitchen, I was very excited to read that the recipe could be used as written, to make the apple cinnamon muffins, or it could be used as a basic muffin recipe if you took out the cinnamon and you could put in whatever you wanted.

Well of course….she requested that I put in chocolate chips. A girl after my own heart.

The recipe was easy to follow. I had two snack cups of natural applesauce here that I used, which was lucky because I hadn’t planned ahead for this, so I was glad I had it on hand at home already. I used canola oil instead of sunflower oil and skim milk. The recipe was quick and easy to follow and I was able to make 18 muffins, so she ate a few that morning and then I froze the rest. Now, a couple of weeks later, there are only three left, and I’m already thinking of what recipe to make next. I am thinking of using some of our frozen blueberries that we picked in August to make some homemade blueberry muffins.

I was so happy to see this recipe on the back of this package of flour from Trader Joe's.

I was so happy to see this recipe on the back of this package of flour from Trader Joe’s.

This flour was $7.99 a pack, and the muffin recipe used about 3/4 of the pack, so I was glad that I had more than one. I will finish it off and start my next package of flour when I make my next batch of muffins. There was also a pancake recipe on here, but as you saw last Wednesday, we were happy with our Bisquick gluten free pancakes, so for now I’m sticking with that.

If you haven’t found a muffin recipe you like yet, and you’re searching for gluten free, I encourage you to try this one. It did not require anything unusual and the muffins were tasty. All three kids eventually got to have them, and they all gave them a thumbs up each time.

If you have any other good muffin recipes to try that don’t require a ton of unusual ingredients, I’d love to hear about them!

What’s for dinner Wednesday: Gluten Free (and fat free and shellfish free)

2 Dec
Suddenly, we were adjusting to a member of our family who was now gluten free.

Suddenly, we were adjusting to a member of our family who was now following a gluten free diet. It was not our first time at the menu modification rodeo. I have a shellfish allergy, and my older daughter has an intolerance to fatty foods.

Happy December!

Have you missed me? It’s been two weeks (at least) since I last wrote, and what a busy two weeks it’s been!

My last post was a new muffin post for Peanut Butter Pumpkin muffins, and then…nothing! Well, a lot has been going on over here in the past weeks, and it’s taken me some time to process and organize it all, and to be able to share it with you.

First, Happy Thanksgiving! We had a great holiday and I hope you all did too! We got to visit with family and it was wonderful. I was a bit under the weather with a cold that did me in and took away my voice for much of that week, but overall it was a great holiday and a much needed school break.

The break provided us with some time to catch up a little bit. We slept a lot, we shopped very little, and we got ourselves organized at home a little bit too. We’d recently been told to try our youngest daughter on a gluten free diet as a trial, to see if it would alleviate her chronic stomach issues that had been plaguing her since the springtime. Normally, any stomach problems we’d encountered had responded to medication, but for the first time ever, adjusting her medications hadn’t done the trick. We spent the end of the school year and our entire summer, even as we criss-crossed the country on our Cross Country Adventure of 2015, trying to make heads or tails of her constant, chronic stomach pain. We could not alleviate it and we could not figure out the cause of it. Our oldest suffers from an intolerance to fatty foods, and we saw some similarities, but yet not exactly. All of our three have dealt with, and our youngest continues to deal with, abdominal migraines, but yet that didn’t seem to be it either, and the medications for it didn’t seem to be helping anymore.

When we returned from our trip she begged me to call the doctor again.

“I can’t go back to school like this,” she said. “I ended last year like this, I don’t want to start the new year like this.”

She was right, and so I placed another call to him and this time we went in. I explained that the last few things we had tried through the spring and summer weren’t working. He offered out a couple of new things to try, and each time we’d have a follow-up visit in three more weeks. Each time we’d go back with not much better news from whatever we’d tried over the three weeks. Finally, he handed me a meal plan to try with her, a “low FOD Maps” plan. You can explore that here, or google it for more information. As he handed it to me and we went through it, it mentioned gluten free items here and there, and he said, “Or, you can try gluten free, too.”

When I went home, it took me a few days to sit and look through the new diet and to consider my options. As I looked at the low FOD Maps list, there wasn’t a ton on it that she didn’t already do, and as I looked at the foods to avoid on the high FOD Maps list, there wasn’t a ton on there that she ate. It didn’t seem worth figuring out for such little change. I decided to explore the gluten free diet. I figured we’d try it for one week. I knew from past experience that if you didn’t feel a difference by then, you weren’t going to. And if it worked, you’d feel the difference even sooner.

My daughter and I went shopping and picked up just a few things to get us started. It was enough stuff for dinner that night, some breakfast, lunch and snack items for the next day.  That night for the first time in months and months, she went to bed without a stomachache after her first gluten free dinner. She woke up the next morning without a stomachache. I packed her a gluten free lunch, planned after school snacks that were gluten free, and off we went. Day two, still stomachache free. I couldn’t believe it. I had not expected it to work. We’d been down that path with my other daughter and had seen no difference in the two weeks we’d tried it. Each day or so I picked up a few new things in my travels and began to think ahead as well. Thanksgiving was a week away. Luckily, my sister-in-law was coming in to visit, and she was also on a gluten free diet, so my mom and dad had her dietary needs in mind, and they were hosting the holiday, so that would work for Alex too.

It’s now been two full weeks and she’s doing great. We visited the doctor the other day for our three week check-up and he gave us the okay to continue on the gluten free diet from here on in. We have since had a major holiday, we’ve eaten out, we’ve eaten in, and hosted a big event out of the house ourselves, and we’ve pretty easily incorporated her needs into all of our plans. Our next big event is Christmas, and looking for Christmas Cookie recipes or changing our own is obviously at the top of my list. They now need to be low in fat for one daughter and gluten free for another.

Keeping everything in one spot in our pantry so we don't have to go searching for the gluten free ingredients and snacks.

I’m keeping everything in one spot in our pantry so we don’t have to go searching for the gluten free ingredients and snacks.

In the weeks we’ve been doing this, I’ve already gotten to experiment and to organize our pantry and freezer a bit in order to make it easy for everyone to see what she can and can’t have, even if I’m not here, and I’ve tried out some great recipes and foods that she’s liked. We also have pantry shelves in our garage and we’ve allotted a section of that space for just gluten free foods too.

Over the next weeks and months, I’ll be posting what we’ve been up to on this new adventure, whenever I can, and as we go along I’ll be able to make more and more, and try out new things. I’ve taken lots of pictures of the foods we’ve bought and the foods she’s liked as well as the recipes I’ve had a chance to make. As always, and I welcome your ideas and comments as well!

This has been a great ingredient for our pantry. We've already used it for two different recipes.

This has been a great ingredient for our pantry. We’ve already used it for two different recipes.

For today, I’m starting at the beginning. One of the first dinners we had was a quick “breakfast for dinner” of pancakes with blueberry compote. The compote was homemade and you can find the recipe here. It was already gluten free. The pancakes are something we often make homemade, but on this night we were using a “just add water” boxed mix for our own, and that’s what I used for Alex’s too. I had already bought the gluten free Bisquick which had recipes on the side and back of the box for waffles, pancakes, biscuits and pizza dough. Bisquick is a familiar and trustworthy name in my opinion, and I thought it was a good first choice for my pantry. The recipe made enough pancakes that we could save some leftover for another day. By cooking for just one person, I’ve been able to make a lot at once and freeze ahead so that we can pull out what we need for her as we go, rather than starting from scratch every time. Alex liked these pancakes a lot, and had no problem having them again later in the week for breakfast.  The meal was a win-win for everyone.

Alex's pancakes looked just like ours and she said they tasted just as good.

Alex’s pancakes looked just like ours and she said they tasted just as good.

I hope you’ve enjoyed my first (of many, I’m sure) posts about eating and cooking for a gluten free diet. Do you or anyone in your family follow a gluten free diet? What kinds of tips and tricks can you share?

Peanut Butter Pumpkin Muffins from Family Food on the Table

18 Nov
The combination of ingredients was what piqued my interest in this recipe.

The combination of ingredients was what piqued my interest in this recipe.

I don’t know about you, but I don’t get off my pumpkin kick until after Thanksgiving. I’m still all about pumpkin for a few more weeks, at least.

I’m finding that this school year, due to our scattered after school schedules, I’m doing a great deal more driving than I am baking in the afternoons and evenings. Whereas I used to be able to do a quick after school baked snack at the end of my work day, this year I can only do that a couple of times a week, if I’m lucky. This means that I haven’t had a lot of new and exciting recipes to try out and to share, and for that, I apologize!

On Monday however, a recipe came across my virtual desk and it definitely piqued my interest. I actually had to read the title a couple of times to make sure I was reading it correctly, as I wasn’t sure I’d seen this combination of ingredients in the past. It’s not that it was anything crazy, it’s just that it wasn’t something I think I’d paired together in the past.

It meant that I just had to try it, just to see how it was.


Batter looked good, that's always a good sign!

Batter looked good, that’s always a good sign!

The recipe was for Peanut Butter Pumpkin Muffins, and it was from Family Food on the Table and it said chocolate chips were optional. To me, chocolate chips are almost never optional, but I liked all of the ingredients that were listed and I had them all, except for the white-wheat flour. I had white, I had wheat. I did not have white-wheat, so I decided to try using half white and half wheat instead. Otherwise, the recipe seemed perfect for an after school snack/late night snack/breakfast for our whole family; well at least for almost all of them. I forgot that one of them doesn’t like very much with peanut butter. She ended up having something else for her snack instead.

These came together quickly and easily. The prep time was estimated to be about ten minutes, and that was pretty on-target. The cook time was 18-22 minutes. A few of mine were a little soft on top, and probably could’ve cooked a little longer than the 18 that I did, but everyone was starving by the time I finished working and started baking, and everyone gets home so early now that I rushed them out, not checking each one as thoroughly as I should have.

However, despite my feeling a bit rushed, these muffins were delicious! They were hearty and healthy and deemed a keeper by all but my one non-peanut butter lover. I also noticed that there were several options listed at the end, including the option to substitute various types of nut butters such as almond butter to keep them peanut free. It also said that they were tasty with a little extra spread of peanut butter on them when eaten. One of my daughters did that, and she did say they were delicious that way too!

So if you’re as curious as I am as to the combination of peanut better and pumpkin and chocolate chips, I suggest you give these tasty muffins a try! Head on over to Family Food on the Table and check out this recipe and all their others too! Or maybe, you eat pumpkin, peanut butter and chocolate chips together all the time, and in that case, you most definitely want to head on over and check this recipe out!

Enjoy and have a great rest of your week!

What’s for Dinner Wednesday: Baked Cheese and Broccoli Patties

6 Nov
These were so great! Definitely a keeper!

These were so great! Definitely a keeper!

ORIGINALLY POSTED ON DECEMBER 3, 2014

On a recent school day afternoon, I received a text from one of my daughters. It was about an hour before I had to leave and she’d be arriving home while I was gone, but I wouldn’t be back for quite some time.

Her lunch had been ruined. I can’t remember the reason why or specifically what happened. My memory isn’t what it used to be. She was annoyed and she was already starving, with a couple of hours to go before she’d arrive home.

I didn’t have an after school snack planned, and she knows how to make a bagel, cereal, a sandwich, things like that, but I had an idea. I looked up a recipe I’d been wanting to try for a while,  one I’d seen floating across my Facebook page for Baked Cheese and Broccoli Patties.

Now I know that doesn’t sound like a typical yummy after school snack, it’s definitely not chocolate and not sweet, but it’s savory and my kids actually all like broccoli. In fact, this one in particular loves it, and her winning recipe that got us to the White House in 2012 was a simple broccoli and cheese omelet. Rather than let her come in and make just anything for a snack, which was now replacing her lunch, I thought maybe I could leave her these to just reheat and she’d get something a little warmer and more nutritious than a bowl of cereal.

I checked out the recipe, checked out the time and figured out that if I moved quickly, I could squeeze in the prep and cook times before I left. They’d be done and on top of the stove when she got home. It might even make her day a little better, which would be an added bonus.

They were delicious. I texted her a photo of them when I knew she was out of school, on the bus, on her way home. “Just reheat and eat,” I said.

She was so happy. So hungry and so happy. I later texted again to see if she liked them and she said she loved them, that they were very similar to this recipe that we’d gotten out of our cookbook that we’d received at our White House luncheon, minus the hot dogs and pasta. When my other daughters got home from school, they too reported loving this after school snack.

So I call this a great recipe success! All thumbs up, a quick and easy recipe and it can be used for a side dish with a meal or on its own; even as an after school snack. Who knew?!

When I saw this recipe go by on Facebook, a friend was sharing it to another friend’s wall, but there was no originating information to go with it. I did an online search, saw the recipe on the Food.com site, but the photo was different than the one in the recipe I had, and this person too, reported getting it from a random Facebook post. However, someone put up a comment with the origination of the recipe, so I’d like to give credit here to the Po’Man Meals blog. Thanks for inspiring a whole lot of us!

I’m using the ingredients and directions I found on Food.com, which is the same as the one I have printed out at home, so thanks to them as well.

I encourage you to give it a try!

Baked Cheese and Broccoli Patties

Directions:

  1. Preheat the oven to 400 degrees. Lightly grease a baking sheet lined with aluminum foil.
  2. Heat the oil in a small pan over medium heat, add in the garlic and onions. Season with salt/pepper to taste. Sauté until onions are garlic are tender, set aside to cool.
  3. Add the broccoli to a kitchen towel. Wrap the towel around the broccoli and squeeze out the extra moisture. Pour the drained broccoli into a large bowl, add the onion and garlic and mix gently.
  4. To the same bowl, add the panko, the cheeses, eggs, and salt/pepper to taste.
  5. Mix together and form into patties, place on the prepared baking sheet.
  6. Bake in the preheated oven for 15 minutes. Flip and bake for another 15 minutes if needed, or until browned and crispy.


What’s for Dinner Wednesday: Taco Bake

4 Nov

This little “cookbook” is handmade from my college roommate, Karen, circa May 1993. I still cook from it!

ORIGINALLY POSTED MARCH 13, 2012

Last week during one of my posts I mentioned a cookbook that my college roommate, Karen had made me before we graduated URI back in 1993. Despite all our moves from state to state, apartments to house, that little booklet has traveled with me and several of our regular recipes have come from it. However, there’s so many in there that I haven’t made in years. Recently I pulled it out again, as I was specifically looking for a recipe for dinner that we hadn’t made in years, probably since before we had kids. It was a huge hit, so I thought I should share it here.

My family all likes Mexican food but I was getting a little tired of our alternating meals: tacos and quesadillas (even though they weren’t at all tired of them and could probably eat tacos and quesadillas day after day, I could not.) I decided to give Karen’s Taco Bake a try. It got four thumbs up. (And a thumbs down from Alex who said, “But I really liked the tomatoes Mom.”)

You don’t need a ton of ingredients for this recipe and I had everything on hand even though I hadn’t planned it in advance.

This recipe is all the things I like: quick and easy, one pan, and budget friendly. I had a pack of ground turkey in the fridge and everything else on hand in the house already.

KAREN’S TACO BAKE
INGREDIENTS

1 lb. Grd. Turkey or Beef

1 12 oz. jar of salsa (I had a 24 oz. jar, with about half left so I just dumped it all in.)

1 cup corn (drained if canned, mine is frozen)

1/2 cup mayo

1 Tbl. Chili Powder

2 cups crushed tortilla chips (I didn’t measure, but I put about half a bag into a ziploc and crushed them.)

2 cups Montery Jack Cheese (I used a block of cheddar)

I love how it first looks when you throw it all together.

DIRECTIONS

Brown and drain meat.

Stir in salsa, corn, mayo and chili powder.

Layer 1/2 meat, cheese and chips in a 2 qt casserole (I used a 11×7 baking dish)

Repeat so that cheese is on top of chips.

Bake 20-25 minutes until cheese is lightly crisp.

Top with shredded lettuce, tomato and sour cream.

My kids were so excited for this new meal, they couldn’t wait to try it out.

Now you could serve it on a plate as is, or as my kids like to do, you could throw it into a soft taco and wrap it up, with all the fixins’ and eat it that way. We had a little of both at our house; some on a plate and some in wraps. Either way….delicious.

So there you have it….another one of Karen’s famous recipes from my college years.

Enjoy!

Carrot Cake Muffins

24 Sep
Breakfast, snack or dessert? All of the above!

Breakfast, snack or dessert? All of the above!

Good morning!

My blogging schedule is so off this school year, but I’m getting posts in whenever I can for you, and I know you’ll think this one was definitely worth the wait!

Today’s is one that’s been on my editorial calendar since the spring when a friend of mine shared photos of these Carrot Cake Muffins on Facebook. I asked her for the recipe right away and she sent me this one from Allrecipes.com, a favorite site of mine when looking for new recipes.

I knew right away my kids would like these, especially if I added a little icing made with confectioner’s sugar. I mean really, what’s not to love??

My favorite thing about them is that I’m sneaking in a little bit of vegetables that normally they might not all eat. I have since made these multiple times. One afternoon I only had time to make the muffins, not the icing, and left that recipe out for my oldest to do on her own at home. It worked out perfectly.

I love anything that can double or triple in its job, and these muffins do just that. They can be a breakfast, an after school or late night snack, or even a dessert. Although we’ve always had them with the icing, I’m sure they’d be delicious without it also. Most times when I’ve made this in the afternoon, I bag up the leftovers into bags of two muffins each, and that’s a breakfast or a lunchbox snack for the next day too.

You can click here for the muffin recipe from Allrecipes.com, and below is the Powdered Sugar Icing recipe that we use each time.

Powdered Sugar Icing (taken from the Better Homes and Gardens New Cookbook tenth edition, copyright 1989)

1 cup sifted powdered sugar

1/4 teaspoon vanilla

Milk or orange juice (We usually do milk.)

Mix powdered sugar, vanilla and 1 tablespoon milk or juice. Stir in milk or juice, one teaspoon at a time, till of drizzling consistency.

Makes 1/2 cup or enough to drizzle over one 10-inch tube cake.

Let cake stand two hours before slicing.  (We do let our muffins cool first, but not for two hours.)


By popular demand: Answers to some of your allowance program questions

11 Sep

5aEarlier this week I used my Monday Musings post to share some details about our new system for managing the kids’ allowance each week.

I’ve had some questions and I thought it’d be best to answer them here, since if one person is asking, most likely other people have the same questions and just haven’t asked yet.

The first question I got appeared as a comment and I answered as a reply to the comment, but I’m going to put the question and answer here as well.

  1. Q: Are all of the chores worth the same amount of money or are harder jobs paid more?
    A.: I purposely made all of our chores worth the same amount of money. My goal first and foremost was to make sure that this was easy for me to manage, and keeping everything to one dollar per job was easiest for me. I didn’t want to do less than a dollar and have to deal with change, but I also didn’t want to have to remember which jobs paid which amount. Everything, across the board, is worth one dollar. Additionally, I only make so much money per month on average, and my checks pay for more than just the kids’ allowance each month. I had to keep our payouts affordable so that it didn’t interfere with the other things I needed to pay out each month. If I started to make jobs worth $2.00 for example, that’s now times three kids every month. Instead of filling those higher paying job pockets with three dollars each time, I’d now be putting in six dollars per job each time. At the end of the month, the kids would be making more money than me.
  2. Q: Do all three kids do all the same jobs?
    A: Yes. Again, to keep it simple to manage and to also keep it equitable, everyone’s jobs are exactly the same all week and all three kids each have one chance per month or per filling of the pockets to get to do any of the extra jobs. Once they’ve taken their turn, they put their clip on the pocket and someone else does that job later in the month. This allows everyone to share in all of the responsibilities all month long.
  3. Q: Why monthly?
    A: I get paid once per month, and therefore that’s when I set up the allowances for the following month. However, the kids get paid by the week. It’s just laid out a month in advance.
  4. Q: Can you give us a list of the jobs for each section?
    A: I can, but I hesitated to do so initially, only because everyone’s household runs differently and everyone’s needs are different-both as parents and as kids and what they need to learn or what they need help with remembering to do, which for us is a big part of why we do allowance. For example, many people insist that their kids make their own breakfasts or lunches each day. However, at our house, because of our tiny kitchen, our morning shower schedule and routine, and our nightly schedules, that would make me crazy. Therefore, that’s a Challenge job at our house and each kid can choose to do it for one week out of the month. It gives me a little break in the mornings, yet doesn’t overcrowd my already space-challenged kitchen, and doesn’t interfere with any other carefully choreographed schedules in the morning or at night. Ultimately, at the end of the day, I know my kids will know how to make their lunches and breakfasts, and how to pack a healthy lunch for themselves. That’s my goal. That and keeping whatever is left of my sanity.

    That said, here is the list of what I chose for our chores. It addresses things we need/want them to do to help out, things we need/want them to learn and know how to do when they leave our house as young adults, and things that some one of them might struggle with remembering to do. It also rewards them for some of the things that may come easy to one of them that they always did without being told, but that the others might not have done regularly or easily.

    3a“HELP WANTED!” CHORES: These are the six weekly chores and these pockets are to be emptied and refilled every week, so each child has the potential to earn $6.00 per week minimum.
    1) Feed the dog on your designated nights of the week.
    2) Clear your place at the table after meals.
    3) Organize your school supplies after school and at night before bed for the next day.
    4) Put away your folded laundry.
    5) Do your bathroom jobs by 4pm on Saturday evening.
    6) Make your bed every day.
    FYI: I did tell them that if after 4pm on Saturday night they see one of the other kids’ bathroom jobs not done, they are welcome to do it and take the dollar. They’ve had the whole week to get it done, and I’d much rather have a clean bathroom than not. I also rotate the bathroom jobs every year so no one is stuck on toilets for five years in a row. Each child has two jobs in the bathroom per week–sink/counter tops washed, mirrors washed, toilet cleaned, floor dry and wet mopped, laundry emptied and trash emptied.)

    “#FREEMONEY$” CHORES: These pockets are filled monthly and everyone has one chance per month to do them, assuming the opportunity exists (Example: snow shoveling opportunities don’t happen every month, but when they do, they are plentiful. Additionally, I’m flexible and I’d let all three work together to do the snow, the leaves and the car washing, for example, if they wanted to.)
    1) Dishes washed (we don’t have a functioning dishwasher)
    2) Help rake the leaves
    3) Windows washed
    4) Wash a car
    5) Help shovel snow
    6) Wash the kitchen floor
    7) Vacuum the floor
    8) Dust the furniture
    9) Help fold the laundry
    10) Help out in the kitchen with meal preparations

    “@CHALLENGES” CHORES: Everyone has one chance per month to do these chores also.
    1) Make your own breakfast for a week
    2) Make your own lunch for a week
    3) Clean up the playroom/office–a “big cleaning”
    4) Extra pocket for any extra jobs

    Hopefully this will be helpful to everyone who was looking for a starting point for their own allowance and chore systems. There are lots of “chore chart” resources out there that list chores by age-appropriateness which might also prove helpful to you as well. Remember to be flexible. There may be bumps in the road or changes that need to be made, just as with any new system.

Monday Musings: Allowance…do we or don’t we?

8 Sep
Do your kids earn an allowance?

Do your kids earn an allowance?

I’m sure that’s a question every parent asks themselves at some point during their parenting journey.

“Do we give our kids allowance? If so, how much? If not, why not?”

I also know for sure that there are many schools of thought on the issue. Some people believe that a family works together as a team, and no one person on the team gets paid for pitching in to get the household jobs done. Other people believe that hard work earns rewards, whether it’s house work, yard work or school work. Yet other people don’t believe their kids should have chores at all, that their school work is work enough, and their focus should be on that and that alone.

It’s all good, I’m sure, and whatever works for one family may not work for another.

As parents, we too asked ourselves those same questions as our kids were young. We definitely knew we didn’t pay them for grades on their report cards or school work. When our kids were very small, they didn’t do much in the way of chores, but as they grew older, they were more capable of helping out around the house and cleaning up after themselves. We began to question the idea of allowance in order to encourage them to consistently get certain jobs around the house done. Early on, we went with the philosophy that we were all a team and pitched in together and everything just gets done. We mostly subscribed to that philosophy because we were not financially in a position to pay anyone anything extra, and when you have a large family, you don’t want to institute something you can’t afford. Three kids times four or five weeks of allowance a month adds up quickly and there wasn’t enough to spare, for quite a few years in a row.

But as our financial situation changed over time, so did our philosophy. We had some money to spare and our kids were all big enough to manage household chores. More importantly, we had always stayed true to the “We buy you what you need, you need to save your money for the things you want,” philosophy. It was tough though, because our kids were willing to save their money, they just had no way to earn it. A once-a-year birthday gift might garner them $25 or $50 from a family member or two, but other than that, they wanted to save for things that were “wants” and yet they had no flow of income. They were too young to go out and get a real job.

We also felt strongly that a large part of life lessons and experiences revolve around saving money, setting goals, having money, not having money because you spent it on something previously that you now wish you hadn’t, or better yet, the sense of pride of having set a goal, saved for a period of time, sacrificed not purchasing smaller items, and then walking away with a big-ticket item you bought yourself. Without a flow of income, our kids couldn’t learn any of those types of life lessons.

And so, a couple of years back, we instituted a set of weekly chores and each month I’d cash my paycheck, dole out the next month’s worth of allowance and place it in four weekly piles in an envelope. At the end of the week, if the kids had done their chores they could take their allowance. If they hadn’t, it stayed in the envelope. It was a little bit hard to track though. I couldn’t easily keep track of who had done what, who hadn’t done what, and it was hard to “dock their pay” for not doing jobs. Yet, some kids went over and above helping out with extra-big jobs, and I had no way to compensate them when I really wanted to, just as I would an employee that worked overtime. I also had extra jobs I’d love to see them take the initiative on, but I knew that wouldn’t just happen on their own. Additionally, on many occasions, I’d see a random $5.00-one week’s pay for one child- still sitting in the envelope when I opened it to fill it the next month, and yet no one knew whose it was or who didn’t remember to take their allowance during the month prior. I’d put it back in the envelope for the next month, but I always felt badly that someone lost out on their weekly allowance.

I can't take credit for this, as it was passed along to me and the rest of the Facebook nation this past summer.

I can’t take credit for this, as it was passed along to me and the rest of the Facebook nation this past summer.

This past summer, I saw an allowance idea pass me by on Facebook, and it stopped me in my tracks. I have posted it here on the left, and if it’s yours, please feel free to credit yourself in the comments. When I got it and saved it, I had no idea where it had originated.

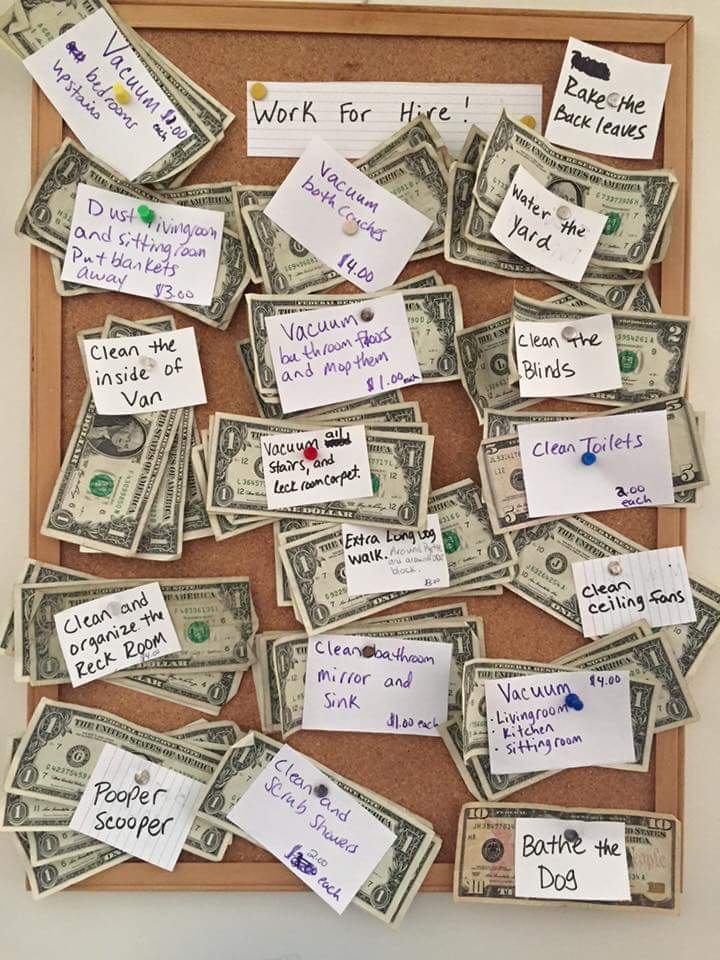
I shared it as well, and my husband saw it and commented on it. We loved the idea of taking the money and splitting it up by jobs, and I loved some of the jobs I saw on there. The photo got my wheels turning, as I began to think of how I could change our own allowance system in order to make it more efficient and more exciting. It was summertime, my downtime, and if I was going to start a new system, now was the time to do it.

I knew I needed something that was easy to manage, something that would allow me to see who had done what and when, and who had taken their money and who hadn’t, and I also needed a way to encourage some extra work, as well as a way to reward those who go over and above when helping out. Additionally, I wanted to throw a couple of things in there that would help to remind the kids of things one of them might struggle with on a daily basis. They’re all too old for a sticker chart, but no one is ever too old to earn a dollar if they remember to do a particular thing before school in the morning or before bed at night, and it is worth more than a dollar to me if it makes the morning rush less of a rush.

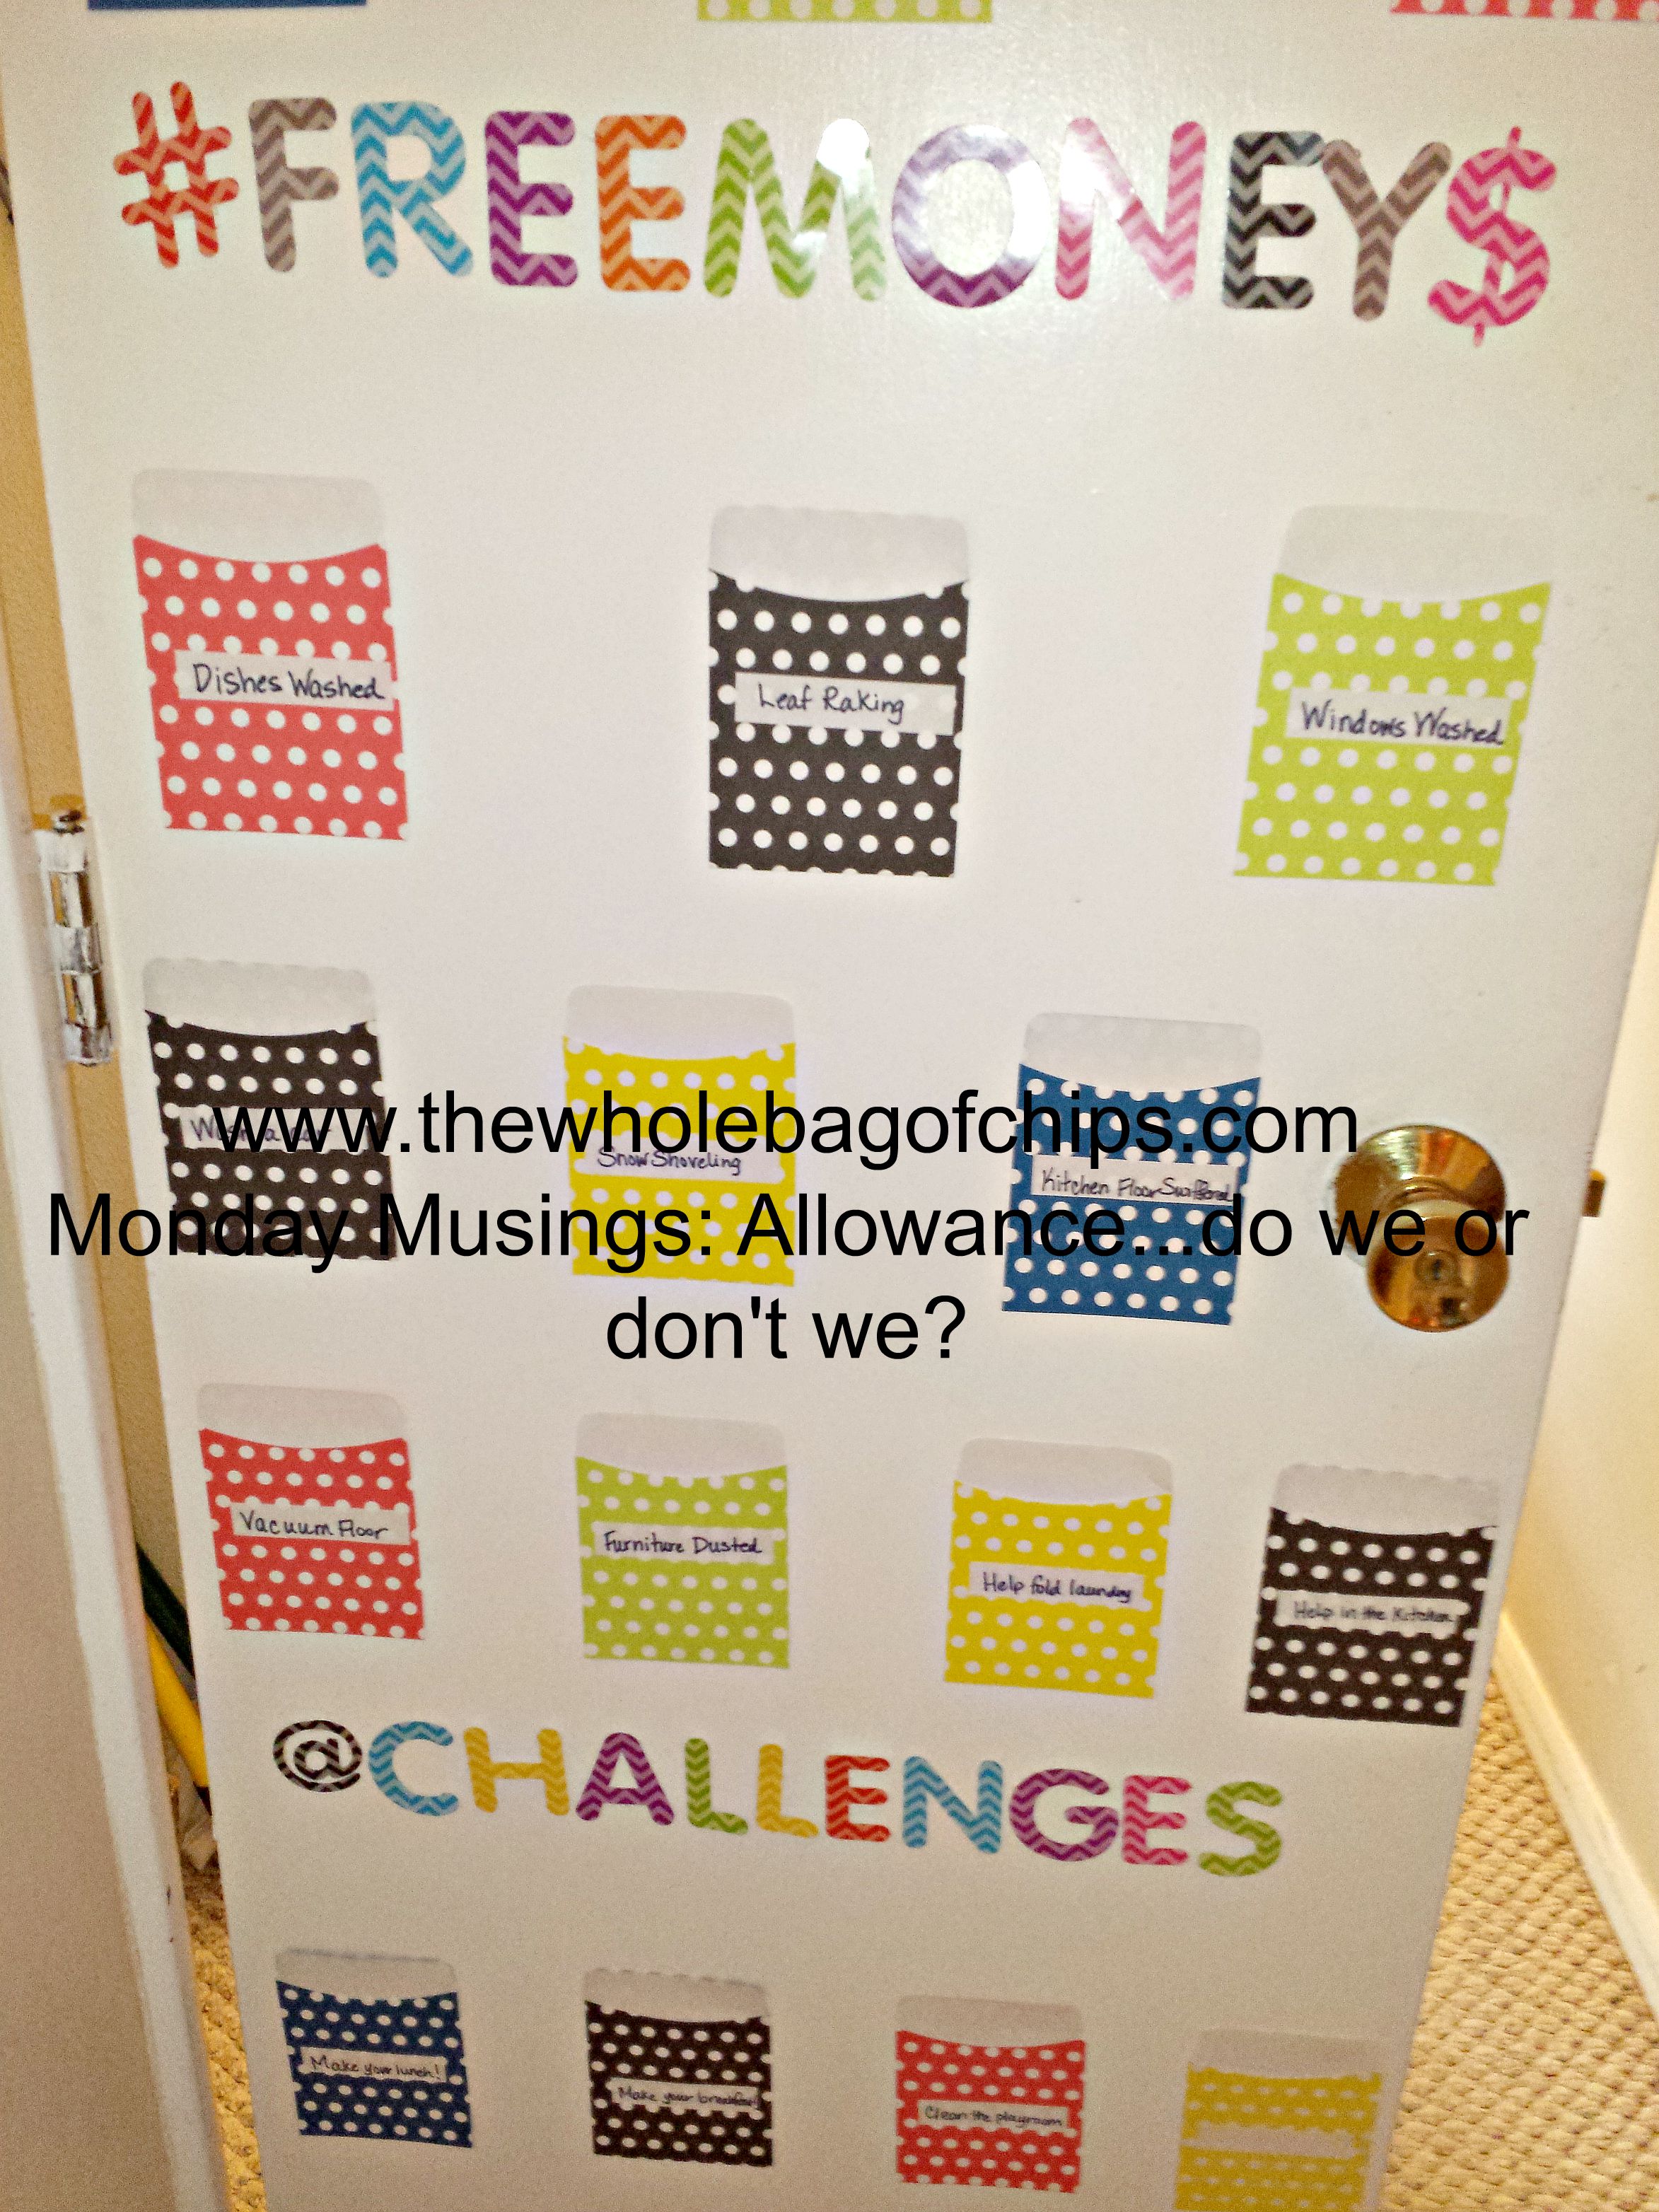
As I drove around town in August, my idea began to formulate in my head. I knew I could very easily go to the local Lakeshore Learning Store and get library book pockets, the kind that used to be inside of library books to house the library card you’d sign your books out with. I also knew I could get a pack of alphabet letters. I had a nice, empty linen closet door right outside their bedrooms, right next to the main bathroom in our house, which is essentially theirs, and solely their job to clean each week. I began to think of my marketing and advertising hooks. I came up with the idea of “Help Wanted” as a title and I liked it a lot. I stopped at Laksehore one day and I was thrilled to see so many colorful options for alphabets and library card pockets. I love pretty things, and nothing helps to motivate kids more than a bright, colorful space (filled with money). I picked out a set of each and a set of adhesive squares to cut up for adhering my letters to the door without taking off any paint. The pockets were self-adhesive. I had some white labels at home that I could use to label the pockets. At the dollar store I grabbed a set of several hundred colored paperclips and I was happy to see that each of my kids’ favorite colors were represented in the pack. Ultra-convenient.

Just before I cashed my August paycheck, I set up our new allowance system, piquing everyone's interest here at home.

Just before I cashed my August paycheck, I set up our new allowance system, piquing everyone’s interest here at home.

One August day, just before school started, and just before I cashed my check, I began to set up my door. The kids helped me punch out letters, but they had no idea what they would be spelling out, at first. I put my “Help Wanted” sign at the top and started by putting my six pockets there for the kids’ weekly chores. Those pockets would be filled (and hopefully emptied) once per week. They were instantly excited.

Then, I added a new section. The alphabet set had an “#” sign, so I thought that was incredibly cute and I used it for my next section: “#Freemoney$” which I hoped would encourage some extra jobs to be done and would let the kids work extra hard if they were saving for something big. I included things that were only seasonal, things I knew wouldn’t take place every week, but I also included things I knew they could truly do at least one time each month. These pockets were filled once to start, but would only be re-filled once they were emptied. The snow shoveling job won’t be done for a long, long time, but yet the leaf raking job might get done next month.

The kids were really on board now, and the pockets weren’t even filled with money yet, nor would they be for another whole week until I got paid myself. This would let them really get pumped up before the money went in, and then they’d have another week until they could take money out; they’d have to complete their weekly jobs first. Looking at my door display however, they saw jobs that weren’t there that they thought I could add on as challenges. There was an “@” sign in the alphabet pack too, so we set up an “@Challenges” section and added in those jobs too. To me, they were similar to the Free money jobs, but I wanted the kids to be invested and involved so I let them create this extra section themselves.

3a

I had to admit, I was in love with my allowance system display and I couldn't wait to see if it worked or not. The kids thought for sure that they were about to be rich.

I had to admit, I was in love with my allowance system display and I couldn’t wait to see if it worked or not. The kids thought for sure that they were about to be rich.

The following week, I cashed my check, counted out $3 per pocket-one dollar per child per pocket- and figured out how much extra I needed to refill the Help Wanted section each week, and then I began to fill the pockets.

In order to address the issue I’d previously had with never knowing who had taken their allowance and whose was still left in the envelope at the end of the month, I used the paperclips. Each child had a color: pink, green or purple. Their color was on their dollar for every job. If they did their job that week consistently, at the end of the week they could take their dollar out of the pocket, remove their paperclip and leave it back on the pocket for me to use the following week when I refilled the jobs. If they did one of the free money or challenge jobs that month they could also remove those dollars and leave their clips. I had worked it so that if they did a particular job that week (like dusting, vacuuming or washing windows for example) they then had to do a different one the following week so that everyone had a turn to earn a dollar doing each job once a month. This would alleviate any arguing as to who had to dust last time or who got off easy by only having to wash the dog’s nose marks off the windows and door; everyone would easily be able to see who’s clip was on the pocket and who still had options to earn an extra dollar.

I'd call the first week a success! I hope that it continues on just as successfully!

I’d call the first week a success! I hope that it continues on just as successfully!

At the end of the first week, they couldn’t wait to take their earned money out of their pockets. Although one of the weekly jobs was putting away their baskets of laundry, only one child’s laundry had come through in the first week, so only she got her dollar, but the next two kids’ baskets will come through in the second week and they’ll get to take theirs, assuming they actually do put it away. If they don’t, the money will sit there until they do, and then they’re welcome to take it.

It’s only been a week, but I love this new system. Once it is set up, it’s easy to see who has earned what, and who can take what, who can’t take a portion of their money that week, and who forgot to pay themselves. It’s easy for someone to set an earning goal and then find ways to meet that goal by doing extra work around the house, and it’s a nice feeling to know that every so often someone will willingly wash a car, wash the floor or help out with raking leaves or shoveling snow. In teaching terms, it’s easy to give no credit, partial credit, full credit and extra credit. I even have one pocket left in case I think of an extra job. Last week we had little cousins in from out of town and I knew they’d be awestruck to see a closet door full of dollars, so I put their names on a post-it note on the extra pocket, and put in a dollar for each of them to take home, as a bonus from us.

As I said above, not everyone’s philosophy for allowance is the same, but for our family allowance is a vital part of learning financial literacy, and it works for us. I am hopeful that this new system will continue to motivate and reward our kids for a job well done, and I hope that it will alleviate some of the management issues we had previously. Our kids know too, if I don’t work for any reason, I don’t get paid, which means they don’t get paid either, since my job pays their allowance and all their extra-curricular activities. We talked about that at the start, and they know that if something should happen and I lose my income and they lose theirs, their weekly jobs still get done, because ultimately we are truly a team and we do all pitch in to get the jobs done. That’s what being a family is all about.


Fun Friday: Crazy for Crust’s Homemade Brownie Mix

21 Aug

Today’s post is one that started out as something we were using for our cross country trip, but we’ve used since returning home also, and I plan to continue to use it at home, especially during the crazy school year weeks.

I had been looking for a pre-made brownie mix that I could duplicate to take along with us on our trip so that I would have an easy to make dessert on hand all the time. We were bringing five mugs with us so that we could make Nutella mug cakes, and I had the ingredients for that, but I didn’t want to have to have a lot of other ingredients on hand because our pantry was small. As I searched, I came across a homemade brownie mix that could be made up ahead of time, stored in an airtight (mouse tight and ant tight) container and only the wet ingredients would need to be added. I decided to make a double batch of the mix. I wasn’t sure we’d even use it, but I thought it would be good to have on hand. Our oven in the RV was tiny, so I brought a 9×9 square baking dish, as it was an option for the recipe as were 9×13 and loaf pan sizes.

brownies 2The recipe I chose was from the Crazy for Crust website, and you can visit it here to take a look around. We made up our double batch of the mix before we left and put it in an easy to store container that would fit into our pantry. I made sure to print out the recipe which contained the details for adding in the wet ingredients as well as the dish size options and the bake times. I put the directions into an envelope with the flap cut off and taped it to the top of the container for future reference.

brownies 1While we were on the trip, we decided to try out our oven. We’d gone many nights without dessert, and on other nights we’d had mug cakes, we’d had ice cream, but now I wanted to give baking a try, and we were really craving something good.

I found the recipe very easy to use, very quick to prep because we’d done the dry mix ahead of time, and as I mixed it all together, it looked thick and fudgy, just as a brownie mix should. We put everything in the pan, put it in the oven and I crossed my fingers.

Brownies 5A little over 20 minutes later, our brownies were done! They looked and smelled delicious, and we were thrilled that they tasted delicious also! Our first-ever baking experiment in our camper’s oven was a success, but more than that, I’d found a perfect brownie mix to keep on hand at home for future use. So often we need a last minute dessert and don’t have a mix on hand to throw together. I recently used this mix to make another couple of batches of brownies at home: a 9×13 and 9×9 batch at the same time, and there is still a little bit of dry mix left over!

I can’t wait to make another batch of this homemade brownie mix, and I can’t thank Crazy for Crust enough for sharing their recipe with us! I hope you’ll pay their site a visit so that you too can have the best homemade brownie mix ever. It’s a great, user-friendly recipe for kids and adults alike. You can see some amazing photos of their own freshly baked brownies while you’re there checking out the recipe!

20150728_202955

#crosscountryadventure2015: Final Cranston Herald newspaper article

13 Aug

SD to RI quilted map 1So here it is…the last Cranston Herald article about our trip. This is the seventh article in the series of seven, and it will share with you our final week of cross-country adventures. One might think that with so many days of driving in a row and no sightseeing that there might not be much to tell, or many adventures to have, but surprisingly enough, there were many things to share from that last week of travel. It was actually my longest article of the seven. This final article also summarizes our trip and you’ll see how it played out budget-wise as well. I hope you’ve enjoyed the articles! If you’ve missed any you can scroll back through the blog and you’ll find them all posted. Click here to read the last one.