Archive | Recipes RSS feed for this section

What’s For Dinner Wednesday: DIY Pasta

14 Aug
Choose your own toppings. You can have all of it, some of it or none of it!

Choose your own toppings. You can have all of it, some of it or none of it!

I know I’ve said it before, but it’s awfully hard to come up with new and exciting meals AND please the taste buds of five different people.

Last week we were having the “what to have for dinner” dilemma again. It was a nice night and warm, so we didn’t want to heat up the kitchen a whole lot by turning on the oven.

Don looked around and sized up the refrigerator and pantry situation.

It was looking like pasta.

Again.

But wait! Not just plain old pasta. Not again. Not this time. Even though plain old pasta would make a couple of people pretty happy, there were others of us who were craving something bigger and better.

So Don came up with a compromise.

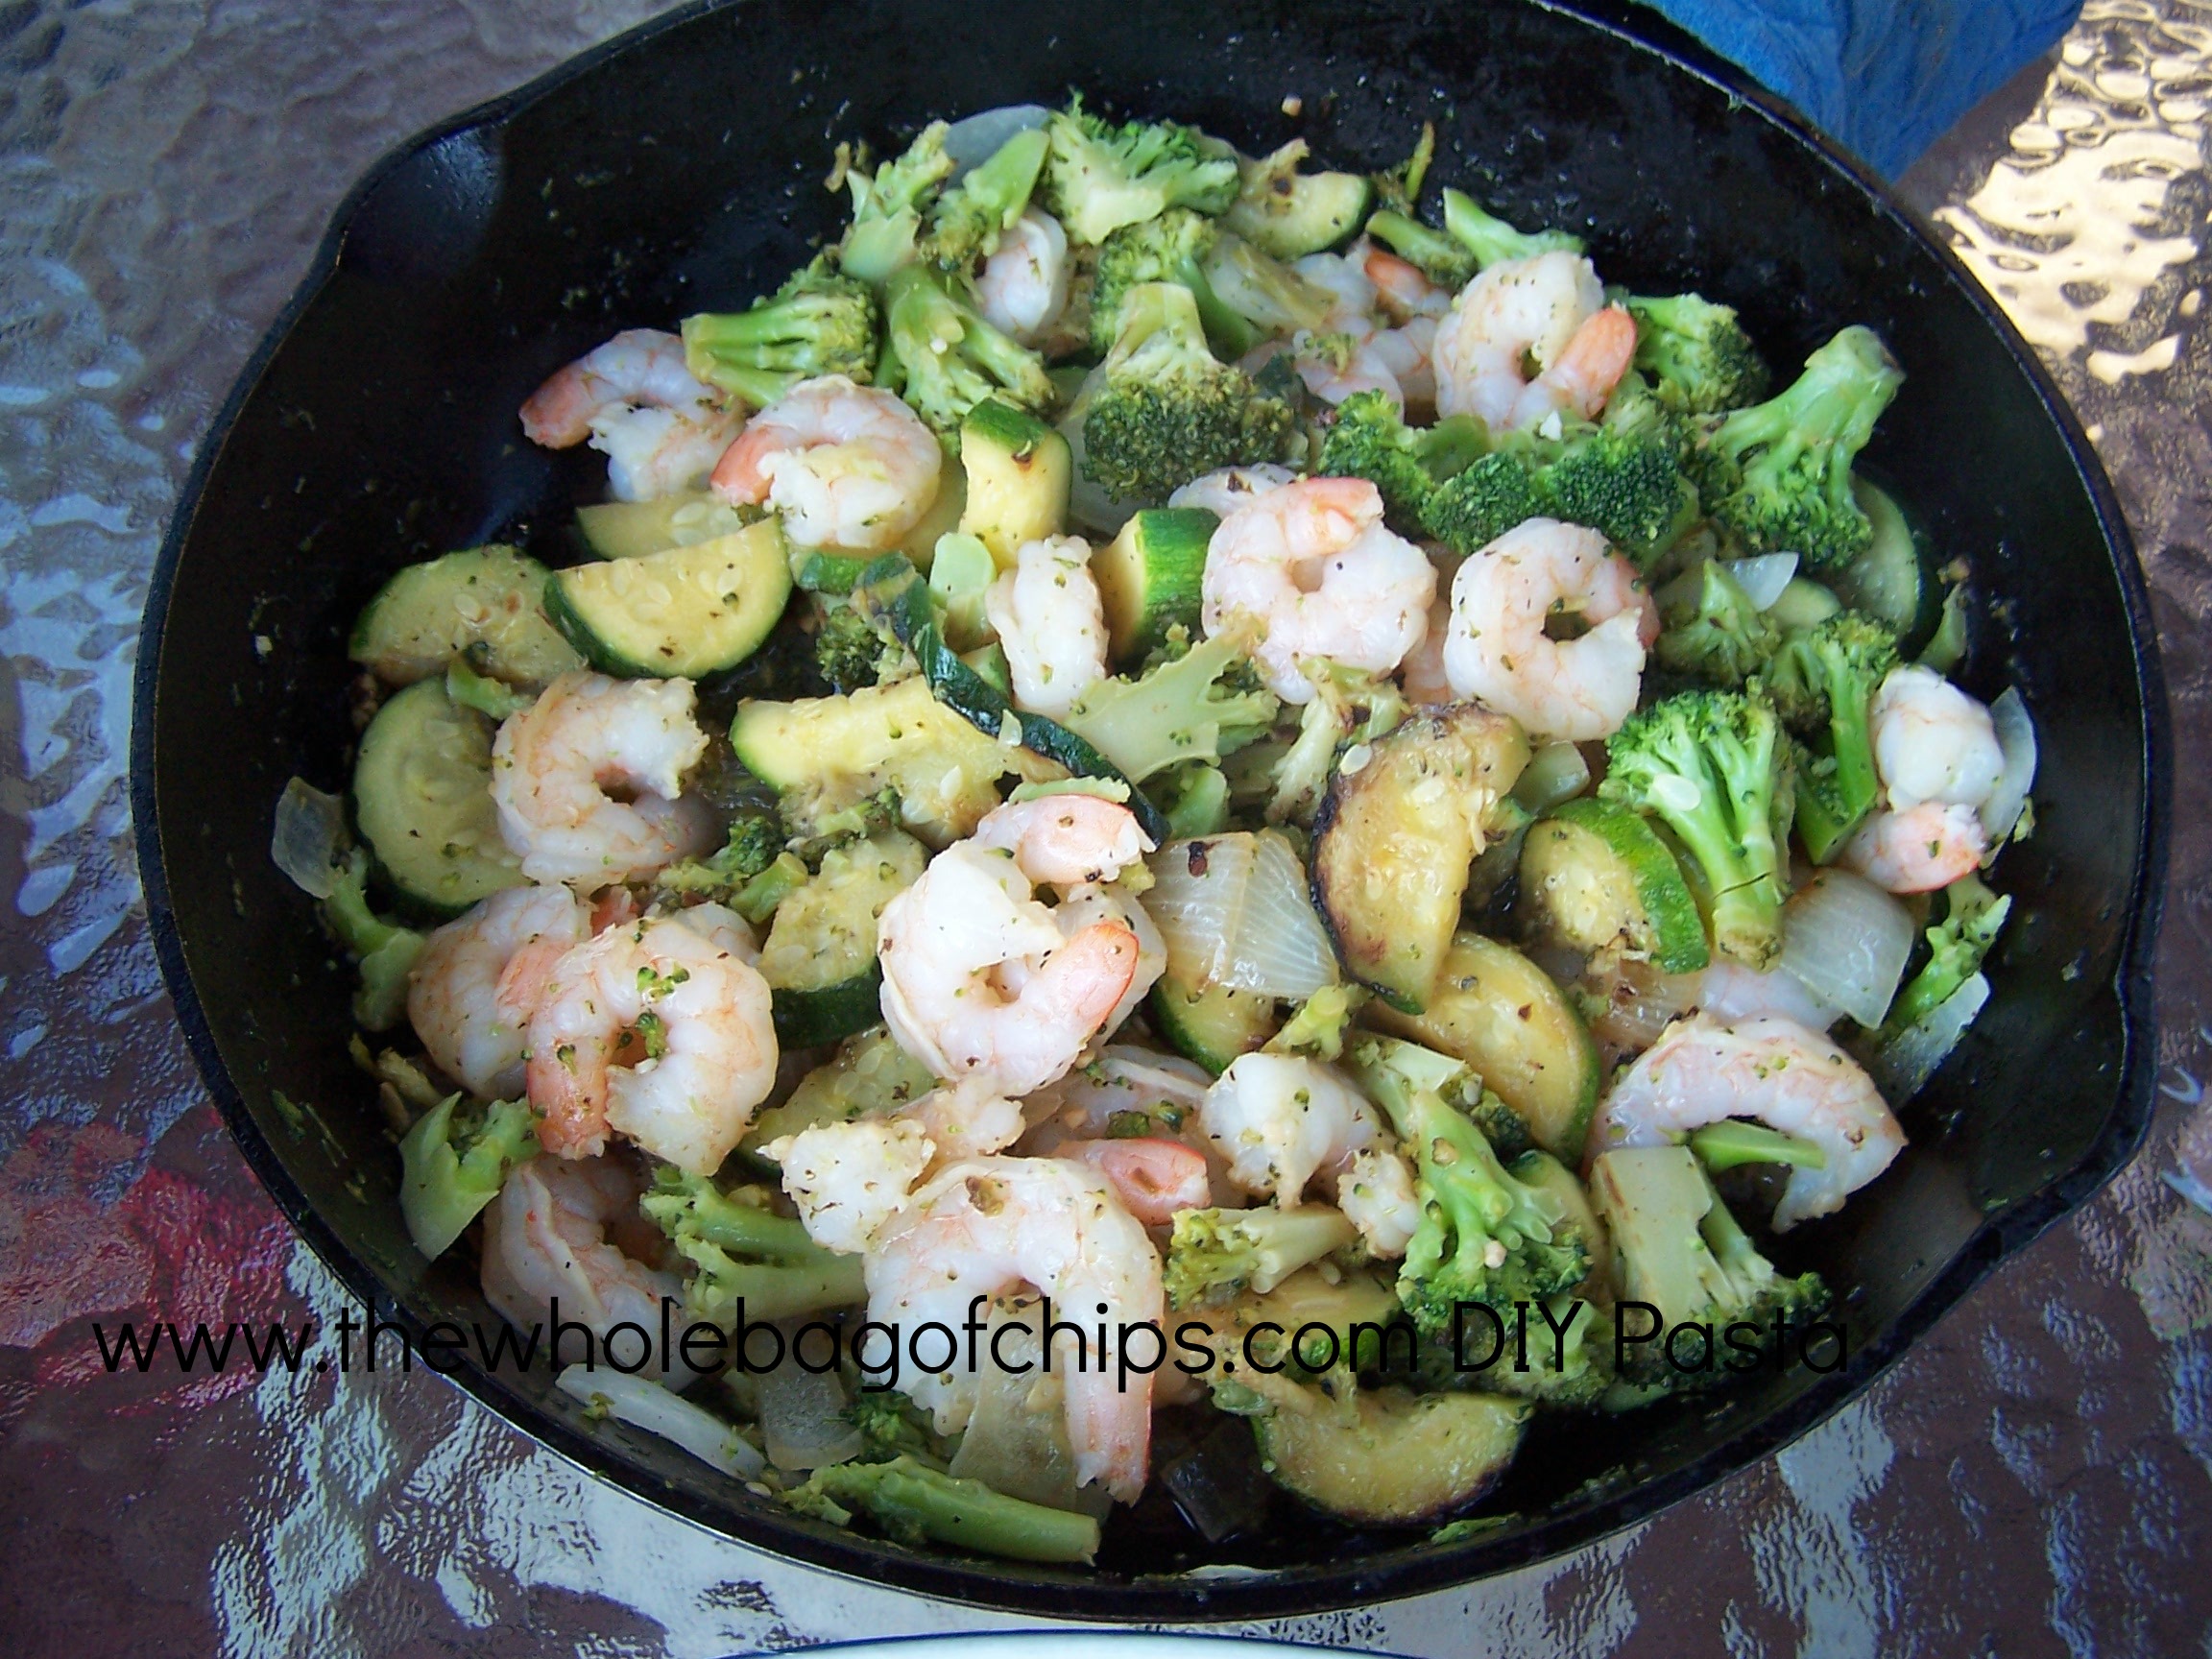
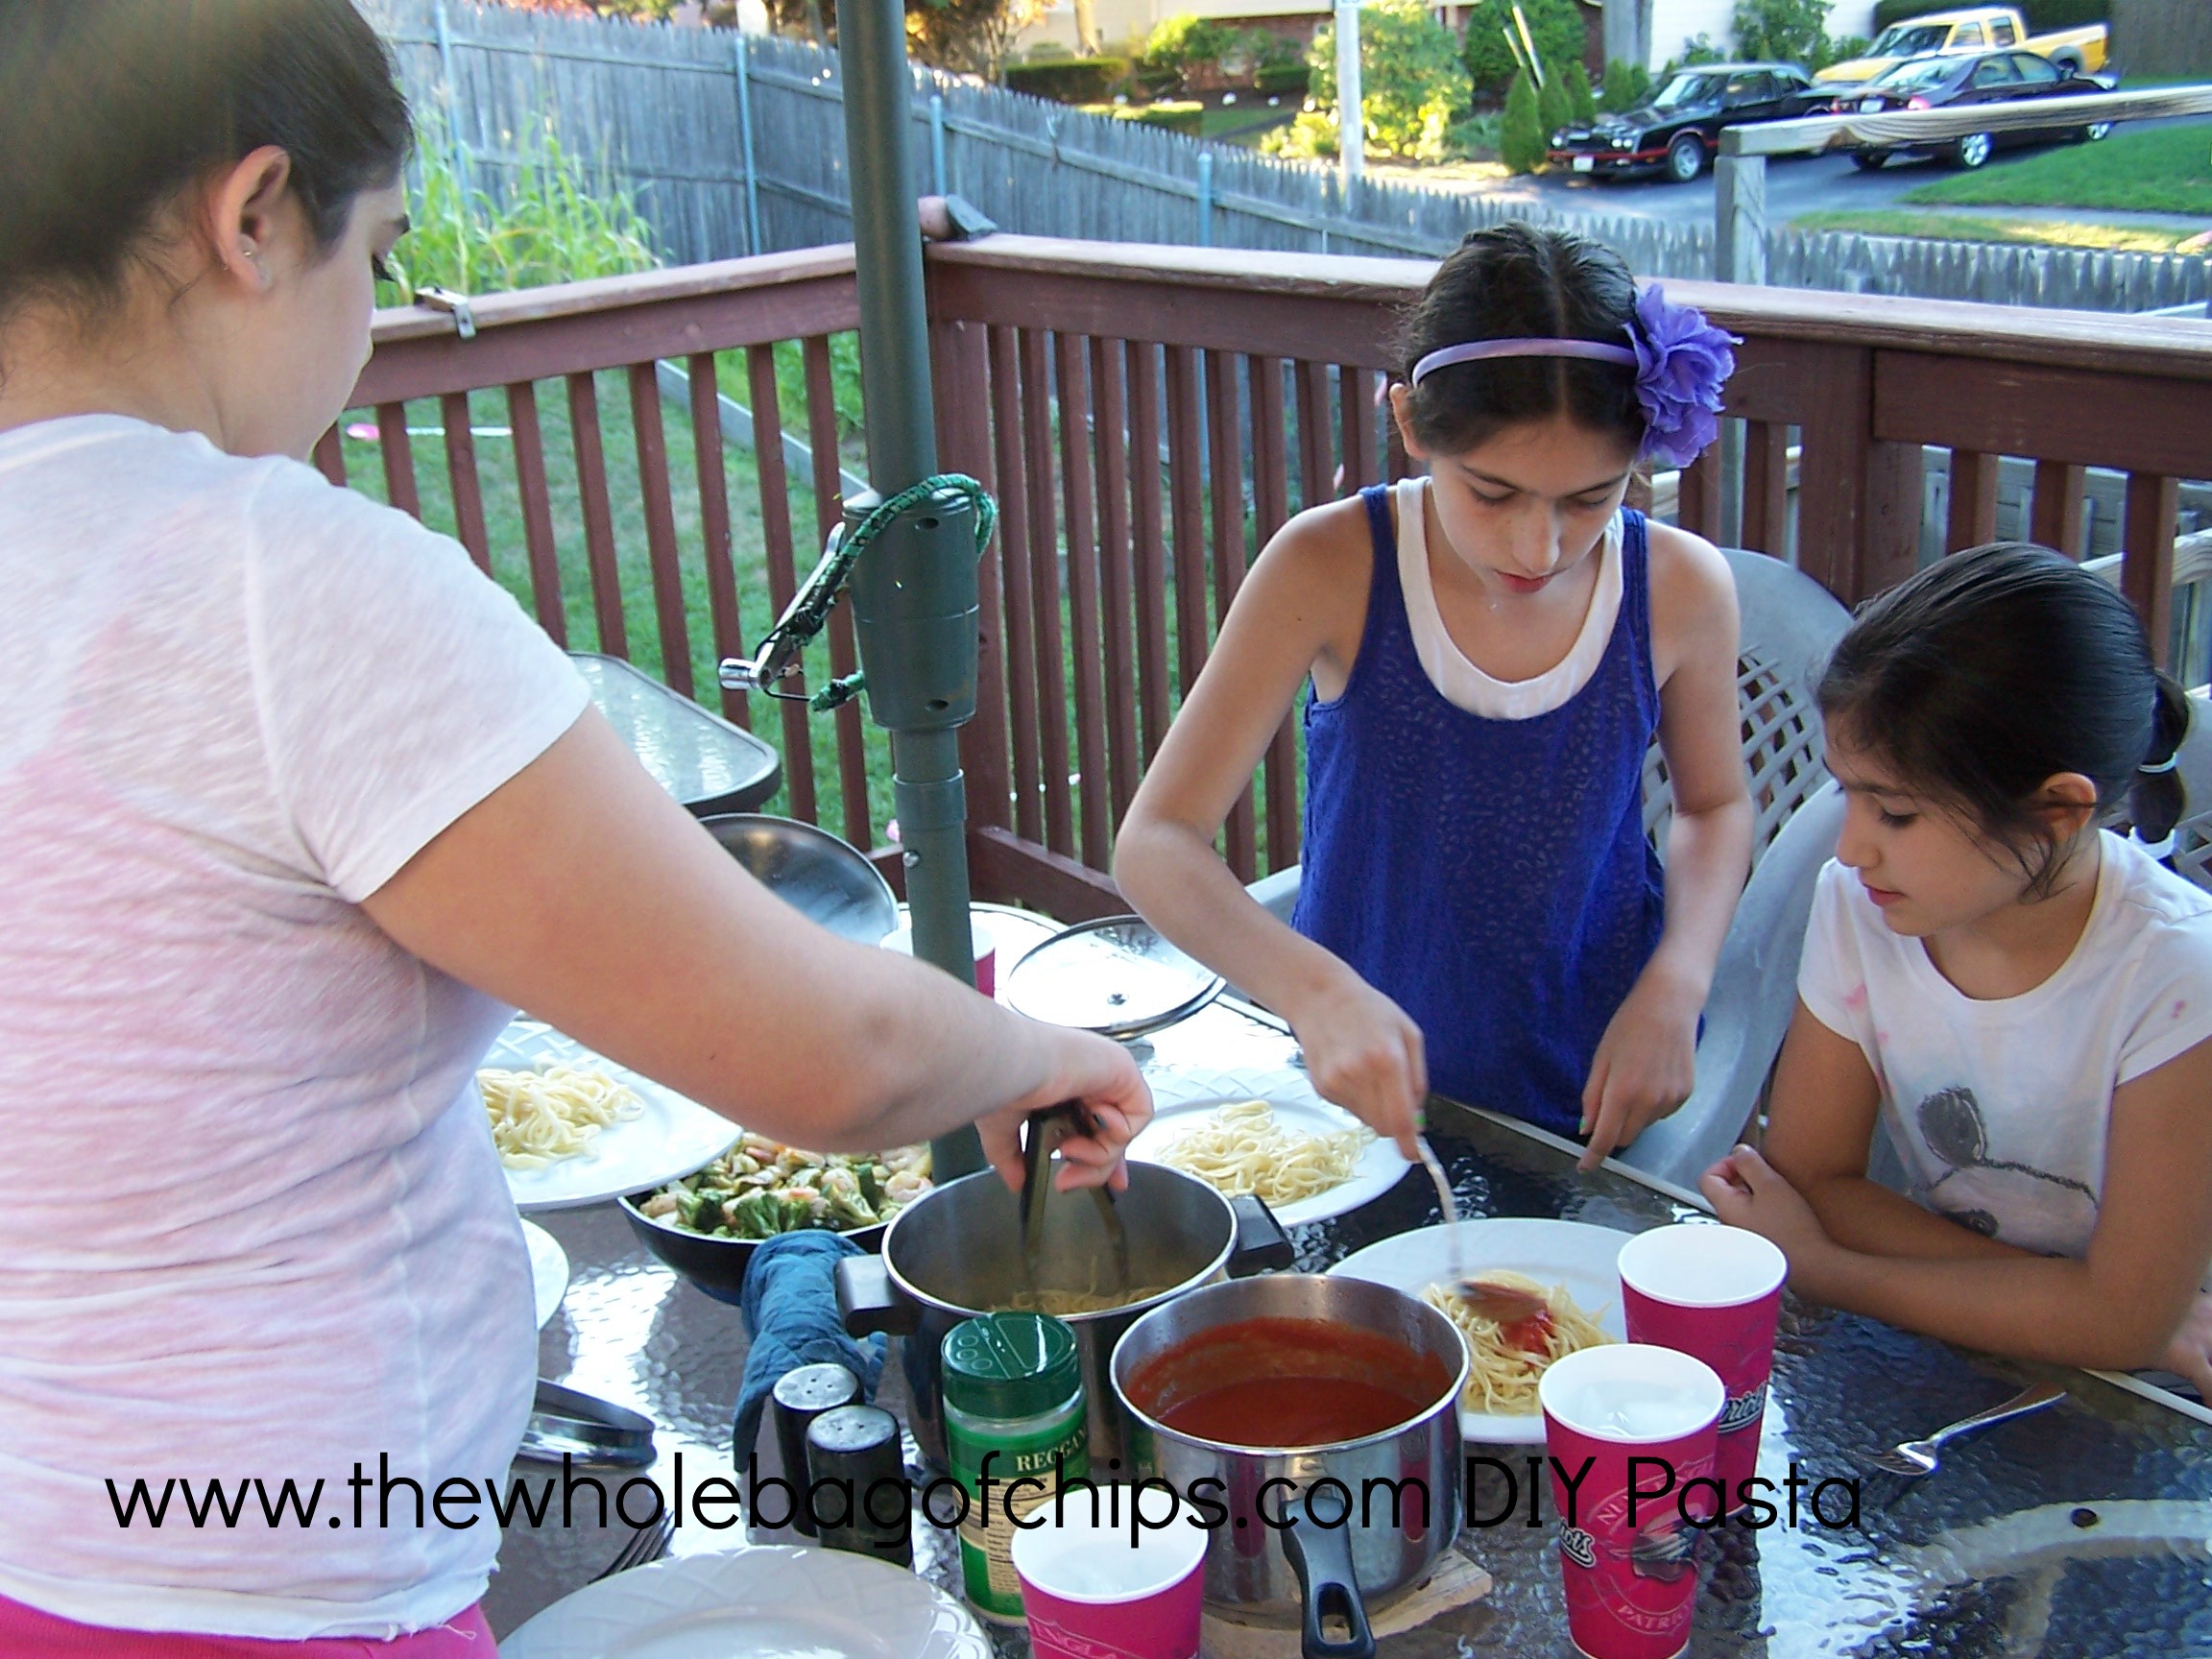
DIY Pasta. A pasta bar of sorts. Build-your-own pasta dinner.

He boiled up some linguine, made up a quick marinara sauce.

I liked it all!

I liked it all!

Then, he sauteed some shrimp and veggies; a whole bunch of different veggies all mixed together. He used Valerie’s cast iron skillet to cook them up.

The house was smelling wonderful!

And the best part: we were going to be eating outside on the deck, a favorite summer treat that we do as often as we can.

Once everything was finished and ready to go, we lined it all up on the outdoor table in a row.

You could have plain pasta.

You could have pasta with sauce.

You could have pasta with sauce and some veggies or lots of veggies or veggies and shrimp!

You could add cheese on top, or not.

It was truly a customized meal, and it was fun to watch the kids build their pasta dishes.

I, of course, ate it all. I took linguine, added sauce, and threw my shrimp and veggies on top with some cheese.

It was another A+ meal by Don, and we all enjoyed whatever part of it we chose to eat.

So if you’re looking for something fun and different this week, look around your pantry and  your fridge and see what you can throw together to create your own DIY meal!

The kids had fun building their own pasta dinners!

The kids had fun building their own pasta dinners!

What’s for Dinner Wednesday: Tracey’s Pork Schnitzel

7 Aug
This was a delicious new meal for us!

This was a delicious new meal for us!

My mom discovered the Tracey’s Culinary  Adventures blog several months ago and since then she has tried some of her recipes. When she loves them she passes them on to us. Tracey also happens to be a local blogger so I enjoy sharing her blog with others.

Today’s recipes is one of those that my parents tried and loved, and sure enough we loved it too.

When my they tried Tracey’s Pork Schnitzel, they made just one change. Here is what my mom wrote to me:

“We tried this tonight and thought it was a winner. The only thing we did different was to deglaze the pan with white wine and lemon juice once the pork was cooked and out of the pan. Then we poured that “sauce” over the pork.” 

Don did the same thing when he cooked our meal and it was wonderful. I served this with couscous, homemade applesauce, and sauteed green beans. I’d definitely make it again. We actually purchased thin cut pork chops from Aldi’s so we didn’t need to pound ours at all.

Tracey’s blog is full of great recipes and I encourage you to check it out!

Here is the recipe as she has it on her blog. She had taken it from the May 2013 issue of Cooking Light magazine:

Pork Schnitzel
from Cooking Light, May 2013

4 (4 oz) boneless center-cut pork chops
1/4 cup milk (I used 1%)
1 large egg, lightly beaten
3/4 cup plain breadcrumbs
2 tablespoons chopped fresh parsley
1/2 teaspoon garlic powder
1/2 teaspoon ground black pepper
1/2 teaspoon salt
2 tablespoons olive oil

Using a meat mallet (or whatever you have – a skillet or rolling pin would be fine), pound each of the pork chops until they are 1/8-inch thick.

In a wide, shallow dish, beat the milk and egg with a fork until combined. In a second dish, stir together the breadcrumbs, parsley, garlic powder, and pepper. Season the pork chops on both sides with the salt. Dip in the egg mixture, coating both sides and letting the excess drip off, then transfer to the breadcrumb mixture, covering each side with an even layer.

Set a large nonstick skillet over medium-high heat. Add 1 tablespoon of the oil and heat until shimmering. Place two of the pork chops in the pan and cook for about 2 minutes on each side, or until the coating is golden brown and the pork is cooked to your desired doneness. Transfer the pork to a plate and tent to keep warm. Repeat with the remaining tablespoon of oil and the remaining two pork chops.

Fun Friday: Have you ever tried these?

2 Aug
One of our summer dessert experiments: Ice Cream Cone Cupcakes

One of our summer dessert experiments: Ice Cream Cone Cupcakes

I can’t be the only mom who’s seen these everywhere, can I?

Cupcakes.

Ice cream cones.

Ice Cream Cone Cupcakes.

It sounded easy enough when my kids asked if we could try these and take them to one of the concerts on the beach this summer.

It was going to be Elizabeth’s birthday that night and we thought that’d make a great treat for her and for the rest of the kids who would be joining us at the concert.

I made cake batter and frosting. I had cones, food coloring and cherries. Elizabeth asked if we could make the cake batter marbled with the food coloring to make it look like “Crazy Vanilla” ice cream, a flavor at our local ice cream spot.

How hard could this be?

Silly question.

These look near-perfect in the photo, but I definitely had some issues. If anyone has ever made these before, I’d love to hear some comments with tips or suggestions!

Problem number one: leaky cones!

Problem number one: leaky cones!

My first problem was that the cake batter leaked out of many of the cones, filling the tins.

The cake batter was cooked, and swirled as Elizabeth had requested, but some of the cones were now half-full and then had these little muffin top type things around the bottom.

They almost went in the trash.

The kids stopped me before I got there. They were still cupcakes they said. They would still taste good, they said. Let’s just keep them, they said.

So we did.

I added food coloring to the frosting and gave them each a color and a bowl of cherries to decorate their cupcakes.

They were done! So pretty. Ready to go.

Which leads me to Problem Number Two.

How would one transport these pretty little ice cream cone cupcakes?

I had a cupcake carrier, which I planned on using. However, keeping them standing upright proved to be a difficult task.

Impossible actually.

By the time we got ourselves onto the beach they had all fallen. I’d even tried wrapping them in foil around the bottom to fill the tins, in the hopes it’d keep them from falling over.

I’d call this an Epic Fail, a term my kids often use.

But they weren’t all bad. The kids all ate them anyway. Upside down, sideways, leaky or not, they were still a cupcake. Still frosted with a cherry on top (or next to). They still tasted good, or so they said.

So would I make these again? I think so.

Anyone out there have any ideas, tips or tricks for me?

A delicious weekend breakfast: Baked Eggs

29 Jul
These were absolutely fabulous!

These were absolutely fabulous!

This past Saturday I was in the mood for something different for breakfast. I wasn’t sure what, but I knew I didn’t want the same old thing.

While I was pondering what I was in the mood for, I remembered that when my kids slept over my parents’ house last, they had mentioned a new baked egg breakfast they’d tried. My mom found it in “Dash” magazine, and it had ham in the muffin cups with the eggs cracked inside, and parmesan cheese sprinkled on top. The kids had loved it and I’d been meaning to try it here ever since.

At the same time, I also remembered that Alex’s new “High Five” magazine had come in the mail this week, and that coincidentally, the recipe had been one for baked eggs as well. It was slightly different in that it didn’t call for ham on the bottom but instead had diced tomatoes and shredded cheese.

So, I decided to combine the two recipes. The bake time and temperature was the same for both recipes. The only difference was the ingredients and we liked everything the two recipes called for.

They.Were.Amazing.

Fabulous.

Delicious.

We loved them.

I highly recommend you try these out the next time you are craving something different for your breakfast. They’d even be great for a brunch.

Fast, easy.

Into the oven they went. One pan, couldn't be any easier!

Into the oven they went. One pan, couldn’t be any easier!

Here’s what I did:

1) Spray each muffin well with nonstick spray.

2) Place a slice of ham in the bottom of each muffin well. I actually used deli ham that was sliced in half. One half into each spot.

3) Place about a teaspoon or so of diced tomatoes on top of the ham. (One large vine ripened tomato was enough for all 12 portions.)

4) Sprinkle some shredded cheddar cheese over the tomatoes. (I used nonfat cheddar.)

5) Break one egg into each spot.

6) Sprinkle a little bit of salt and pepper on each.

7) Bake at 350 degrees for 18-20 minutes or until the yolks are as firm as you desire and the whites are cooked through.

Serve with toast or an English Muffin if you’d like.

What’s for Dinner Wednesday: Strawberry English Muffin Fruitwiches

24 Jul
English muffins: not just for breakfast!

English muffins: not just for breakfast!

A while back I posted about Elizabeth’s cookbook and I posted one of the recipes we’d tried at the time, a tuna salad recipe. Since then we’ve had it for lunch and even for dinner!

Today, I thought I’d post another recipe from that same cookbook, one that we have had for lunch and for dinner this summer, and one that we’ve also modified slightly to meet everyone’s different taste buds. It’s a great summer meal because it is cool, doesn’t involve using an oven, and uses a great summer fruit: fresh strawberries.

The ingredients for this are simple, no matter which way you choose to make it. You need:

Fresh sliced strawberries

an English Muffin

Strawberry jam

Goat cheese, cream cheese, or peanut butter

Elizabeth's cookbook of choice

Elizabeth’s cookbook of choice

The directions are even more simple!

“Split an English Muffin and lightly toast the halves. Spread the cut side of the bottom half with softened goat cheese or plain whipped cream cheese (we also have done peanut butter). Top with a thin layer of strawberry jam, followed by a layer of thin strawberry slices. Cover with the top half of the muffin, jam side down, and press gently.”

We prefer to do open-faced sandwiches, in order to have more fresh strawberries! This sandwich has been a hit every time we’ve served it, and it’s easily modified for everyone.

Next time you’re looking for a summery lunch or a cool dinner (or maybe even a yummy summer breakfast,) give these English Muffin Fruitwiches a try!

What’s For Dinner Wednesday: Grilled Caprese Portobello Mushrooms

17 Jul
A yummy addition to our summer meal menu options!

A yummy addition to our summer meal menu options!

We are on our second heat wave this month. When you’re in the midst of a heat wave like this, sometimes you don’t feel like cooking. Or eating.

Scratch that. I almost always feel like eating, even when it’s hot.

But what to eat becomes the question. You don’t want to turn on the oven and sometimes it’s even too hot to grill outside, because when it’s 100 degrees, do you really want to stand over a hot fire?

Sunday was that kind of a night. What to eat? What to cook. Don listed everything in our fridge and freezer but nothing sounded appealing. He’s never that thrilled when I say no to everything we have.

On this night however, it was a good thing that I didn’t want anything we had on hand. We ended up trying a great new recipe from the Sugar Free Mom blog and loving it!

I know I’ve mentioned Brenda’s blog before, but if you haven’t visited it yet, now’s a great time to do so. The recipe we tried was for grilled Portobello mushrooms made Caprese style; a great summer menu addition. Another friend of mine posted the recipe on Facebook and I knew immediately that this meal was in our future.

We bought three Portobello mushrooms, (we knew not everyone would like these so we only bought for those who would), some mozzarella cheese to slice and some good-sized tomatoes to slice up as well. Rather than grilling the mushrooms, Don cooked them in our cast iron skillet, and they were fabulous! We served ours with a side of macaroni salad and corn on the cob. A perfect summer meal.

Give Brenda’s blog a visit, and try out her recipe! I know you’ll love it, and  you’ll love her photos.  Her Portobellos were much prettier and more photogenic than mine!

Her recipe is below.

100_5874

We did not have fresh basil on hand so we used dried instead.

  • 6 large portobello caps
  • 1 teaspoon salt
  • 1/2 teaspoon garlic powder
  • few cracks of pepper from peppermill
  • nonstick olive oil cooking spray
  • 6 ounces mozzarella, sliced into 6 pieces
  • 1 large vine tomato, sliced into 6 pieces
  • 2 teaspoons extra virgin olive oil

Directions

Wash the mushrooms and drain them on paper towels upside down then pat dry. Turn them upright. Spray the mushrooms with nonstick cooking spray. Sprinkle 1/2 teaspoon salt and garlic powder over the mushroom caps. Add a few cracks of pepper then place the seasoned side onto a medium high grill or grill pan. Follow the same procedure for the bottoms of the mushrooms and allow to cook for 2-3 minutes on one side before flipping over. Top each mushroom cap with one slice of tomato and cheese. Close the grill for 1 minute to let cheese melt slightly. Place caps onto a serving plate. Add one large basil leaf to each cap. Drizzle extra virgin olive oil over the tops, season to taste with more salt and pepper if desired and serve warm or room temperature.

A great summer snack: Honey Yogurt Fruit Dip

15 Jul
This is a great dip for a summer day!

This is a great dip for a summer day!

The summer is flying by! I can’t believe the Fourth of July is well past us and it’s mid-July already.

We have been super busy, celebrating the holiday, Elizabeth’s birthday, spending time with family and even celebrating Christmas in July last week.

My blog posts have been sporadic, as promised!

But, I wanted to take some time to share with you a new dip that we tried out recently. A while back I’d posted a similar dip but it used 1/4 cup of sugar, which I always found to be a lot. It was delicious, don’t get me wrong…I’d eat it with a spoon if I could, but it was a lot of sugar nevertheless.

Recently I found this dip in the April 2013 issue of Good Housekeeping, which uses honey instead of sugar and the flavor is similar. We tried it out with some summer fruits and it was wonderful. I thought I’d share it with you today so that you can give it a try also.

I hope that you are enjoying your summer as much as we are!

HONEY YOGURT FRUIT DIP

3/4 cup plain yogurt  (we use fat free or low fat yogurt)

3 TBSP. Honey

1/4 tsp. vanilla

Serves Four

What’s for Dinner Wednesday: Fajita Quesadillas

10 Jul
Fajita Quesadilla veggies

I love the look of fresh vegetables when they’re mixed up and cooking!

ORIGINALLY POSTED JANUARY 25, 2012:

Today’s recipe is again, one that I did not grow up with! Imagine that, four recipes in two days, and not one of them was from my childhood! This recipe is a combination of recipes from two different people and it makes a great meal or an appetizer for a football game.

We actually had never had quesadillas at our house until about four years ago or so. Elizabeth had a friend at preschool whose house we used to go to for playdates often. My friend Jody used to make cheese quesadillas a lot when we went over for playdates. (In fact, this past fall I featured my friend Jody’s Butternut Squash Soup, which was also a playdate lunch. And just so you know, my traditional playdate lunch at my house is mac & cheese from a box with chicken nuggets. we were spoiled at Jody’s!)

Anyway….we started making quesadillas at our house on a regular basis. You can put anything in them so we’ve done just cheese, chicken and cheese, tomato/chicken/cheese, peppers/beef and cheese, and we’ve done bbq chicken/onion/cheese. However, on New Year’s Eve this year my sister in law Jessica made us Fajita Quesadillas which had all kinds of peppers, mushrooms, onions and cheese, and they were so fabulous!! We had to try them at home. So last week, we had them.

Cook up some chicken tenders first. Then shred or dice the cooked chicken.

My sister in law and I are both lucky because we both live near an Aldi’s and you can get everything you need for your Fajita Quesadillas at Aldi’s.  The ingredients vary, depending what you’d like in your quesadillas. You need soft flour tortillas, we use the large ones.

This is another meal where I pull out some frozen chicken tenders, so convenient! Cook them up if you’d like chicken in your quesadillas.

While your chicken is cooking, grate a bowl full of cheddar cheese (a block of cheese is usually plenty.) Slice up your veggies and cook them on top of the stove.

We use a countertop griddle to make our quesadillas two at a time.

Once you’ve got your ingredients pre-cooked, you’re ready to begin the last step. Butter your soft flour tortillas on one side and lay it on the griddle, in a frying pan, or use a Quesadilla Maker (which we do actually have also, but we prefer the griddle most of the time because we can make two at a time.)

Butter one side of the top flour tortilla and place it on top of the others on the griddle and flip (we have a big metal spatula for flipping!)

Once both sides are golden brown and the cheese inside is melted, you’re ready to cut your quesadillas into triangles and eat them!

finished quesadillas

Once the quesadillas are golden brown, cut them into triangles and eat!

A Sweet Treat for a Summer Snack

8 Jul
These barely had any time on the plate before they were devoured!

These barely had any time on the plate before they were devoured!

We tried a new snack recently. I’d seen a recipe somewhere for chocolate covered apricots. I love dried apricots, and I love chocolate, so I thought this would be worth a try. When the time came though, I couldn’t find wherever it was that I saw the original recipe so I Googled them and came up with one from About.com. It called for nuts, but I omitted the nuts and doubled the recipe since I had two bags of apricots to use.

The recipe was fast and easy and made a yummy snack. I’d definitely make them again. There are lots of fruits you can dip in chocolate including strawberries and bananas. I’ve also seen recipes for chocolate dipped kiwi, and since my kids love kiwi I thought I’d try that in the future too, so be on the lookout.

In the meantime, here’s the recipe as we tried it from About.com, modified for our nut-free preferences.

Enjoy!

I melted my chocolate in a double boiler on top of the stove.

I melted my chocolate in a double boiler on top of the stove.

Ingredients: (we doubled this recipe)

  • 24 whole dried apricots
  • 2 ounces (1/2 cup) toasted almonds, finely chopped
  • 6 ounces dark chocolate

Preparation:

1. Prepare a baking sheet by lining it with aluminum foil. Place the chopped almonds in a small bowl. (if using)

2. Temper or melt the chocolate in a medium bowl. (I did a double boiler on top of the stove.)

3. Holding an apricot by the tip, dip most of the fruit into the melted chocolate, swirling to ensure even coverage. Remove it from the chocolate and drag it along the lip of the bowl, removing excess chocolate.

Dried apricots are a pretty healthy snack, before you add the chocolate! We used semisweet chocolate.

Dried apricots are a relatively healthy snack, before you add the chocolate! We used semisweet chocolate.

4. Pat both sides of the chocolate-dipped apricot on the chopped almonds, covering both sides with nuts.

5. Place the candy on the prepared baking sheet, and repeat for the remaining apricots.

6. Place in the refrigerator to set the chocolate for approximately 10 minutes. If the chocolate has been tempered, the candy can be served at room temperature, but if it has not, it should be kept refrigerated until served.

What’s For Dinner Wednesday: Macaroni & Shrimp Salad

3 Jul

This macaroni and shrimp salad is something we look forward to all year long!

ORIGINALLY POSTED JULY 11, 2012: 

If you’re like me, you’re always looking for the perfect side dish to go with the cook-on-the-grill type of meals that happen all summer long. Today’s recipe is one of those perfect side dishes.

As always, it’s super-easy and super-delicious. And as is typical, it’s originally from my mom. She’s been making it ever since I can remember and we’ve been making it on our own for years as well.

You can tell that this photo is of my dish because I actually do put my tomato/cucumber/olive salad in a separate bowl so that nothing runs together, and also because I eat absolutely nothing on my hot dogs. I barely eat the bread. But, I eat every speck of that macaroni salad!

Try this recipe out for your next cookout, I know you’ll love it as much as we do!

MACARONI & SHRIMP SALAD

INGREDIENTS

2 cups elbow macaroni (in general we use a one pound box of pasta and adjust the rest of the ingredients accordingly as well.)

2 stalks celery, thin sliced

1 can tiny shrimp, rinsed

3/4 cup Miracle Whip

celery salt to taste

cayenne pepper to taste

This is a great side dish to bring to those summer dinner parties and cookouts!

DIRECTIONS

Cook pasta according to directions.

Add in shrimp, Miracle Whip and spices.

Cover and cool in refrigerator completely before serving.

Enjoy!