Archive | Camping RSS feed for this section

What’s for Dinner Wednesday: A grab-and-go meal for any time of day

12 Sep

A new grab-and-go idea from my friend Gina!

I love social media and the ability to find new ideas from people who’ve either thought of them first, or tried them out first, and been successful.

Recently, our friend Gina had shared that she has successfully made ahead and frozen egg sandwiches as a quick grab-and-go breakfast either for school days or camping trips or whenever they’re most needed. She uses Bagel Thins and her family loves them.

I decided that this school year, as soon as I had some time, I’d try out her idea for my family. I always have great intentions, and I can’t always do something like this all the time, but I figure that any time I can be prepared ahead of time, is better than not.

Eight bacon, egg and cheese sandwiches were ready to go.

This past weekend, I was able to get the Bagel Thins and give this a try, and I was so happy when my daughter was able to grab a quick egg sandwich for her breakfast later on in the week, deeming the meal a success.

Gina’s instructions were simple: be sure each part of the sandwich is fully cooled, and wrap in paper towels for reheating. The Bagel Thins bag makes for great storage in and of itself, so I just cooked, cooled, wrapped, labeled and froze.

As I was cooking, my daughter Liz was so excited and before even trying one out, she requested sausage patties for the next time around, so I knew she had high expectations for this trial. I used precooked bacon to cut down on some of the prep time (one slice cut in half per sandwich), and I used my counter-top griddle to cook the eggs all at once. I was able to cook six and then two. I cooled them all on a cookie sheet, which I’d popped in the oven for a couple of minutes first, just to fully melt the cheese.

I hope that I can continue this meal prep idea as it gives us an additional breakfast or on-the-go meal for those times when we want something filling and don’t have a lot of time to make anything.

Storing these right in the bag was super convenient.

I appreciate the sharing of ideas from all of my family and friends, and I love this idea from Gina. I hope that we can continue to make these throughout the school year, along with other grab-and-go ideas for those busy days and nights. I encourage you to give it a try too, if you’re looking for something new for your own family’s busy schedule.

Have a great week!

College Ready: sharing what I’ve already learned (part two)

17 Aug

We spent one full day and shopped til we dropped, hitting three major stores to get the bulk of what we needed. We scored deal after deal.

Earlier this week I shared Part One of my College Ready posts. I don’t know it all, I don’t even know as much as other people know, but in a short time, I’ve learned a lot that I can at least share out. Those who need to know can add it to what they’ve learned, save it for later when they need it, or toss it.

Here’s what I’ve learned: college is expensive, and college needs are expensive. We hear a lot about tuition, room and board, and books all being expensive, but what people don’t really talk much about is the huge expense of getting a student ready to live on campus. Not everyone lives on campus, but if your student is going to, start early saving some money for dorm expenses if you can, and start saving coupons and watching for deals. Get those deals when you can and put them aside if you have to. Shopping for something big like this is like a sport. You need a strategy. Here is our strategy.

Many people know that Bed Bath & Beyond prides themselves in being a go-to for college dorm shopping. (And no, I don’t make any commission off of these posts from them.) When you tour dorms there are often BB&B advertisements in the rooms which have been outfitted by the local store, and you see their ads often on social media, television and in print. Their coupons arrive in the mail regularly: 20% off one item, $5 off your total purchase over $15 and $10 off your total purchase over $30. You can even order all of your dorm room supplies online and have them shipped to the local BB&B near your school so that you can pick them up when you arrive for move-in day.

My advice is simple: save every single coupon. Don’t ever throw them away. They have expiration dates on them but they don’t actually expire. They  will accept them forever, and they let you use more than one per shopping trip. Take every single one of them with you if you choose to shop at BB&B for college dorm needs. More importantly, save every coupon to every store that you get during this shopping time and make the most of the deals that pop up as you see them. You may not realize you need something and you don’t want to throw away a good deal.

We opted to first use any store gift cards our daughter had received as graduation gifts towards her college shopping needs. We advised her to save any visa gift cards for books, since we had a little bit of money put away for shopping already, and to save any Amazon gift cards as well, unless we found something cheaper on Amazon (which we didn’t).  We would combine any gift cards with coupons and then after exhausting that option, we’d use the money I’d put aside from January to June with coupons next. This would not touch the money in her savings account at all, which would be saved for when she was living at school.

She had the most in gift cards at BB&B, then at Target, and although we did not have a gift card to At Home, it was my birthday in August and I’d received a “15% off your whole purchase” coupon. She signed up for their loyalty program and received a “10% off your whole purchase” coupon too, but we didn’t need it. Additionally, we visited Five Below, where everything is $5 or less, and looked to see what we could get there since she had a small gift card there and they have some cute dorm decor items. We planned to save our trip to Walmart for last because although it’s slightly cheaper than Target or BB&B, we would be paying entirely out of pocket with no coupons or gift cards at all, and it ended up being cheaper for us to shop with gift cards and coupons first, exhausting all of those before Walmart.

You can make money-saving magic happen with your coupons if you’re strategic.

Just in our BB&B shopping alone, we saved $100 in coupons (we used a total of 14 coupons in two visits, six one time and eight the next time, and we have some left if we need them) and we used $150 in gift cards, only paying $165 out of pocket total-and only on the second trip-the first trip was totally free. We got the bulk of what we needed there, from a comforter set to all of the under the bed, next to the bed and above the bed storage items. We also got a few decorative items there. We saved $21 at the At Home Store with my birthday coupon, and used $30 in Target gift cards before paying anything out of pocket at either store.

Since we don’t know if we’re 100% correct in everything we’re getting, we are saving every receipt. At BB&B they also told us to save all the packaging for returns as well. A good friend once said to me, “You know, it is possible to over-shop,” and I can totally see how that can happen. There is SO MUCH out there and there are so many suggestions of “must haves.” I tried to look at several lists and compare them to each other, and to listen to other people’s advice as well as knowing what we already had or didn’t have before we shopped. If I saw something come up on every single list and it matched up with what other people told me we’d need, it definitely went on to our list as well. If it was something we already had at home and could spare, we tried not to duplicate. We looked at her room layout to see what we thought would fit, and where. Some things just seemed over the top, or extra. We tried to balance having some cute decor items with having the more functional items first and foremost. Some nice-to-haves are okay, but the must-haves had to come first. We were lucky too, that a friend gave us her daughter’s memory foam mattress pad, which everyone now calls a “must have,” but which is very expensive. (Those didn’t exist when I went to school, I had a foam egg crate topper.) I found this type of shopping to be very similar to when we outfitted our RV for the first time. Function was first and foremost, space-saving was key, and money-saving was of the utmost importance.

So now, we wrap up, picking up the last few little things over the next week or so and then start to pack up and move on out. We’ll see how well we did once she moves in; how on the mark we were, what we still might need or what needs to be returned. Keeping our fingers crossed that we are more on the mark than off!

Fingers crossed…


Missing in action, but for good reasons!

4 Aug

We spent two weeks camping at the beginning of the summer, and enjoying sunsets like this one every night.

Hello and happy August!

Yes, I know it’s August.

And yes, I know I haven’t posted a blog post in a very long time, and I am here to say that although I have been MIA for a while, it’s been for good reasons and that we are all well!

When school ended at the end of June, we had one week and then we were very lucky to head almost immediately into two weeks of vacation for the first two weeks of July. We took the camper to a state campground right here in our very own state for a much-needed Staycation. The timing couldn’t have been more perfect, nor could the location. We had an amazing time enjoying each other, our friends and the treasure that is our home state. So often we feel the need to go away to get away, and although we technically did go away, it was only about a half hour away, but yet we felt as if we were away-away.

We spent two very relaxing weeks reading, resting and getting our energy back from a busy school year, but also getting ourselves ready for a huge kitchen renovation project ahead.

In the meantime, we were getting ourselves ready for a huge project that we’d be in the thick of once we were home from our two weeks. We were going to be finishing up a kitchen renovation project that we started, somewhat unexpectedly, last February 2016.

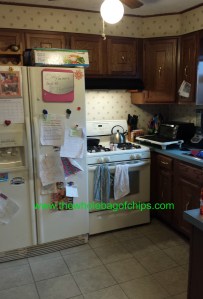
Our old kitchen was out-dated and in need of pretty much everything.

As a family who does a whole lot of cooking, we have always been frustrated that we had a pretty small, closed in, cramped and out-dated kitchen. In February 2016 we were given a generous gift: all new appliances. We were so excited when they arrived, and we could not wait to use them all. Our old dishwasher hadn’t worked in a couple of years, our old fridge no longer made ice or dispensed water on the door, and our old stove didn’t cook things properly or consistently.

When the delivery guy from the store brought in our new appliances, he commented that the layout of our kitchen, with the stove and fridge so close together, was odd and not usually recommended. The layout had always been this way since the house was built in 1976, and we really had no other options than the way it was, so he put the new ones just as the old ones had been.

What could possibly happen?

What could possibly go wrong?

Within weeks, our new stove was melting the side of our new fridge.

Panic set in as we realized we had to quickly fix the situation. We opted to do a partial renovation of our kitchen last year in order to remedy the problem as best we could at the time. So last April we ripped out one set of cabinets and counter tops and ripped out five layers of flooring in order to move our fridge into a new spot. It meant getting a new tile floor (which we also needed badly) and putting up some new wall covering, and painting. Once we did all of that, we put in some temporary cabinets and a temporary counter top where the fridge used to be and then stopped where we were and took more than a year “off” to regroup, save some money and ready ourselves for the rest of the project.

This always-cluttered back counter and cabinet space would soon be a new home for our new fridge.

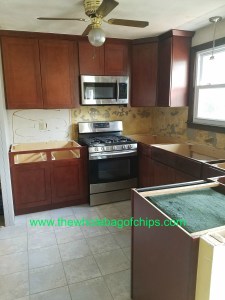
This summer our focus was taking down a wall to knee wall height in order to open up our kitchen and dining area a bit, and replacing all of the rest of the kitchen cabinets and counter tops.

We took out a wall to open up our space significantly.

In order to keep costs down, we did all of the demolition ourselves and assembled our kitchen cabinets ourselves too, rather than having our contractor or the cabinet store do any of it for us. I use the words “we” and “us” quite liberally, since I wasn’t the one actually doing a lot of the manual labor. I did my part, emptying and later re-loading the kitchen, and helped with demolition and assembly in any way I could. Even the kids helped out with demolition, happy to put a hammer to a wall and put a hole through it with permission.

As I type this post, we are about 3/4 of the way done. Our demolition was started before we went camping and finished when we returned, and our contractor arrived the very next week to do the work we couldn’t do on our own. That one week was a bit chaotic, although not nearly as bad as I imagined it would be.

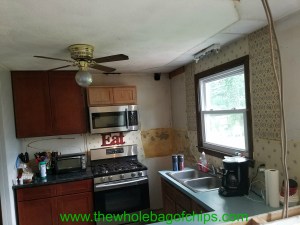
Our kitchen was a mix of old and new for more than a year before we continued with our renovation project this summer, knocking down a wall and taking out the rest of the old cabinets.

Now, we are down to waiting for our new counter tops and sink to arrive so that we can stop doing dishes in our bathroom sink and tub.

We still have a lot to do, and I am sure we will be finishing up this project for quite a while, with a tile backsplash still to go in and touch up painting still to be done on the walls and ceiling, but it’ll be more complete than it’s been in a long time, and for that, I am thankful.

Below are some photos of where we are at right now as we are awaiting the arrival of our granite counters and our kitchen sink this weekend.

I will end my post with a promise that I will eventually post again soon, but it may be a little while longer until I do. At least for now, while you wait, you know what I’m doing instead!

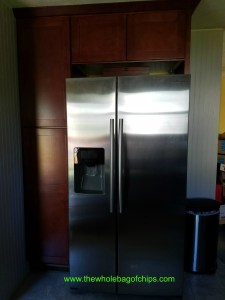
A new home for the refrigerator solved our melting problem.

Looking in from the dining room, which we can do now that the wall is gone.


We can hardly remember what it looked like when the wall was there.

Cave Tools Pigtail Food Flipper: a great new tool for summer grilling

30 Jun

We’ll be taking these with us to the campground this summer!

It’s officially summer! Summer means so many things, but one thing it means for us is grilling. Another thing it means for us is camping.When we camp, we grill! Therefore, I was very excited when Cave Tools asked me to try out another one of their fabulous products. I have reviewed several of their other grilling tools and have yet to be disappointed.

The Pigtail Food Flippers arrived on our doorstep just as we were creating our menu for a week’s worth of meals, and we put steaks right on the menu so we could try out our new tool. We would be grilling at home, but soon we will be camping and we’ll be grilling over a campfire. These new tools, a pair of two-one longer and one shorter-seemed to be perfect for all the grilling we do. Although we were doing steaks on this particular night, the tools are great for so many other things, including bacon, chicken, hot dogs and ribs, just to name a few ideas.

The Pigtail Food Flipper was great for grilling steaks, but it has many other uses as well.

When I asked my husband what he liked about the new Pigtail Food Flippers versus using a spatula, a fork or tongs, he said that the shape of the hook which made for easy flipping.

“I liked the way the hook was shaped,” he said. “All you had to do was hook the meat and flip it rather than trying to get a spatula underneath. I also liked that it came in two sizes, I didn’t have to use a big one for a small piece of meat and I won’t have to use a small one for a big piece.”

The tool was super-easy to clean because they’re dishwasher safe, and to store, which is a big plus for a small kitchen. Additionally, the handles fit well into the palm of your hand, much more comfortable than the flat form of a spatula.

You can find this great new tool set in two places and it’s very affordable. It’s on Amazon here, and on the Cave Tools website here. If you choose to order from the Cave Tools site, there is a great 15% off discount available by entering the coupon code PIGTAIL15 at checkout.

As we pack up for camping, we’ll be including our Pigtail Flippers, and I encourage you to check them out too!


***I was given a free product in order to do this review. However, all thoughts and opinions are my own.***