Archive | After School Snacks RSS feed for this section

Fun Friday: Have you ever tried these?

2 Aug
One of our summer dessert experiments: Ice Cream Cone Cupcakes

One of our summer dessert experiments: Ice Cream Cone Cupcakes

I can’t be the only mom who’s seen these everywhere, can I?

Cupcakes.

Ice cream cones.

Ice Cream Cone Cupcakes.

It sounded easy enough when my kids asked if we could try these and take them to one of the concerts on the beach this summer.

It was going to be Elizabeth’s birthday that night and we thought that’d make a great treat for her and for the rest of the kids who would be joining us at the concert.

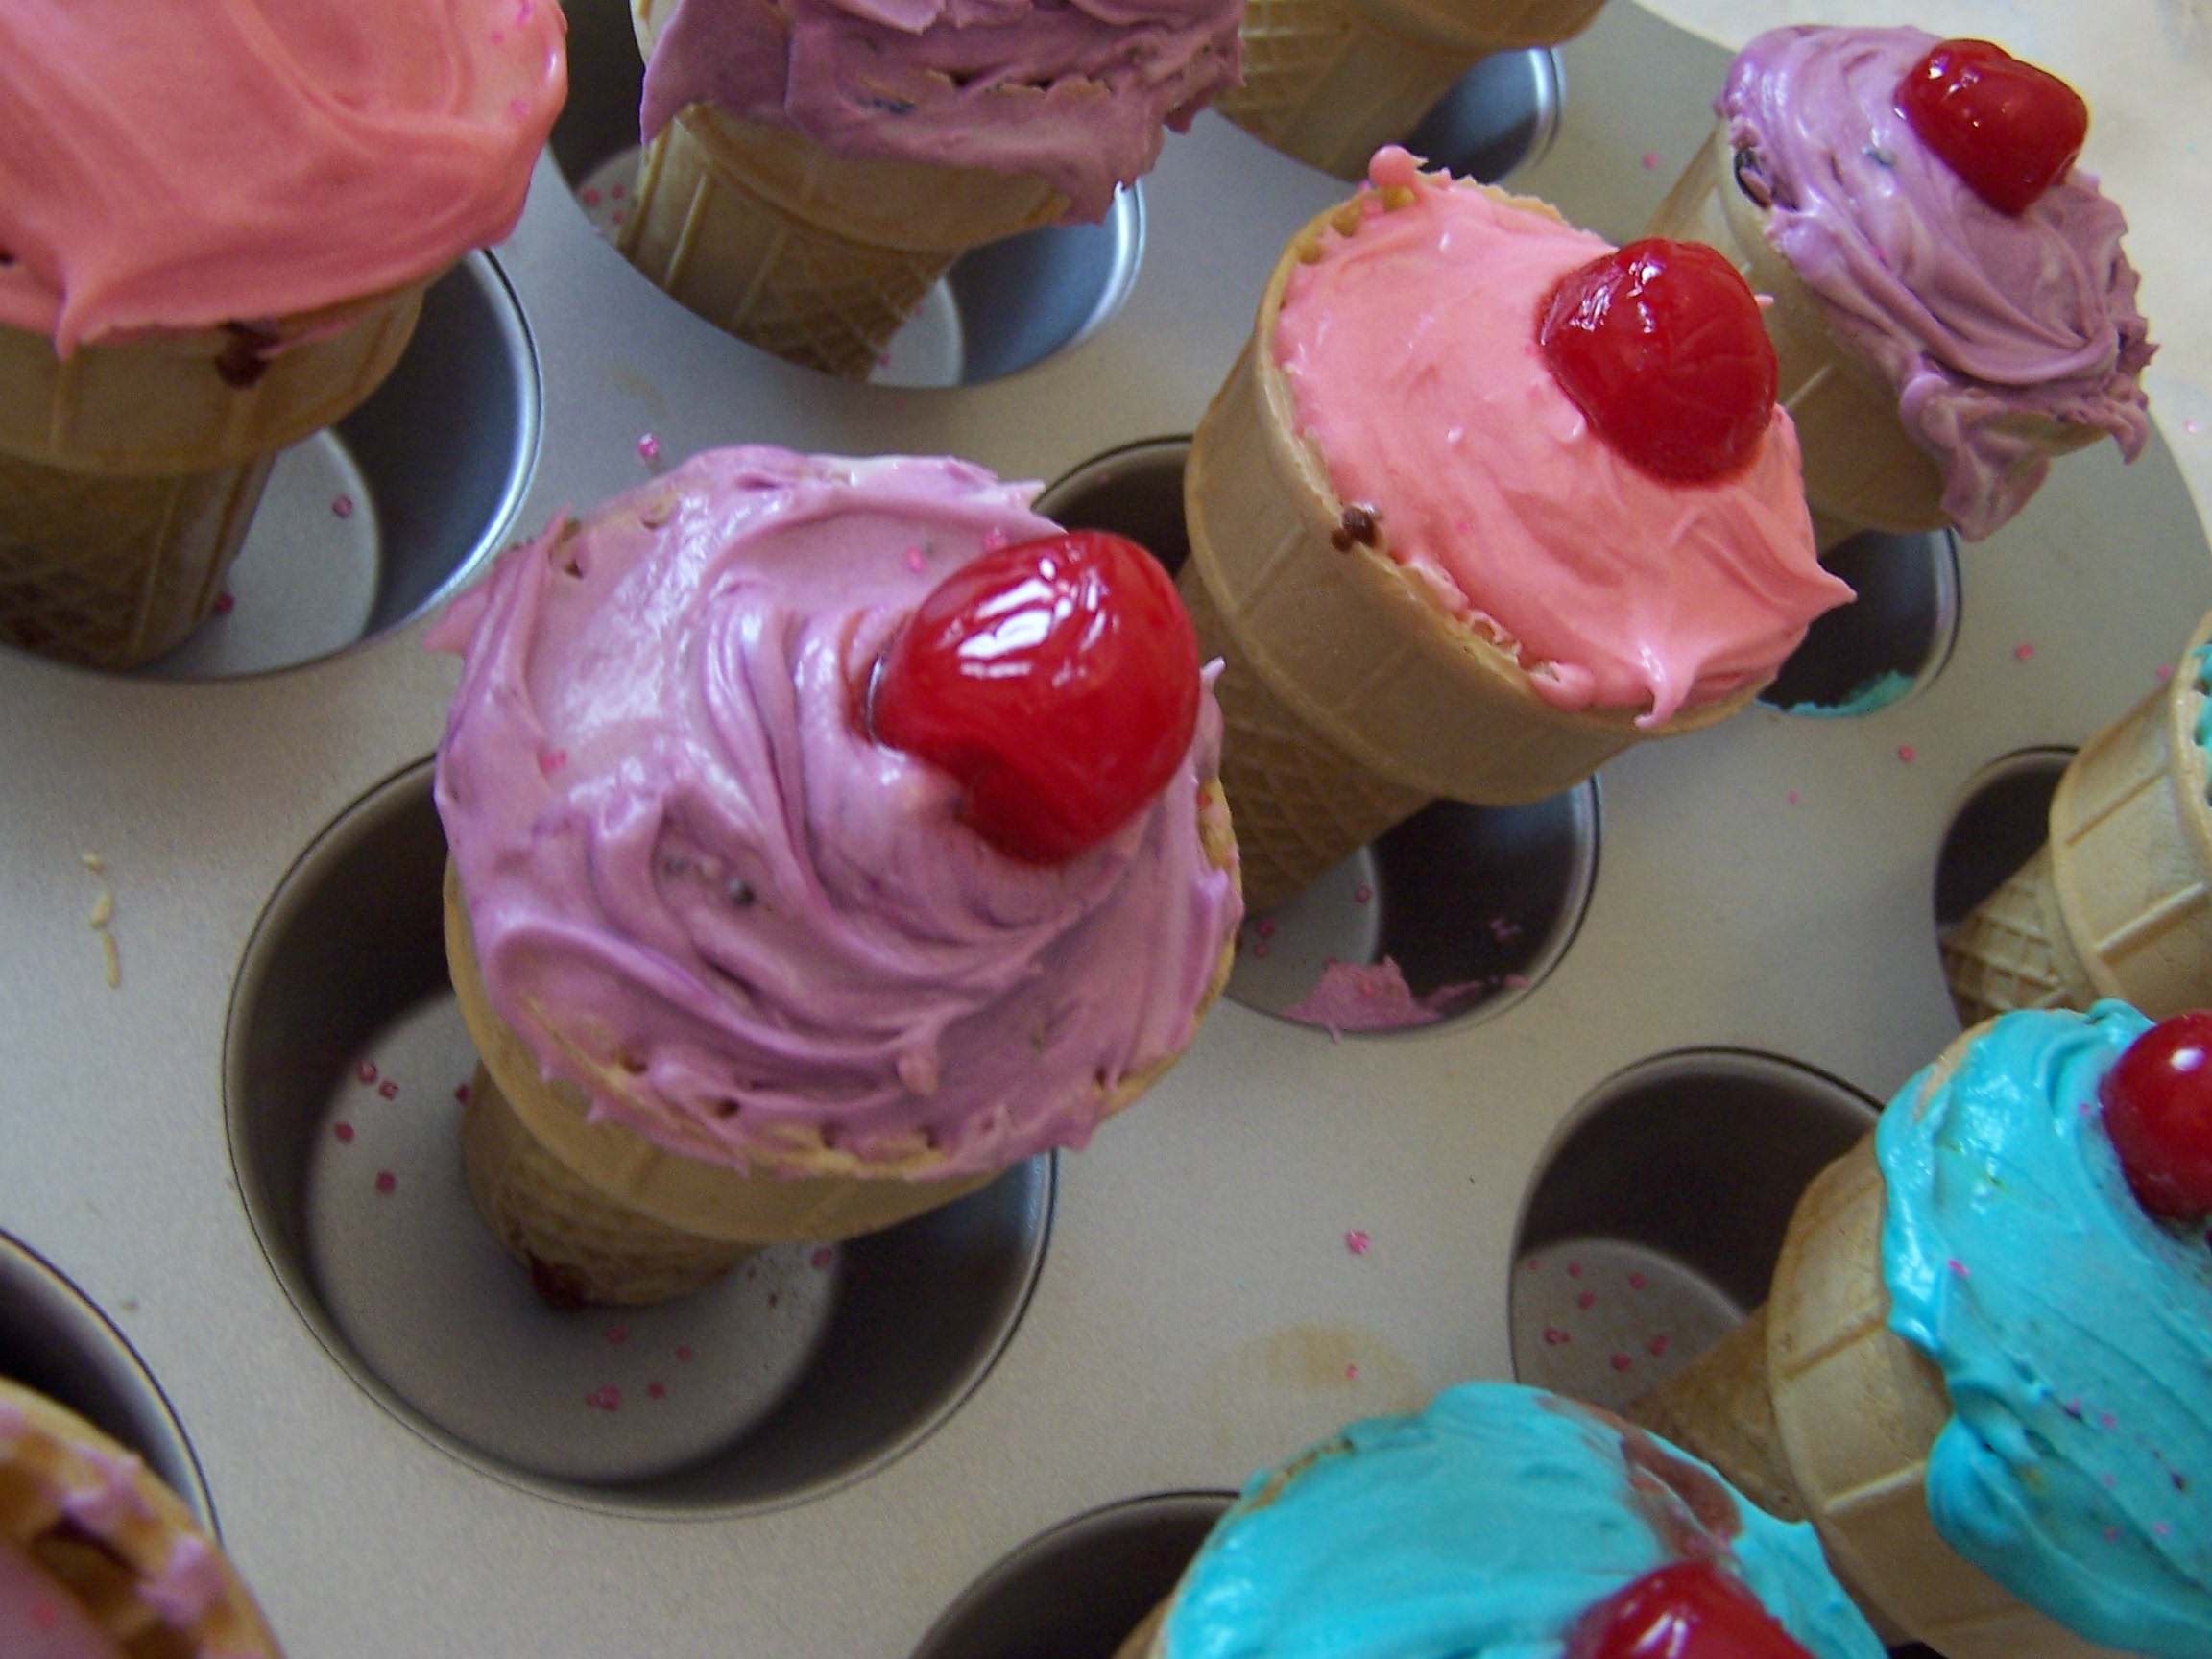
I made cake batter and frosting. I had cones, food coloring and cherries. Elizabeth asked if we could make the cake batter marbled with the food coloring to make it look like “Crazy Vanilla” ice cream, a flavor at our local ice cream spot.

How hard could this be?

Silly question.

These look near-perfect in the photo, but I definitely had some issues. If anyone has ever made these before, I’d love to hear some comments with tips or suggestions!

Problem number one: leaky cones!

Problem number one: leaky cones!

My first problem was that the cake batter leaked out of many of the cones, filling the tins.

The cake batter was cooked, and swirled as Elizabeth had requested, but some of the cones were now half-full and then had these little muffin top type things around the bottom.

They almost went in the trash.

The kids stopped me before I got there. They were still cupcakes they said. They would still taste good, they said. Let’s just keep them, they said.

So we did.

I added food coloring to the frosting and gave them each a color and a bowl of cherries to decorate their cupcakes.

They were done! So pretty. Ready to go.

Which leads me to Problem Number Two.

How would one transport these pretty little ice cream cone cupcakes?

I had a cupcake carrier, which I planned on using. However, keeping them standing upright proved to be a difficult task.

Impossible actually.

By the time we got ourselves onto the beach they had all fallen. I’d even tried wrapping them in foil around the bottom to fill the tins, in the hopes it’d keep them from falling over.

I’d call this an Epic Fail, a term my kids often use.

But they weren’t all bad. The kids all ate them anyway. Upside down, sideways, leaky or not, they were still a cupcake. Still frosted with a cherry on top (or next to). They still tasted good, or so they said.

So would I make these again? I think so.

Anyone out there have any ideas, tips or tricks for me?

What’s for Dinner Wednesday: Strawberry English Muffin Fruitwiches

24 Jul
English muffins: not just for breakfast!

English muffins: not just for breakfast!

A while back I posted about Elizabeth’s cookbook and I posted one of the recipes we’d tried at the time, a tuna salad recipe. Since then we’ve had it for lunch and even for dinner!

Today, I thought I’d post another recipe from that same cookbook, one that we have had for lunch and for dinner this summer, and one that we’ve also modified slightly to meet everyone’s different taste buds. It’s a great summer meal because it is cool, doesn’t involve using an oven, and uses a great summer fruit: fresh strawberries.

The ingredients for this are simple, no matter which way you choose to make it. You need:

Fresh sliced strawberries

an English Muffin

Strawberry jam

Goat cheese, cream cheese, or peanut butter

Elizabeth's cookbook of choice

Elizabeth’s cookbook of choice

The directions are even more simple!

“Split an English Muffin and lightly toast the halves. Spread the cut side of the bottom half with softened goat cheese or plain whipped cream cheese (we also have done peanut butter). Top with a thin layer of strawberry jam, followed by a layer of thin strawberry slices. Cover with the top half of the muffin, jam side down, and press gently.”

We prefer to do open-faced sandwiches, in order to have more fresh strawberries! This sandwich has been a hit every time we’ve served it, and it’s easily modified for everyone.

Next time you’re looking for a summery lunch or a cool dinner (or maybe even a yummy summer breakfast,) give these English Muffin Fruitwiches a try!

A great summer snack: Honey Yogurt Fruit Dip

15 Jul
This is a great dip for a summer day!

This is a great dip for a summer day!

The summer is flying by! I can’t believe the Fourth of July is well past us and it’s mid-July already.

We have been super busy, celebrating the holiday, Elizabeth’s birthday, spending time with family and even celebrating Christmas in July last week.

My blog posts have been sporadic, as promised!

But, I wanted to take some time to share with you a new dip that we tried out recently. A while back I’d posted a similar dip but it used 1/4 cup of sugar, which I always found to be a lot. It was delicious, don’t get me wrong…I’d eat it with a spoon if I could, but it was a lot of sugar nevertheless.

Recently I found this dip in the April 2013 issue of Good Housekeeping, which uses honey instead of sugar and the flavor is similar. We tried it out with some summer fruits and it was wonderful. I thought I’d share it with you today so that you can give it a try also.

I hope that you are enjoying your summer as much as we are!

HONEY YOGURT FRUIT DIP

3/4 cup plain yogurt  (we use fat free or low fat yogurt)

3 TBSP. Honey

1/4 tsp. vanilla

Serves Four

A Sweet Treat for a Summer Snack

8 Jul
These barely had any time on the plate before they were devoured!

These barely had any time on the plate before they were devoured!

We tried a new snack recently. I’d seen a recipe somewhere for chocolate covered apricots. I love dried apricots, and I love chocolate, so I thought this would be worth a try. When the time came though, I couldn’t find wherever it was that I saw the original recipe so I Googled them and came up with one from About.com. It called for nuts, but I omitted the nuts and doubled the recipe since I had two bags of apricots to use.

The recipe was fast and easy and made a yummy snack. I’d definitely make them again. There are lots of fruits you can dip in chocolate including strawberries and bananas. I’ve also seen recipes for chocolate dipped kiwi, and since my kids love kiwi I thought I’d try that in the future too, so be on the lookout.

In the meantime, here’s the recipe as we tried it from About.com, modified for our nut-free preferences.

Enjoy!

I melted my chocolate in a double boiler on top of the stove.

I melted my chocolate in a double boiler on top of the stove.

Ingredients: (we doubled this recipe)

  • 24 whole dried apricots
  • 2 ounces (1/2 cup) toasted almonds, finely chopped
  • 6 ounces dark chocolate

Preparation:

1. Prepare a baking sheet by lining it with aluminum foil. Place the chopped almonds in a small bowl. (if using)

2. Temper or melt the chocolate in a medium bowl. (I did a double boiler on top of the stove.)

3. Holding an apricot by the tip, dip most of the fruit into the melted chocolate, swirling to ensure even coverage. Remove it from the chocolate and drag it along the lip of the bowl, removing excess chocolate.

Dried apricots are a pretty healthy snack, before you add the chocolate! We used semisweet chocolate.

Dried apricots are a relatively healthy snack, before you add the chocolate! We used semisweet chocolate.

4. Pat both sides of the chocolate-dipped apricot on the chopped almonds, covering both sides with nuts.

5. Place the candy on the prepared baking sheet, and repeat for the remaining apricots.

6. Place in the refrigerator to set the chocolate for approximately 10 minutes. If the chocolate has been tempered, the candy can be served at room temperature, but if it has not, it should be kept refrigerated until served.

Fun Friday: Kale Chips

21 Jun
These were a fun after school snack!

These really were a fun after school snack!

Kale doesn’t sound all that fun does it?

It really doesn’t. But, I’ve chosen it for my Fun Friday post today for several reasons.

First: We had Kale Chips at the White House for the first Kids’ State Dinner last August. That whole entire trip was fun, including trying the Kale Chips which were from Samuel Wohabe, age 9, from New York.

Second: The newest winners of the Healthy Lunchtime Challenge were just announced yesterday! The Rhode Island winner, Samantha Mastrati, is from Cranston and a friend of ours! She will have so much fun on her trip!

Finally: These were a fun after school snack for the girls to try out. Although Caroline had them and enjoyed them on the trip, no one else had, so I thought this would be a fun snack to share with them.

To make these is super-easy. I bought one bunch of kale for just over a dollar at the store and it made lots of chips!

The prep instructions are minimal and the cook time is quick. Within minutes you have ahealthy, crunchy snack.

Here, according to Samuel’s instructions is the recipe for Kale Chips.

Coat, toss and bake!

Coat, toss and bake!

KALE CHIPS

INGREDIENTS:

1 bunch kale, stems removed and leaves
torn into bite-size pieces
2 tablespoons olive oil
¼ teaspoon salt

DIRECTIONS:

Preheat the oven to 400°F.

On a large nonstick baking pan, drizzle the kale with olive oil, season with salt, and toss until
evenly coated.

Bake until crispy, about 15 minutes.

Fun Friday: Spiced Chickpeas for an After School Snack

7 Jun
Everyone enjoyed this snack!

Everyone enjoyed this snack!

I forget sometimes that as much as I love sweets, that there are some people in this house who like the salty, more savory flavored foods. My three kids have a mix of tastes but my snacks are often the sweet kinds because that’s what I like best.

However, recently I found a recipe in the Stop and Shop Magazine for Spiced Chickpeas, which are roasted in the oven, and although I didn’t think I’d personally love them, I decided to try them as a snack for my family. The funny thing is, I personally loved them. Everyone loved them. In fact, I just bought two more cans of chickpeas so we can make them again since it’s been a little while since I made them last.

The recipe was simple and had very few ingredients besides the chickpeas, so it makes it tasty, easy, extremely healthy and affordable. If you’ve never tried them before, if you’re a sweet treats kind of person yourself, I encourage you to step out of your snacking comfort zone and give these a try!

SPICED CHICKPEAS

Makes four 1/2 cup servings

INGREDIENTS

1 can (15.5 oz.) chickpeas (garbanzo beans) about 2/3 cups

1 1/2 tablespoons extra virgin olive oil or canola oil (we used olive)

1/2 teaspoon paprika

Dash of cayenne pepper or to taste

1/4 teaspoon of ground cumin

3/4 teaspoon garlic powder

1/2 teaspoon sea salt (optional)

Nonstick cooking spray

DIRECTIONS

Preheat oven to 400 degrees.

Drain, rinse and dry chickpeas on paper towels.

Combine olive oil and spices in bowl.

Add chickpeas and toss until evenly coated.

Spread chickpeas evenly onto a baking sheet sprayed with non-stick cooking spray.

Bake for 25-30 minutes until golden and crispy.

Shake chickpeas around every 10 minutes or so for even crisping and to prevent sticking.

Remove baking sheet from oven and transfer chickpeas to a serving bowl. Enjoy while warm!

Per serving: 180 calories, 7 g fat, 1 g saturated fat, 0 mg cholesterol, 26g carbohydrates, 5 g fiber, 0 g sugars and 6 g protein

Fun Friday: Oven Fried Parmesean Zucchini Rounds

31 May
This recipe from the Sugar Free Mom blog make a great after school snack!

This recipe from the Sugar Free Mom blog make a great after school snack!

Happy Friday to you!

Part of my Friday routine usually includes a visit to my Grandma Rose with my kids after school. We spend some time together, have a few snacks and treats and then off we go until the next visit.

One thing Grandma Rose is famous for is her Fried Zucchinis. She has a knack for slicing them, coating them and frying them perfectly. Whenever there is an event, she makes about 100 of them.

The funny thing is: she doesn’t even like them!

Let’s just say it’s a good thing I am not the one responsible for bringing them to events. I’d probably start out with 100 and end up with about 50 of them by the time I arrived.

Lately, with our low fat dietary restrictions, I’ve been finding other alternatives to some of our favorite foods, and this recipe from the Sugar Free Mom blog was a great option for us. The author of the blog, Brenda is a local mom in our community.

The zucchini rounds are baked, not fried and they are much lower in fat. Brenda adds in Parmesan cheese to her recipe, where Grandma Rose does not, but it adds a great flavor to it.

Here’s the recipe as Brenda has it on her blog. Be sure to visit her blog as she has loads of great recipes on there, and she has lots of healthy options. No matter what your restrictions are, you will find something you like on her blog.

Sugar Free Mom’s Oven Fried Zucchini Rounds

I used my Pampered Chef slicer to make prettier sliced zucchini.

I used my Pampered Chef slicer to make very pretty sliced zucchini.

INGREDIENTS

  • 3 large zucchini, sliced (6 cups sliced rounds)
  • 1 whole egg
  • 1 egg white
  • 1 1/2cups Parmesan cheese, grated
  • 1/4 cup fresh parsley, chopped
  • 1/2 teaspoon garlic powder
  • olive oil cooking spray
  • DIRECTIONS
  • Preheat oven to 425 degrees.
  • Spray baking sheets with cooking spray.
  • Beat the egg and white in a shallow bowl, set aside.
  • Place the Parmesan, garlic powder and parsley in another bowl and mix well.
  • Dip zucchini rounds in egg mixture then in Parmesan and place on baking sheet.
  • Do not overlap zucchini on baking sheet.
  • Bake for 10 minutes then flip them over and bake until 10 minutes or until the are golden brown on top.

Fun Friday: Blueberry Banana (no flour) Muffin

3 May
These made a great , healthy after school snack!

These made a great , healthy after school snack!

I love it when I find new recipes to try out. I follow so many foodie pages on Facebook that I’m always getting great ideas for new things to try.

A few weeks back, I came across a post from The New Modern Mama blog where she talked about trying some new muffins at her house. They sounded good to me and I had everything for them so the next day I tried them at my house. They were great!

I made them for an after school snack and then there were leftovers for the next morning as well. I made a few changes:

*I used nonfat vanilla yogurt, not greek yogurt.

*I used Truvia rather than Stevia and followed the measurement guidelines on the Truvia package.

*I had both “quick” Steel Cut Oats and the regular kind. The quick kind are softer and I thought they’d blend easier, so I used those.

*Although I used my blender, if I made them again, which I hope to, I’d use a food processor. My blender had a hard time.

They were good, they were something new and different and everyone loved them. This recipe is a keeper for us, for sure. I hope you’ll try it too! I know that you can try other fruits in the recipe besides blueberries, so next time I just might do that!

Thanks to the New Modern Mama for sharing!

Next time I'd try these in the food processor instead of the blender.

Next time I’d try these in the food processor instead of the blender.

Blueberry Banana No Flour Muffins
From The New Modern Mama

Ingredients:

  • 2 overly ripe bananas
  • 2 eggs
  • 2 1/2 cups steel cut oats
  • 1 single serving cup, low fat, greek yogurt {I used vanilla}
  • 1 cup of blueberries
  • 3/4 cups of sugar or stevia
  • 1 1/2 tsp baking powder
  • 1/2 tsp baking soda

Method:

  1. Preheat the oven to 400 degrees.
  2. Put all of the above ingredients into a blender except for the fruit.
  3. Blend ingredients until smooth {you may have to scrape down the sides and do this several times}.
  4. Pour blended ingredients into a bowl and stir in blueberries.
  5. Pour muffin mix into greased tin.
  6. Bake for 20 minutes.

This made exactly 12 muffins.

Couponing Update: Last week’s CVS haul

29 Apr
It's that time of year again: Summer Stock Up time!

It’s that time of year again: Summer Stock Up time!

About a year and a half ago I started my couponing, and last spring I decided to try to stock up for summer on things we go through most, so that I would not have to shop for those items over the summer.

This year, it’s springtime again and I’ve decided to do the same thing. As time has gone by, I have gotten a better handle on things we go through a lot of and things that last a long time.

For example, last year I found out that 48 rolls of toilet paper lasts way longer than just through the summer, but body wash we go through almost weekly. So this year I’m making adjustments in my stockpile. Recently I’ve gotten good deals on women’s deodorant, dish detergent, and a few other things. Last week, however, I had a particularly good “haul,” so I thought I’d share it with you and tell you how I did it. People often ask me for a quick tutorial, so this may help anyone who’s thinking about couponing.

Today’s post is about a CVS trip, and it’s probably the place I shop the most often because of their great store sales, their fantastic stackable coupons, their super Beauty Club, and their awesome Extra Bucks.

Going into CVS, here is what I had:

a $4 off $10 worth of body wash which I’d gotten out of the CVS machine. CVS brand body wash is $2.37 each or 2 for $4.00 normally. That week though in the CVS flier, it was Buy one get one half off. I had to buy 7 to get to $10, but then I got $4.00 off.

5 manufacturer’s coupons for Old Spice men’s deodorant for 20 cents off. The deodorant was on sale in the flier for $2.29 that week. So I’d be getting mine for $2.09 each.

1 CVS machine coupon for 20 cents off Palmolive dish soap. The soap was on sale in the flier for 99 cents already. Normally it’s more than $1.00 at CVS.

7 manufacturer’s coupons for $1.00 off two bags of Chex Mix. The Chex Mix was on sale at CVS that week four bags for $5.  Each bag is more than a single  serving, so it makes a great lunchbox snack if you put it into ziploc bags, and it is great for a playdate or after school snack. During the summer it’ll be great for beach snacks, assuming it lasts that long!

I also discovered that day that Chex Mix comes in Chocolate Turtle flavor. I had to remind myself that each bag was more than one single serving or I might have eaten the whole bag.

My total cost that day was $30.

I got:

7 bottles of body wash
5 deodorants
1 Palmolive dish soap
14 bags of Chex Mix

So, in total, 27 items for $30.

If you are new to couponing, the lessons to take away from today’s post are the following:

Be sure to examine *all* of your couponing and sale options. Use the CVS machine coupons, and remember you can scan your card multiple times a day until it tells you there’s nothing more for you.

Look closely at the flier because oftentimes the fliers and sales coincide with the store and manufacturer coupons. Remember that you can stack CVS store coupons with manufacturer’s coupons.

Only buy what you use, unless it’s totally free and you can donate it. Don’t spend money on things you can’t use, just because it’s on sale.

And finally, use as many manufacturer coupons as you can. Having multiple numbers  of coupons is great when stores run sales such as the one I got on Chex Mix and deodorant this time around.

Happy Saving!!

My new addiction: Four Ingredient Nutella Mug Cake

26 Apr
Nutella is not new, but there's this great little treat that I make with it, which I'm addicted to!

Nutella is not new, but there’s this great little treat that I make with it, which I’m addicted to!

For the longest time, I knew that Nutella existed, but I never bought it.

Yes, seriously. It was not on my all-the-time shopping list.

That was in my old life. My pre-Nutella addicted life.

Recently, Elizabeth came home and said how her good friend had a Nutella sandwich for lunch at school. It got me thinking. There’s so many things you can make with Nutella, and it might be a great treat for the kids’ lunches and mine, on occasion.

Let me just say, it’s a slippery slope, that Nutella. One lunchtime treat has led to many jars of Nutella in my shopping cart.

I love it for breakfast, for lunch, with strawberries, with bananas, with peanut butter and for a late night snack.

I think about it all the time.

And I keep finding bigger jars of it. I first started out with a small jar. I’d buy two at a time. Then I found an even BIGGER jar at Target. I’m on my second one of those. But I hear there’s an EVEN BIGGER jar available at BJ’s. I’m afraid to go see. I’d join just to buy it.

So one day, my friend Paula sends me a link she’d found to a Four Ingredient Nutella Mug Cake. She found it on a blog called Kirbie’s Cravings.

Four ingredients. One of them being Nutella.

Check.

Check. Check. Check.

I had all four ingredients.

I’ve made a mug cake before from a different recipe for a coffeecake, and didn’t love it. Never posted it.

This, I love.

I think I’ve made it four times in two weeks or so.

It takes all of five minutes to mix up, if that.

It takes all of one minute and 30 seconds to cook in my microwave.

I kid you not.

So today, for my Friday post I share with you my newest addiction: the Four Ingredient Nutella Mug Cake from Kirbie’s Cravings.  Now pay attention when you read her blog post about this cake. She has taken a lot of ingredients out of her original recipe, which used to be over 1000 calories. Now it’s just over 500 calories. That’s still a lot. But knowing it *used* to be more, doesn’t that make it sound like a bargain?

Yes!! It does!

And she recommends sharing it.

I don’t choose to go that route.

She also recommends waiting to eat it until it cools.

I don’t do that either. I can barely get it out of the microwave and I’m getting my spoon.

I recommend topping it with whipped cream or something like that. My whipped cream is fat free. In fact, most of what we eat is low fat or fat free, so I don’t really feel terrible eating this on occasion.

Multiple occasions.

Here’s the recipe. Try it out!

Four Ingredient Nutella Mug Cake

from Kirbie’s Cravings

Ingredients:

4 tbsp flour
1/4 tsp baking powder
1/4 cup Nutella
3 tbsp fat free milk

Directions:

Combine all ingredients into an oversized mug. Mix with a small whisk until batter is smooth. Cook in microwave for about 1 minute. Sharp knife inserted should come out clean and top of cake should look done rather than gooey. If cake is not cooked in one minute, add an additional 20 seconds. Let cake cool in mug completely before eating.

Totally Addicting.

Totally Addicting.