Archive | Lowfat/Nonfat RSS feed for this section

What’s For Dinner Wednesday: Grilled Caprese Portobello Mushrooms

17 Jul
A yummy addition to our summer meal menu options!

A yummy addition to our summer meal menu options!

We are on our second heat wave this month. When you’re in the midst of a heat wave like this, sometimes you don’t feel like cooking. Or eating.

Scratch that. I almost always feel like eating, even when it’s hot.

But what to eat becomes the question. You don’t want to turn on the oven and sometimes it’s even too hot to grill outside, because when it’s 100 degrees, do you really want to stand over a hot fire?

Sunday was that kind of a night. What to eat? What to cook. Don listed everything in our fridge and freezer but nothing sounded appealing. He’s never that thrilled when I say no to everything we have.

On this night however, it was a good thing that I didn’t want anything we had on hand. We ended up trying a great new recipe from the Sugar Free Mom blog and loving it!

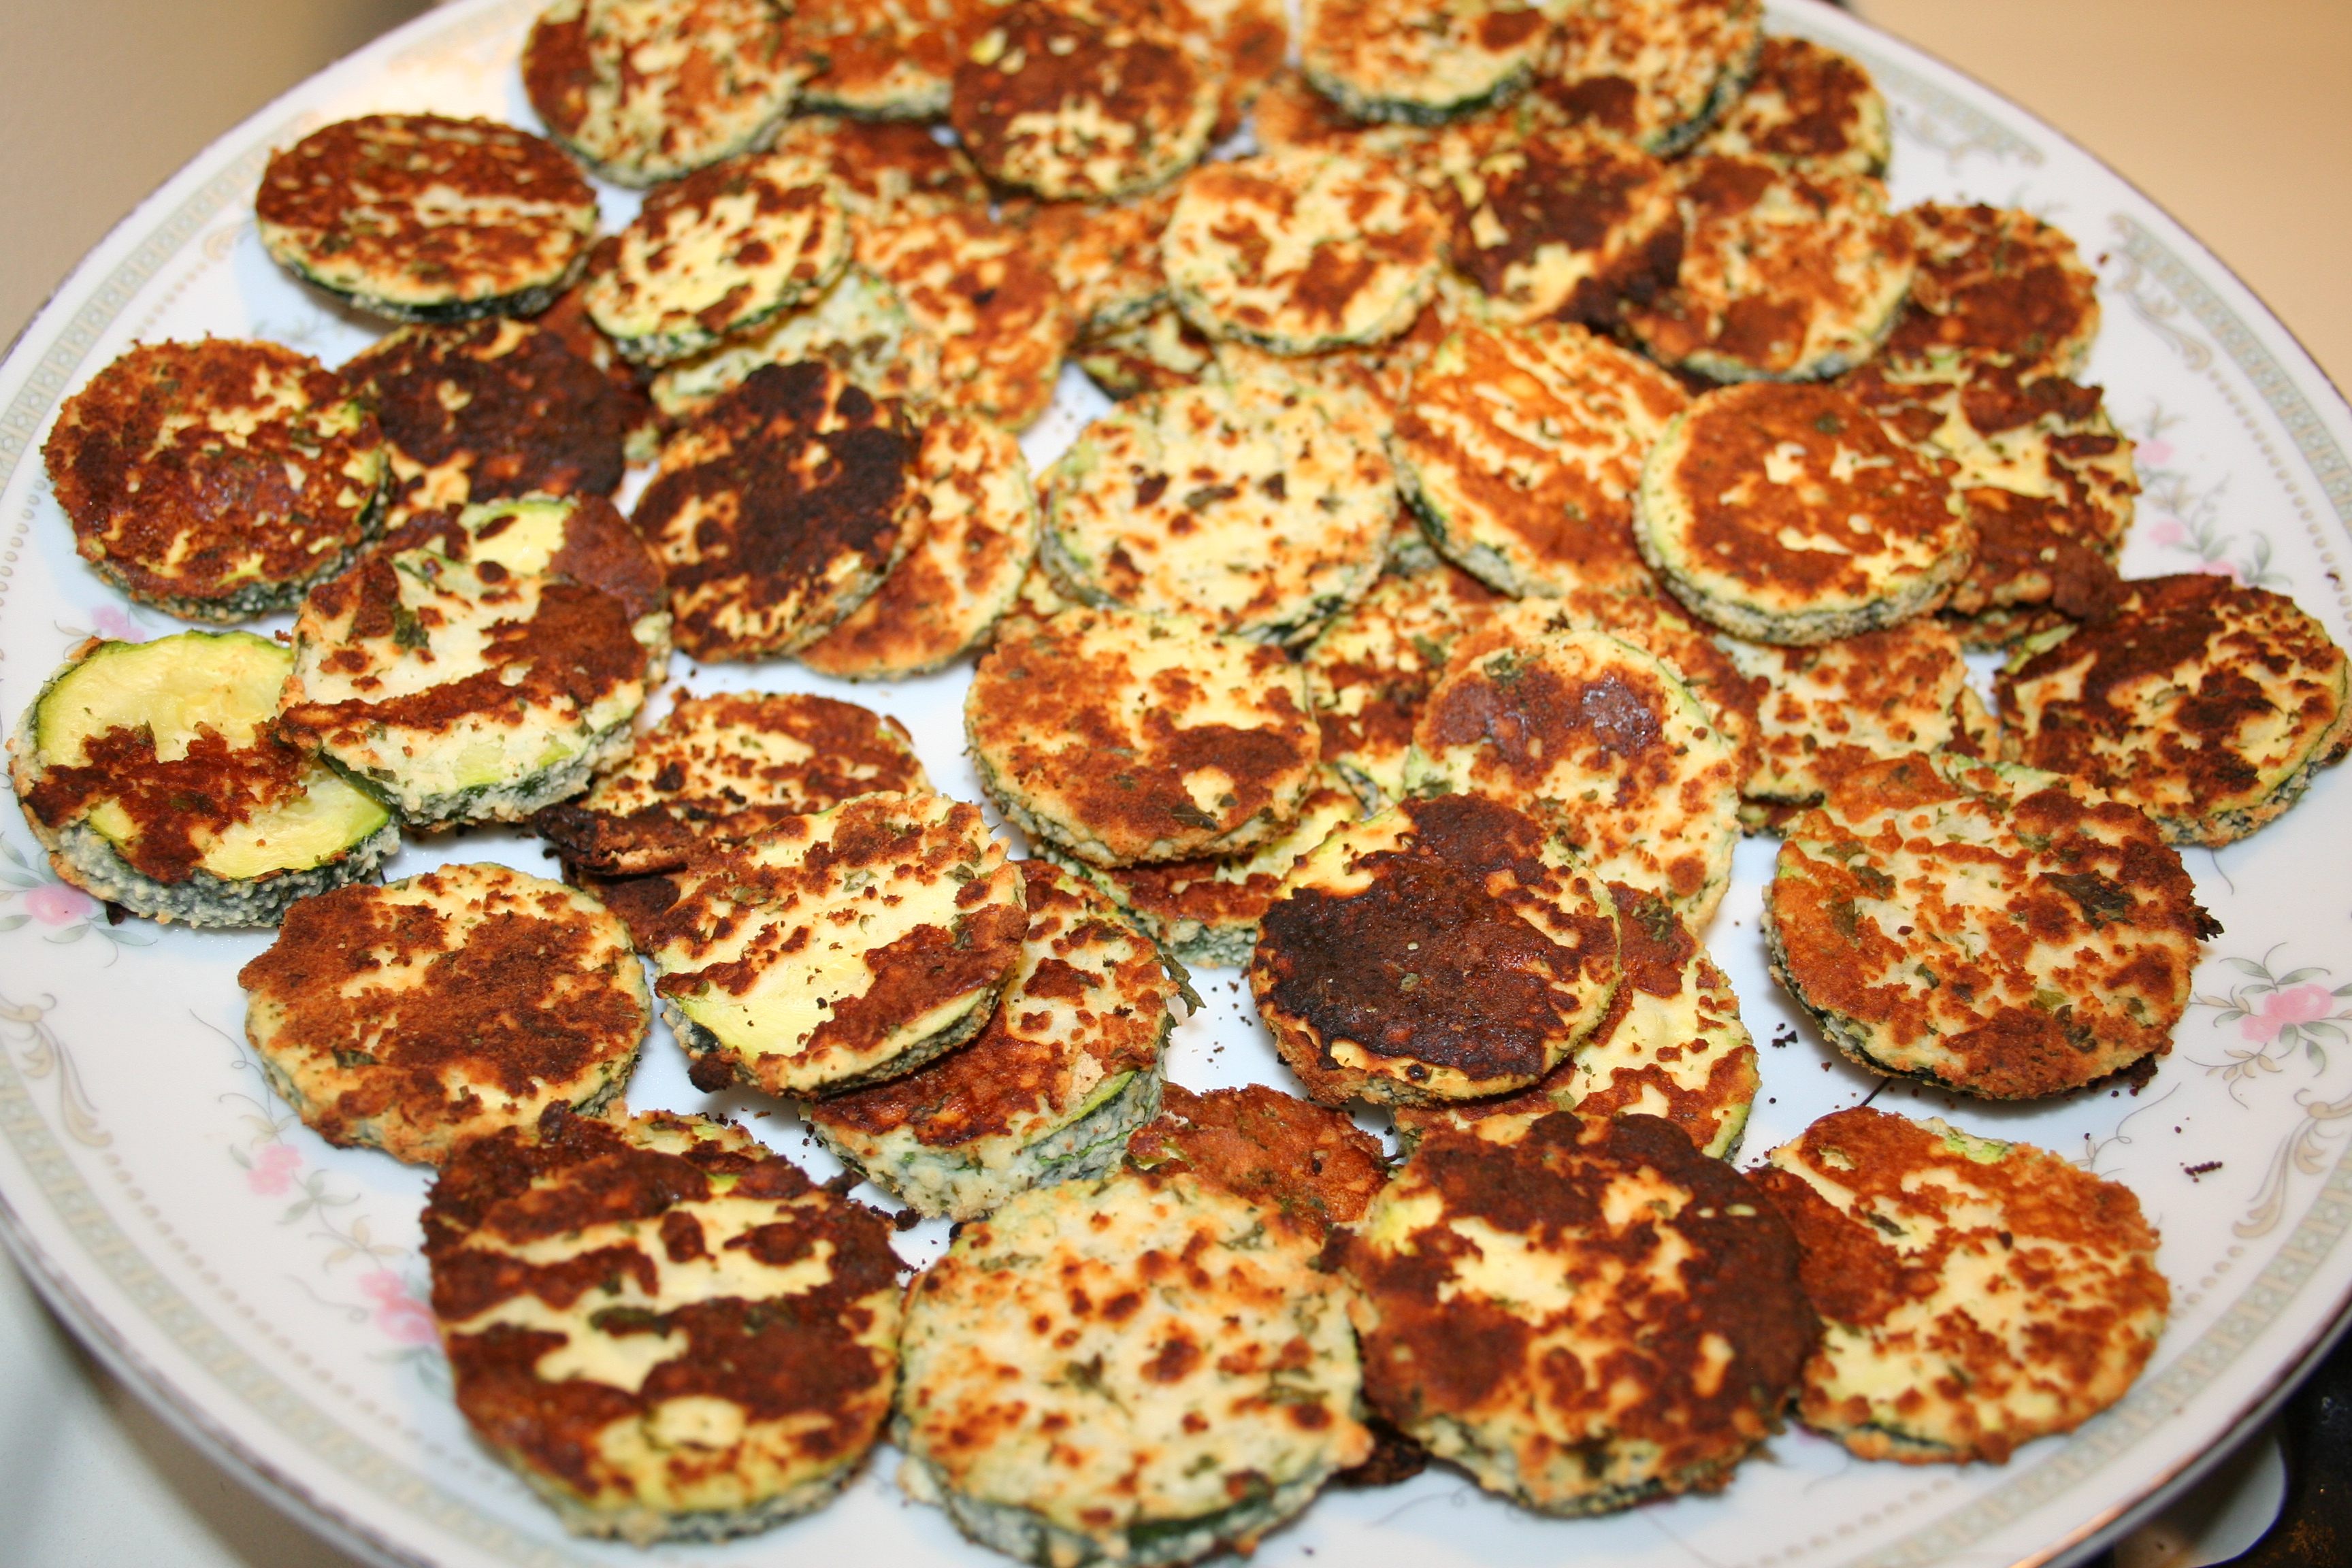
I know I’ve mentioned Brenda’s blog before, but if you haven’t visited it yet, now’s a great time to do so. The recipe we tried was for grilled Portobello mushrooms made Caprese style; a great summer menu addition. Another friend of mine posted the recipe on Facebook and I knew immediately that this meal was in our future.

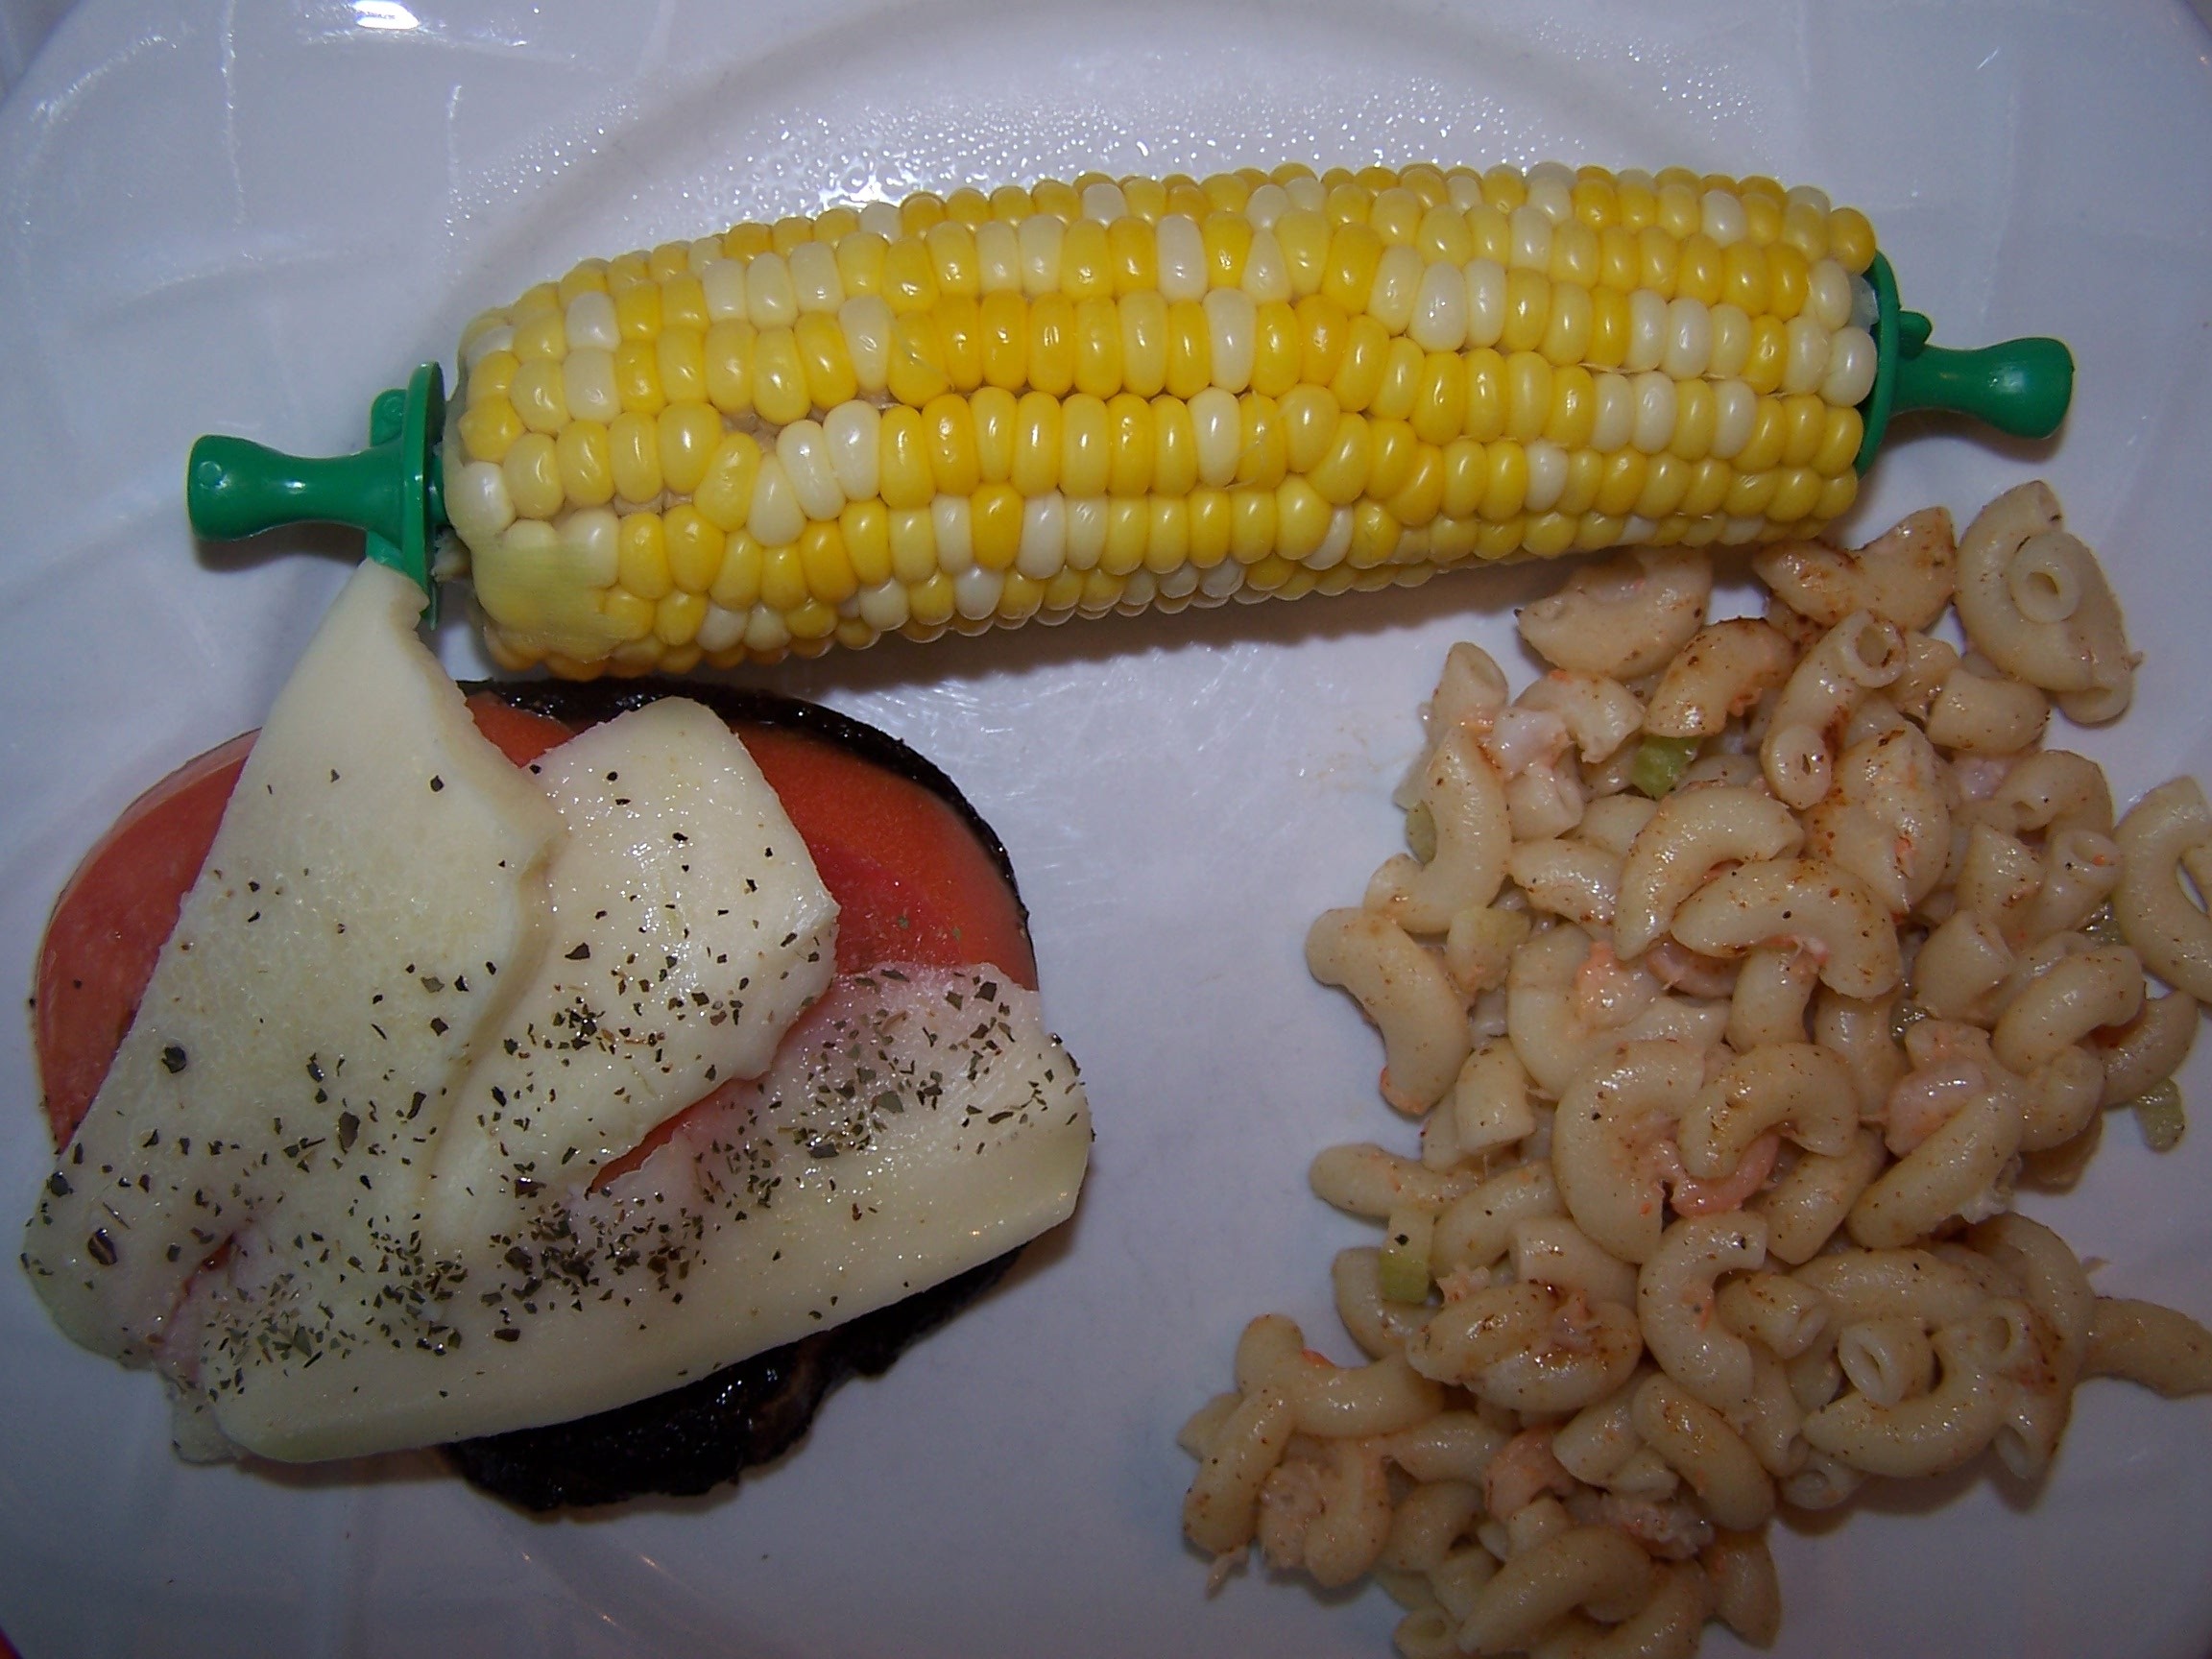
We bought three Portobello mushrooms, (we knew not everyone would like these so we only bought for those who would), some mozzarella cheese to slice and some good-sized tomatoes to slice up as well. Rather than grilling the mushrooms, Don cooked them in our cast iron skillet, and they were fabulous! We served ours with a side of macaroni salad and corn on the cob. A perfect summer meal.

Give Brenda’s blog a visit, and try out her recipe! I know you’ll love it, and  you’ll love her photos.  Her Portobellos were much prettier and more photogenic than mine!

Her recipe is below.

100_5874

We did not have fresh basil on hand so we used dried instead.

  • 6 large portobello caps
  • 1 teaspoon salt
  • 1/2 teaspoon garlic powder
  • few cracks of pepper from peppermill
  • nonstick olive oil cooking spray
  • 6 ounces mozzarella, sliced into 6 pieces
  • 1 large vine tomato, sliced into 6 pieces
  • 2 teaspoons extra virgin olive oil

Directions

Wash the mushrooms and drain them on paper towels upside down then pat dry. Turn them upright. Spray the mushrooms with nonstick cooking spray. Sprinkle 1/2 teaspoon salt and garlic powder over the mushroom caps. Add a few cracks of pepper then place the seasoned side onto a medium high grill or grill pan. Follow the same procedure for the bottoms of the mushrooms and allow to cook for 2-3 minutes on one side before flipping over. Top each mushroom cap with one slice of tomato and cheese. Close the grill for 1 minute to let cheese melt slightly. Place caps onto a serving plate. Add one large basil leaf to each cap. Drizzle extra virgin olive oil over the tops, season to taste with more salt and pepper if desired and serve warm or room temperature.

A great summer snack: Honey Yogurt Fruit Dip

15 Jul
This is a great dip for a summer day!

This is a great dip for a summer day!

The summer is flying by! I can’t believe the Fourth of July is well past us and it’s mid-July already.

We have been super busy, celebrating the holiday, Elizabeth’s birthday, spending time with family and even celebrating Christmas in July last week.

My blog posts have been sporadic, as promised!

But, I wanted to take some time to share with you a new dip that we tried out recently. A while back I’d posted a similar dip but it used 1/4 cup of sugar, which I always found to be a lot. It was delicious, don’t get me wrong…I’d eat it with a spoon if I could, but it was a lot of sugar nevertheless.

Recently I found this dip in the April 2013 issue of Good Housekeeping, which uses honey instead of sugar and the flavor is similar. We tried it out with some summer fruits and it was wonderful. I thought I’d share it with you today so that you can give it a try also.

I hope that you are enjoying your summer as much as we are!

HONEY YOGURT FRUIT DIP

3/4 cup plain yogurt  (we use fat free or low fat yogurt)

3 TBSP. Honey

1/4 tsp. vanilla

Serves Four

A Sweet Treat for a Summer Snack

8 Jul
These barely had any time on the plate before they were devoured!

These barely had any time on the plate before they were devoured!

We tried a new snack recently. I’d seen a recipe somewhere for chocolate covered apricots. I love dried apricots, and I love chocolate, so I thought this would be worth a try. When the time came though, I couldn’t find wherever it was that I saw the original recipe so I Googled them and came up with one from About.com. It called for nuts, but I omitted the nuts and doubled the recipe since I had two bags of apricots to use.

The recipe was fast and easy and made a yummy snack. I’d definitely make them again. There are lots of fruits you can dip in chocolate including strawberries and bananas. I’ve also seen recipes for chocolate dipped kiwi, and since my kids love kiwi I thought I’d try that in the future too, so be on the lookout.

In the meantime, here’s the recipe as we tried it from About.com, modified for our nut-free preferences.

Enjoy!

I melted my chocolate in a double boiler on top of the stove.

I melted my chocolate in a double boiler on top of the stove.

Ingredients: (we doubled this recipe)

  • 24 whole dried apricots
  • 2 ounces (1/2 cup) toasted almonds, finely chopped
  • 6 ounces dark chocolate

Preparation:

1. Prepare a baking sheet by lining it with aluminum foil. Place the chopped almonds in a small bowl. (if using)

2. Temper or melt the chocolate in a medium bowl. (I did a double boiler on top of the stove.)

3. Holding an apricot by the tip, dip most of the fruit into the melted chocolate, swirling to ensure even coverage. Remove it from the chocolate and drag it along the lip of the bowl, removing excess chocolate.

Dried apricots are a pretty healthy snack, before you add the chocolate! We used semisweet chocolate.

Dried apricots are a relatively healthy snack, before you add the chocolate! We used semisweet chocolate.

4. Pat both sides of the chocolate-dipped apricot on the chopped almonds, covering both sides with nuts.

5. Place the candy on the prepared baking sheet, and repeat for the remaining apricots.

6. Place in the refrigerator to set the chocolate for approximately 10 minutes. If the chocolate has been tempered, the candy can be served at room temperature, but if it has not, it should be kept refrigerated until served.

Fun Friday: Elizabeth’s Lunches

28 Jun
Elizabeth's cookbook of choice

Elizabeth’s cookbook of choice

We’ve often described Elizabeth’s taste as being very mature for her age. She often likes things that surprise us, things that we think other kids her age may not like. It’s exciting to see her try new things, but it’s often challenging to pack her lunch because she’s not a fan of your typical, quick and easy pb&j sandwich.

Last year at some point, she spent one of her Barnes & Noble gift cards on a new cookbook, “The Lunch Box,” filled with unique lunchtime meals. I think she figured if she bought it, we’d make all the things in it for her lunch box.

It was a good thought, but she still ended up with a lot of the more typical lunches we put out each morning- turkey, pb&j, nutella, salad.

Poor Liz.

"The Lunch Box" was not the only cookbook Elizabeth had tabbed for me to start trying some new recipes this summer.

“The Lunch Box” was not the only cookbook Elizabeth had tabbed for me to start trying some new recipes this summer.

But, as the school year came to a close and summer began, Elizabeth came to me with the lunch box cookbook and showed me “a few” of the pages she’d tabbed that sounded good to her. She asked me if we could spend the summer trying out some of these lunches, and I agreed we could. She then showed me a few other cookbooks she’d tabbed a few other pages in.

Just a few.

This might take me more than one summer. Like five.

But, keeping my word, we tried the first recipe Elizabeth picked out, a Tuna & White Bean Salad. She even added in her own ingredient: sliced black olives.

She loved it. I made some for Don, he loved it. I even tried it myself, I loved it. I served some as one of the lunchtime options at a playdate and even they loved it. That’s recipe success in my book.

And so today, for my first real summertime Fun Friday post, here is the first fun lunchtime recipe we tried out of Liz’s cookbook. We’ve tried three or four more, and since I always find lunchtime meals to be particularly challenging, I’ll be sharing more of the recipes with you in the future as well.

In trying this recipe we have found that both cut-up triangles of pita pocket bread or crunchy tortilla chips make a good side with this. You can either put it in the bread, or use the bread or chips to scoop it up. You can eat it with a fork or in a sandwich or wrap. It’s a very versatile tuna salad!

100_4674

The very first recipe we tried from Elizabeth’s cookbook: Tuna & White Bean Salad

Tuna & White Bean Salad

from “The Lunch Box”

“In a small container with a tight-fitting lid, combine 2 teaspoons olive oil, 1 teaspoon lemon juice, and 1/2 teaspoon Dijon mustard. Add equal parts canned white beans, rinsed and drained, and canned tuna, drained and flaked. Sprinkle with minced celery and onion. Cover and shake to combine. Season with salt and pepper.”

Enjoy!!

Fun Friday: Kale Chips

21 Jun
These were a fun after school snack!

These really were a fun after school snack!

Kale doesn’t sound all that fun does it?

It really doesn’t. But, I’ve chosen it for my Fun Friday post today for several reasons.

First: We had Kale Chips at the White House for the first Kids’ State Dinner last August. That whole entire trip was fun, including trying the Kale Chips which were from Samuel Wohabe, age 9, from New York.

Second: The newest winners of the Healthy Lunchtime Challenge were just announced yesterday! The Rhode Island winner, Samantha Mastrati, is from Cranston and a friend of ours! She will have so much fun on her trip!

Finally: These were a fun after school snack for the girls to try out. Although Caroline had them and enjoyed them on the trip, no one else had, so I thought this would be a fun snack to share with them.

To make these is super-easy. I bought one bunch of kale for just over a dollar at the store and it made lots of chips!

The prep instructions are minimal and the cook time is quick. Within minutes you have ahealthy, crunchy snack.

Here, according to Samuel’s instructions is the recipe for Kale Chips.

Coat, toss and bake!

Coat, toss and bake!

KALE CHIPS

INGREDIENTS:

1 bunch kale, stems removed and leaves
torn into bite-size pieces
2 tablespoons olive oil
¼ teaspoon salt

DIRECTIONS:

Preheat the oven to 400°F.

On a large nonstick baking pan, drizzle the kale with olive oil, season with salt, and toss until
evenly coated.

Bake until crispy, about 15 minutes.

What’s for Dinner Wednesday: Balsamic Chicken with Rosemary (A South Beach recipe)

12 Jun
This was both simple and delicious!

This was both simple and delicious!

This is a recipe we tried and liked some time back. It’s a South Beach Diet recipe and it was simple, easy and delicious! At this time of year we need quick and easy with all of the end-of-year meetings and events, so I pulled this recipe out again. In this photo, ours is served with couscous and a sauteed vegetable medley of broccoli, cauliflower and zucchini.

BALSAMIC CHICKEN

From the South Beach Diet Book

INGREDIENTS

6 Boneless, skinless chicken breast halves

1 1/2 teaspoons fresh rosemary leaves, minced or 1/2 teaspoon dried

2 cloves garlic, minced

1/2 teaspoon freshly ground pepper

1/2 teaspoon salt

2 tablespoons extra virgin olive oil

4 – 6 tablespoons white wine (optional)

1/4 cup balsamic vinegar

Refrigerate overnight.

Refrigerate overnight.

DIRECTIONS

Rinse the chicken and pat dry.

Combine the rosemary, garlic, pepper and salt in a small bowl and mix well.

Place the chicken in a large bowl. Drizzle with the oil, and rub with the spice mixture.

Cover and refrigerate overnight.

Preheat the oven to 450 degrees.

Spray a heavy roasting pan or iron skillet with cooking spray. Place the chicken in the pan and bake for 10 minutes. Turn the chicken over.

If the drippings begin to stick to the pan, stir in 3-4 tablespoons water (or white wine if using).

Bake about ten minutes or until a thermometer inserted into the thickest part of the portion registers 160 degrees and the juices run clear. If the pan is dry, stir in another 1-2 tablespoons of water or white wine to loosen drippings.

Drizzle the vinegar over the chicken in the pan.

Transfer the chicken to plates. Stir the liquid in the pan and drizzle over chicken.

Serves six

Per serving: 183 calories, 26 g. protein, 4 g. carbohydrates, 6 g. fat, 1 g. saturated fat, 270 mg. sodium, 65 mg. cholesterol, 0 g. fiber

Fun Friday: Oven Fried Parmesean Zucchini Rounds

31 May
This recipe from the Sugar Free Mom blog make a great after school snack!

This recipe from the Sugar Free Mom blog make a great after school snack!

Happy Friday to you!

Part of my Friday routine usually includes a visit to my Grandma Rose with my kids after school. We spend some time together, have a few snacks and treats and then off we go until the next visit.

One thing Grandma Rose is famous for is her Fried Zucchinis. She has a knack for slicing them, coating them and frying them perfectly. Whenever there is an event, she makes about 100 of them.

The funny thing is: she doesn’t even like them!

Let’s just say it’s a good thing I am not the one responsible for bringing them to events. I’d probably start out with 100 and end up with about 50 of them by the time I arrived.

Lately, with our low fat dietary restrictions, I’ve been finding other alternatives to some of our favorite foods, and this recipe from the Sugar Free Mom blog was a great option for us. The author of the blog, Brenda is a local mom in our community.

The zucchini rounds are baked, not fried and they are much lower in fat. Brenda adds in Parmesan cheese to her recipe, where Grandma Rose does not, but it adds a great flavor to it.

Here’s the recipe as Brenda has it on her blog. Be sure to visit her blog as she has loads of great recipes on there, and she has lots of healthy options. No matter what your restrictions are, you will find something you like on her blog.

Sugar Free Mom’s Oven Fried Zucchini Rounds

I used my Pampered Chef slicer to make prettier sliced zucchini.

I used my Pampered Chef slicer to make very pretty sliced zucchini.

INGREDIENTS

  • 3 large zucchini, sliced (6 cups sliced rounds)
  • 1 whole egg
  • 1 egg white
  • 1 1/2cups Parmesan cheese, grated
  • 1/4 cup fresh parsley, chopped
  • 1/2 teaspoon garlic powder
  • olive oil cooking spray
  • DIRECTIONS
  • Preheat oven to 425 degrees.
  • Spray baking sheets with cooking spray.
  • Beat the egg and white in a shallow bowl, set aside.
  • Place the Parmesan, garlic powder and parsley in another bowl and mix well.
  • Dip zucchini rounds in egg mixture then in Parmesan and place on baking sheet.
  • Do not overlap zucchini on baking sheet.
  • Bake for 10 minutes then flip them over and bake until 10 minutes or until the are golden brown on top.

What’s for Dinner Wednesday: Anthony’s Stir Fry in Valerie’s Cast Iron Skillet

29 May
This was a recipe with all the best ingredients.

This was a recipe with all the best ingredients.

Many of you who have been reading this blog since its inception and even those of you who used to read my Sauce vs. Gravy recipe blog way back when, know that recipes mean more to me than a good meal.

To me a good recipe is one that means something to me because of a connection that I have to it, whether it is from a family member or a friend, whether it’s a dish I ate at a memorable event or maybe even stems from a family tradition that we hold near and dear.

Recipes connect me to others and to memories of others.

Today’s recipe is from my friend Anthony. Anthony owns Reel to Real Recording Studio here in Cranston and we will sometimes bump into each other at local events, but we are friends on Facebook so we “see” each other on there all the time.

Recently, Anthony posted a photo on Facebook of a stir fry he was making for dinner at his house. It looked delicious. I had to have it and I asked him if there was anything special in the stir fry as far as a sauce, but he said it was simple: olive oil in the bottom of the pan, and Worcestershire sauce mixed in while cooking, basically made to your liking. Anthony listed some ingredients he will often throw into his stir fry, including chicken or shrimp,  zucchini, broccoli, and cauliflower.

The next time I went to the store, I bought chicken AND shrimp, zucchini, broccoli and cauliflower. I couldn’t wait to get home to make our dinner that night. There was going to be something in this dish that everyone loved.

Even better, I was going to be using our new cast iron skillet, given to me by my cousin Valerie just a few weeks ago. When Val asked me if we had a cast iron skillet, I said that we didn’t, and she said she had an extra one that she would bring to me when she came down for Alexandra’s First Communion.

When she arrived, she gave me the pan and along with it, an envelope with my name on it. Because we were having the party, I didn’t get to read Valerie’s note until the next day, but when I did, I almost cried as I read.  In the letter, Valerie told me the story of the skillet and how she’d found it while shopping with her brother in-law during their annual summer consignment shop shopping trips. She mentioned that it’s just she and he who love these shopping trips. Her husband and his sister are not fans of the “junk” that Val and John bring home.

The story of my cast iron pan makes everything I cook in it, including Anthony's Stir Fry, that much more special.

The story of my cast iron pan makes everything I cook in it, including Anthony’s Stir Fry, that much more special.

The skillet was part of a set of three, “dusty, rusty, neglected diamonds in the rough,” Valerie wrote. She told me of how she and John bought the pans and took them home. She knew that these treasures only needed “a good home, a hot bath, and someone to make them feel useful again, things we all want.”

Valerie cleaned and seasoned our skillet for us, giving us the last of the three rescued trio of pans in the set that she and her brother in-law had found last summer.

“Good, old, seasoned cast iron is a treasure. it is a work horse in the kitchen. It holds the heat well, cooks evenly, is the original ‘non-stick’ cookware. it makes mean fried eggs, crusty hash browns and frittatas to die for,” Valerie said.

Last week, my new cast iron skillet made a fabulous stir fry, Anthony’s Stir Fry, and it was delicious.

Good friends, good pans, and treasured family members. I am blessed to have them all.

Give Anthony’s Stir Fry a try with your favorite ingredients in it.

And if you have a cast iron skillet of your own, definitely use it.

What’s for Dinner Wednesday: John Wayne Casserole

22 May
This was a great Mexican dish that we were able to make using many nonfat ingredients.

This was a great Mexican dish that we were able to make using many nonfat ingredients.

My family enjoys eating Mexican foods. I make a good Taco Bake, we eat quesadillas, tacos and a yummy nacho bake. We’ve had to tone down our menu to make it more fat-free or at least low fat, but it’s easy to do with most of those items by changing just a few key ingredients.

Today’s recipe is one that was sent to me by my father-in-law a couple of weeks back. The title of the email said, “Looks good.”  And indeed, it did look good.

I was able to use the recipe by making the following substitutions:

Ground turkey instead of ground beef

Nonfat sour cream instead of regular

Nonfat cheddar cheese instead of regular

Light mayo made with olive oil instead of regular

I also had to cheat a bit and use salsa instead of the fresh onion, tomato and pepper, because I thought I had a pepper here and when it came time to make dinner, I did not.  If I make this again I’d do the fresh veggies instead, but the salsa did work fine.

Of all people, Alexandra was the kid who loved this the most. She’s by far the pickiest eater. Caroline liked all but the top and Liz liked it well enough. Don and I loved it. I even ate it leftover and it was just as good.

It did make a lot, and I think the next time I’d cut it in half, and use an 11×7 dish rather than a 9×13 dish.

Don even said he’d throw the corn right in the layer with the meat. It was definitely a hearty dish and a tasty one! If your family enjoys Mexican meals too, I’d recommend this!

The recipe as my father-in-law sent it, is below.

JOHN WAYNE CASSEROLE

Ingredients

2 pounds ground beef, cooked and drained
1 (1.25-ounce) packet taco seasoning
4 ounces sour cream
4 ounces mayonnaise
8 ounces Cheddar cheese, shredded and divided
1 yellow onion, sliced
2 cups biscuit mix
2 tomatoes, sliced
1 green bell pepper, sliced
1 (4-ounce) can sliced jalapeno peppers

Directions

1. Heat oven to 325. Brown ground beef and add taco seasoning and water, according to packet instructions; set aside.

2. In a separate bowl, combine sour cream, mayonnaise, 4 ounces of cheddar cheese, and half of the onions; set aside.

3. Stir biscuit mix and water (directions on box) **our box said to use milk so I did and it was skim**to form soft dough. Pat dough on the bottom and one-half-inch up the sides of an 9 x 13 in. greased casserole dish.

4. Saute remaining onions and bell peppers until slightly tender.

5. On top of biscuit mix, evenly distribute ingredients in the following order: ground beef, tomato slices, green peppers, onions, jalapeno peppers, sour cream mixture and end with remaining shredded cheese.

6. Bake for 30-40 minutes or until edges of dough are lightly browned.

Fun Friday: Mozaik 48 Piece Mini Dessert Set

17 May
These were so much fun I just had to feature them for a Fun Friday post!

These were so much fun I just had to feature them for a Fun Friday post!

A few weeks ago we hosted our daughter’s First Communion at our house. Besides cake, we had several other desserts and today I wanted to feature one of them.

My friend Paula had sent me this cute little 48 piece mini dessert set in the mail,  a set from Mozaik. When she saw it in a store near her, she said she thought it would be perfect for First Communion, and she was right.

Around the same time, the girls and I had attended an event at our local library that I covered for the newspaper. Advertised as a Teen Cooking Challenge, the kids had to each create their own healthy trifles, using pudding, whipped cream, and fresh fruit.

Trifle picture

I never imagined that I’d find my First Communion dessert at a kids’ cooking event at our local library!

When I saw the kids’ trifles, I knew I’d found my dessert, simple as it was, for First Communion.

And when I say simple, I mean really.simple.

The desserts I made were in two variations: Jello Sugar Free, Fat Free instant cheesecake flavored pudding or chocolate flavored pudding, prepared using skim milk, and topped with a low fat topping from Aldi’s that’s like Cool Whip. I topped the cheesecake desserts with fresh strawberries and the chocolate desserts with fresh blackberries.

Yup. That’s it!

Each little cup has a matching little spoon, which made for a really cute, yet seemingly elegant, healthy dessert! They were such a hit, there were just a couple of them left over at the end of the day.

There are so many cute ideas that you could use this set for, both desserts and appetizers. Picture a healthy veggie dip in the bottom with a few celery, zucchini and carrot sticks sticking out, or picture individual shrimp cocktail sauces with a few shrimp. Perfect, right?

Right.

And that, my friends, is my Fun Friday post for today!

Enjoy your weekend!