Archive | After School Snacks RSS feed for this section

Fun Friday: Apple Pie Bites from Megan’s Frugalista Diaries

2 Jan
The house smelled so good when the kids arrived home from school on this particular afternoon!

The house smelled so good when the kids arrived home from school on this particular afternoon!

Happy New Year!

After taking some time off from my blogging this past week, I’m sliding back into my regular routine. As I often do, next week I’ll begin blogging some great toy and gift reviews from the holidays. I’ll continue this during the month of January in order to give you some gift-giving ideas for the rest of the year, but before I do, I thought I’d put out a new Fun Friday recipe for you.

Today is Friday and it’s still school vacation, so there’s lots of time to relax and do some fun things together before heading back to the school routine. I love school vacation weeks exactly for this reason. We get to do some fun things that we normally don’t have time for during the craziness of the school year. This is a perfect recipe to try out today. It’s a great recipe for little hands to help with (or for bigger hands to complete on their own) and it’s warm and delicious.

The recipe comes from Megan Zietz over at The Frugalista Diaries blog, but I actually saw it on another blog where she was guest blogging for the day. The ingredients and directions are simple and quick, making it a perfect after school snack, dessert or school vacation day treat.

Megan made a note (see below) that she used Immaculate Baking Company’s crescent rolls. I did not have those on hand but I did use a lowfat version of another company’s crescent rolls. I also skipped the vanilla ice cream since I was using this as an after school snack, but if I were making them for a more involved dessert, I’d definitely put ice cream out.

These all got thumbs up. There were eight crescents and five people here, so next time I’d definitely do two packs of crescents to double the recipe. I think you could also throw in some dried cranberries or some raisins to this recipe, and I bet it’d be great.

I hope you’ll visit Megan’s blog. She’s got lots of great posts on there and she covers more than food, so pay her a visit!

Here’s Megan’s recipe:

Apple Pie Bites – Serves 8
1 (Tart) Apple Sliced
3 Heaping Tbsp. Brown Sugar
2 Tbsp. Cinnamon ( I used a homemade Cinni-Sugar Mix)
1 Tbsp. Melted Butter
1 Pkg. Of Immaculate Baking Co. Crescent Rolls
*(I use immaculate baking co. when I’m not doing homemade – no hydrogenated oils and non gmo –  it’s the only thing I feel safe about giving my kids when it’s not from scratch)
Preheat Oven to 350˚
1. Roll out the dough on a greased cookie sheet, brush with butter and sprinkle Brown Sugar and Cinnamon in individual pieces of dough.
2. Roll up an apple slice in the dough forming a crescent, brush with melted butter and top with cinnamon.  Repeat for others.
3. Bake for 12-15 Mins at 350˚.

4. Remove from Oven, filling will be hot! Serve alone or with a dollop of Vanilla Ice Cream.


Fun Friday: Weelicious Pumpkin muffins with cream cheese frosting

7 Nov
We needed a Fun Friday snack. It was only Wednesday, but we needed it.

We needed a Fun Friday snack. It was only Wednesday, but we needed it.

We’re having an awfully rough semester. Since August 26, we’ve been hit with “flu-like” viruses, pneumonia, sinus infections and bronchitis. We’ve had ambulance rides, hospital visits, doctor visits and prescriptions galore. My husband had two weeks of jury duty. I think I visited my local CVS at least 25 times in October alone, and I’m not really even exaggerating. We get a $5 reward every time we fill ten prescriptions there. We have three people (the maximum allowed) registered for the reward program and I think I’ve earned $15. Throughout all of it, I’ve been fighting something upper respiratory, myself and I can’t really say I’m coming out the winner in this fight, either.

It’s only November 7.

It’s been a long couple of months, with trying to still stay on top of work, school, birthdays, holidays, food drives and all the other daily “stuff,” but we’re surviving. We’re getting through it and trying to keep all our chins facing in the upward direction. We’ve had plenty of bright spots mixed in throughout the rough spots and we try to make those our focus. We have wonderful friends and family who check in daily, weekly, and more. We know of people who are worse off than we are. Things could be much worse.

Even still, some days we need a little bit of help.

Enter the delicious pumpkin muffins with cream cheese frosting from Weelicious.

I have been getting the Weelicious emails in my inbox for a couple of years now. My wee little ones are not so wee or so little any longer, but I find that her recipes are great for all ages.

Because we needed even more help seeing the bright spots on this particular day that I tried these, I made them into Pumpkin Chocolate Chip Muffins with cream cheese frosting, because chocolate chips make everything seem better.

And they did.

It leads though, to our previous conversation: are they a muffin or a cupcake?

I put in chocolate chips, so that might mean cupcake. If they were just pumpkin, that could mean muffin for sure. But with chocolate chips AND frosting for those who chose to use it, it might be a cupcake.

Honestly, with the week we have been having, I didn’t care.

Pumpkin-chocolate chip-frosting-muffin-cupcake.

They were our after-school snack, late night snack, breakfast and lunch.

Whatever they were, they were delicious. Weelicious did not disappoint. She never does.

Here is her recipe, so that when you’re in need of a pick-me-up you can give them a try. We loved them!

If you love them too, you might want to sign up for the Weelicious emails as well.

WEELICIOUS PUMPKIN MUFFINS WITH CREAM CHEESE FROSTING

Ingredients

  • 1 1/2 cups all purpose flour
  • 2 teaspoons baking powder
  • 1/2 teaspoon baking soda
  • 1/2 teaspoon salt
  • 1 1/2 teaspoon pumpkin pie spice
  • 6 tablespoons unsalted butter, melted (I used “I Can’t Believe It’s Not Butter to suit our dietary needs.)
  • 3/4 cup brown sugar, packed
  • 1 cup pumpkin puree
  • 1 large egg
  • 1/4 cup milk
  • 1 teaspoon vanilla extract
  • cream cheese icing:
  • 4 ounces cream cheese, softened (I used 1/3 fat cream cheese to suit our dietary needs.)
  • 4 tablespoons unsalted butter, softened
  • 1 cup confectioner’s sugar
  • 1 teaspoon vanilla extract

Preparation

  1. 1. Preheat oven to 400 degrees.
  2. 2. Place the first 5 ingredients in a bowl and whisk to combine.
  3. 3. In a separate bowl whisk the remaining ingredients.
  4. 4. Add the dry ingredients into the wet and whisk until just combined. *This is where I added in about a cup of chocolate chips.*
  5. 5. Pour into greased muffins cups 3/4 full.
  6. 6. Bake for 20 minutes.
  7. 7. To make the frosting, combine all ingredients and beat for 1-2 minutes, until fluffy
  8. 8 . Cool, frost and serve.


What’s for Dinner Wednesday: Soup for everyone

5 Nov
Three soups that are quick, easy and can all be done simultaneously.

Three soups that are quick, easy and can all be done simultaneously.

Earlier in the school year I did quite a bit of food preparation ahead of time, making and freezing foods for future use. One thing I’d wanted to do but hadn’t had time to do, was make and freeze some soup.

Recently when I had one child home sick for an extended amount of time, I had an afternoon where I’d have a couple of hours to make some soup. The only question was, what kind of soup? Everyone has a favorite. I love cream of broccoli and creamy cauliflower soup, as does my oldest daughter, who happened to be the one home sick. But, my other daughters and my husband, they love the cream of tomato soup that I’ve been making lately and my middle daughter in particular had been asking for it quite often.

When I thought about the recipes though, they were all pretty similar. Other than the actual vegetable for each soup, namely broccoli, cauliflower and tomato, the base ingredients and instructions were all pretty similar: onion and chicken broth. The tomato soup had a few extra spices thrown in, and the broccoli soup had celery added in and some milk and flour at the end, but ultimately I realized that I could actually make all three at the same time, almost like an assembly line: cut up all the onion, divide it into the soup pots, cut up each veggie and add them in, and then simmer. If any additional steps or ingredients were needed, it wasn’t all that hard to do. Nothing was complicated, expensive or time-consuming. In an hour I’d be done. The tomato soup has an option to put in tortellini and shrimp at the end, but this time around I was doing it without those last two ingredients mostly because that is what had been requested.

Just like that...three soups, done and everyone's taste buds were happy!!

Just like that…three soups, done and everyone’s taste buds were happy!!

Although I cried a lot of tears cutting up all those onions, overall it was a great experiment and all went off as planned. I had enough soup for whoever wanted whatever kind they wanted over the next couple of days, and then using quart-sized bags, I froze the rest. We already had a cold, rainy Sunday afternoon where a few of us had soup for lunch from the freezer, and there’s still more for whenever we need it, whether it’s for an after school snack, a lunch or a dinner where someone doesn’t like what’s on the regular night’s menu.

Since these soups have already been featured on my blog, I’m putting the links below so that you can refer to them if you’d like to make any or all of them for yourself. The weather here is starting to cool down and it will be nice to have some soups for the upcoming chilly days and nights ahead!

Here are the links for you.

If you’d like to make the Cream of Broccoli Soup, click here.

If you’d like to make the Creamy Cauliflower Soup, click here.

If you’d like to make the Creamy Tomato Soup, click here.

Enjoy!

Fun Friday: Pumpkin Pie Nutella Chocolate Chip Snickerdoodle Bars

24 Oct
Talk about getting a bang for your buck! These treats have it all!

Talk about getting a bang for your buck! These treats have it all!

I’m not sure if I’m an emotional-stress eater or not, but I’m definitely an emotional-stress baker and cooker. I always crave the opportunity to get into the kitchen and cook something or bake something (or in a perfect world, both) to relax after a tough day, week or lately, a tough month. I like cooking and baking for others and trying out new things to get myself to chill out and relax. Oftentimes after my initial piece of whatever I’ve baked, I’m pretty happy and relaxed til the next time. I don’t need to eat the entire thing, just a taste.

Last weekend, after two particularly tough weeks scattered with illness, elementary school death threats, jury duty for my husband and all the usual daily work and school stress, I was in quite a mood, looking to bake SOMETHING good for the family to take the edge off. I went onto Pinterest, a place I hadn’t visited in a while, found their search bar (which seemed slightly different than the last time I’d been on) and I typed in all the things I was currently craving: pumpkin, Nutella, chocolate chips.

All those things had to go together in something, I was sure of it.

I was in luck! Sure enough, Parsley, Sage & Sweet had a recipe for me! I knew someone would. It’d be hot and out of the oven in just an hour or so.

Pumpkin Pie Nutella Chocolate Chip Snickerdoodle Bars.

Yes, seriously.

I got to work, feeling better and better by the minute.

I won’t lie, the recipe has some steps to it, but believe me, it was worth it in the end!

Through this baking experience, I also learned a valuable lesson that I’ll pass on to you, just as I shared it on Facebook that same evening:

“If you try to put the plastic jar of Nutella into the microwave to soften it up for baking, all the while thinking just how smart you are thinking of this little shortcut, you must remember that the wrapper over the top was originally metal and that there might be some left on there which will potentially catch fire and giant, bright blue sparks will fly inside the microwave, scaring you and your children half to death while making your husband jump higher and run faster than you’ve seen in a long time when you gasp out loud in the kitchen. You’re welcome.”

That said, this was a delicious treat! Everyone was anxious to try it out so I served it warm, waiting just ten minutes to cut into it, rather than the suggested hour cooling time, and it was a hit. However, I had one more piece a day or so later, after the whole thing had been refrigerated, and YUM!! Even better cold, in my opinion, just like pumpkin pie.

I plan to make them again this weekend for a get together I’ll be attending on Saturday.

Here’s the recipe as it’s seen on the Parsley, Sage and Sweet blog. The only thing I did differently was to use regular sized chips instead of mini. I really don’t “do” mini chocolate chips.

Pumpkin Pie Nutella Chocolate Chip Snickerdoodle Bars
Adapted from Megan’s Cooking via Julia, author Of Dozen Flours- with my revisions

Snickerdoodle Layer
3 cups all-purpose flour
2 teaspoons baking powder
1 teaspoon salt
1 teaspoon ground cinnamon
2 cups packed brown sugar
1 cup butter, at room temperature
2 eggs, room temperature
1 tablespoon vanilla
1 cup mini-chocolate chips or chopped chocolate.

Pumpkin Pie – Nutella Layer
1 cup all-purpose flour
1 cup white sugar
1 stick butter, at room temperature
1 teaspoons baking powder
1 teaspoons salt
1 teaspoon pumpkin pie spice
2 eggs, at room temperature
1 1/2 cups fresh roasted or canned pumpkin puree
1/2 to 3/4 cup Nutella

Topping
2 tablespoons white sugar
2 teaspoons cinnamon

DIRECTIONS:
1.  Lightly butter or oil spray a 9 x 13 inch baking pan or dish.  If desired, line with parchment paper, two edges hanging over, so you can lift the whole uncut bar out of the pan for easier cutting.

2. Sift together flour, baking powder, cinnamon and salt and set aside. In large bowl, beat together butter, sugar, egg and vanilla until smooth. Stir in the flour mixture into the egg mixture until uniform. Stir in the mini-chocolate chips. Spread the dough as evenly as you can on the bottom of the pan.

3. In a mixer bowl (you can use the same one you used to make the snickerdoodle dough) with a paddle attachment, mix together butter and sugar (You can also use a hand mixer, or a just a spoon) Add the rest of the ingredients and mix until well combined. This mixture is looser, so pour/scrape over the snickerdoodle layer, smoothing out the top. Preheat oven to 350F.

4.  Drop tablespoons of Nutella over the top of the pumpkin pie mixture.  About 4 rows of three dollops.  Marble gently with a knife or spoon.

5. Combine white sugar and cinnamon in a little bowl. Evenly sprinkle cinnamon sugar mixture over the top of the batter.

6. Bake at 350F for about 35-45 minutes, (depending on your oven..for some, it has taken longer) or until a toothpick inserted into the center comes out clean. Let the bars cool completely (about an hour).
.
7. Use the parchment paper to lift the bars out of the pan. Place on a cutting board and cut into bars.  Drizzle cut bars with melted chocolate (better to drizzle them when cut so some chocolate drips down every side).

8. Let chocolate set or eat them before the chocolate sets (which we did). Store any remaining bars in a covered container, preferably in the fridge so they last longer.


Stop by and visit us on….

20 Oct
Stop by either of two websites to see my blog post for Pilgrim Pies featured!

Stop by either of two websites to see my blog post for Pilgrim Pies featured!

Everything is coming up Pumpkin!

Everywhere you go, everything is featured in flavors of fall.

If you go on over to either this website, or this one, you’ll see my blog post from The Whole Bag of Chips “Pumpkin Palooza” series, featuring the recipe for Pilgrim Pies, which is such a seasonal favorite.

It’s the greatest form of flattery when someone wants to feature your work on their site, and it’s even greater when they credit you for your work. Thanks so much to the crew over at cpnewsnet.com for featuring my work and doing such a great job!

Happy Fall, Y’all!

Get your pumpkin on and Go Orange for No Kid Hungry!

1 Oct
Thanks to Paula over at My Soup For You for teaming up with me today to bring you some great pumpkin recipes, and for bringing even more awareness to No Kid Hungry!

Thanks to Paula over at My Soup For You for teaming up with me today to bring you some great pumpkin recipes, and for bringing even more awareness to No Kid Hungry!

It’s October! It’s fall. It’s the season of beautiful leaves, fun autumn events like apple picking, hay rides and pumpkin carving.

Pumpkin….mmmmm…..does it make you think of pumpkin spiced coffee, pumpkin ice cream, pumpkin muffins and pumpkin pie?!

Me too!!

We’re a lucky bunch, most of us. We can run through the drive through at the local donut shop and get this month’s pumpkin flavored muffin or drink, without too much of a struggle. We can pop a recipe for my good friend Paula’s Pumpkin Chocolate Chip Bread or her Pumpkin Soup right into the oven and enjoy it without too much trouble. All those warm, orange flavors warm our bellies and our thoughts all throughout the fall.

We’re very lucky.

Not everyone is so lucky, however. According to the No Kid Hungry statistics for our local area, as of June 2013 (more than a year ago), 22% of kids in our little state were struggling with hunger. Fifty-five percent of them were eligible for free or reduced lunch at school, and only 51% of those students were eating school breakfast.

At a recent school event I covered for the newspaper earlier this month, when a room full of young students were asked what the most important thing was that they’d miss if they were late to school, their answer wasn’t attendance, or morning math, or reading, it was breakfast. Every student who raised their hand was worried that if they were late to school in the morning, they’d go hungry until lunchtime.

Childhood hunger across our nation is a growing problem, but we can do something to help.

Last year, you may remember that our own family started a local Go Orange Day for No Kid Hungry after seeing a television commercial about the nationwide effort to help end childhood hunger. Nationally, the official Go Orange Day for No Kid Hungry is at the end of September, but we opted to do ours just a little bit later at the start of October. It was a big success. We rallied our large school district, the superintendent’s offices and City Hall all to Go Orange for No Kid Hungry, and raised over $1000 in monetary donations as well as bringing in hundreds of pounds of non-perishable food items for our local food pantry. We were helping to put food on the tables of families all around us, and it was a great feeling.  All around us, local restaurants and other establishments went Orange as well, donating portions of their proceeds to the No Kid Hungry effort, and wearing orange to show their spirit.

This year, we’re doing it again. We’ve pushed our date out slightly further, and this year on Friday, October 31, Halloween Day we’ll be getting our pumpkin on, going Orange for No Kid Hungry again. We’ve rallied our school district, our superintendent’s office, City Hall, and even our church to help us put an end to childhood hunger again this year. So far we’ve had TEN local responses for going Orange on Halloween Day. Even more exciting, we’ve had some inquiries from local folks wanting to spread this year’s local Go Orange day to their communities and schools within our state and neighboring areas. All around our city, people will be showing their Halloween spirit, dressing in orange, donating money and/or non-perishable food items on Halloween Day and helping out their neighbors all in a day’s work.

We are thrilled. Wouldn’t it be great if we could really make a difference EVERY YEAR?

Wouldn’t it be great if just by spreading awareness and spreading the word, we could help feed other families?

We are foodies, we are blessed, we are thankful to be able to cook and bake and eat our fun pumpkin flavors in the spirit of the season, all month long.

So I ask you: will you get your pumpkin on this Halloween Day too? Will you spread the awareness of childhood hunger in your area and continue the good work of No Kid Hungry and their Go Orange efforts in your city or town, at your school or church or temple? Will you help?

Get your pumpkin on. Visit Paula’s blog over at My Soup for You and help her spread the word too. Make some Pumpkin Soup. Grab some Pilgrim Pies, eat some pumpkin spiced Chex snack mix, and be thoughtful, be thankful that you can help another family in such a simple way.


Fun Friday: Cook once, eat twice. After school snacks and breakfast

26 Sep
These were healthy and a huge hit. Definitely a keeper.

These were healthy and a huge hit. Definitely a keeper.

ORIGINALLY POSTED SEPTEMBER 13, 2013

Cook once, eat twice.

I love that old adage. You cook once, and live on the leftovers. Or, you make double, since you’re cooking anyway, and have twice as much.

Either way, I like it.

I’ve been living on that theme all week long.

I’ve been a cooking machine this week, in between my own work hours, trying to deal with our crazy school year schedules, and making sure that we maintain a healthy eating lifestyle at the same time.

Really, just making sure everyone’s got something to eat when it’s time to eat.

However, one thing I really enjoy doing is making great after school snacks for my kids whenever I can. Everyone has something that makes them happy, and I think I’ve inherited my grandparents’ genes. My dad always said that my grandmother was happiest when everyone was eating.

If everyone is eating, they’re happy, and that makes me happy.

To me, as a mom, there is nothing more special than the moment the kids walk in the door from school. They’re tired, they’re hungry, they’ve got more work to do or places to go, but the look on their faces when they smell a snack fresh out of the oven or see it on the table is priceless to me.

I feel like I have the ability to make their day, every day. Or almost every day. I do the best I can. Later on in life, I want their memories of their school years to include coming in from school, and finding me there with something tasty for them to snack on. Some days I’m not even there, my schedule is not always consistent, but I’ve left them a tasty snack and a note on my way out the door.

To me, it’s things like that which make all the difference.

Everyone loves these whether for breakfast or after school or a meal on the run.

Everyone loves these whether for breakfast or after school or a meal on the run.

Additionally, I try to think smarter these days. If I’m going to make an after school snack, I might as well make enough of it to last for more than just one afternoon. I have tried to make things that can be used either as lunchbox snacks or as breakfast the next day.

These little mini quiches, or however you’d describe them, make a great after school snack. They’re healthy and you can make all different varieties to satisfy even the pickiest of eaters. This time I did tomato/egg/cheese, spinach/egg/cheese and just plain egg/cheese. Fifteen eggs made 16 good-sized cups.

They were a snack and they’ve been breakfast or lunch throughout the week as well.

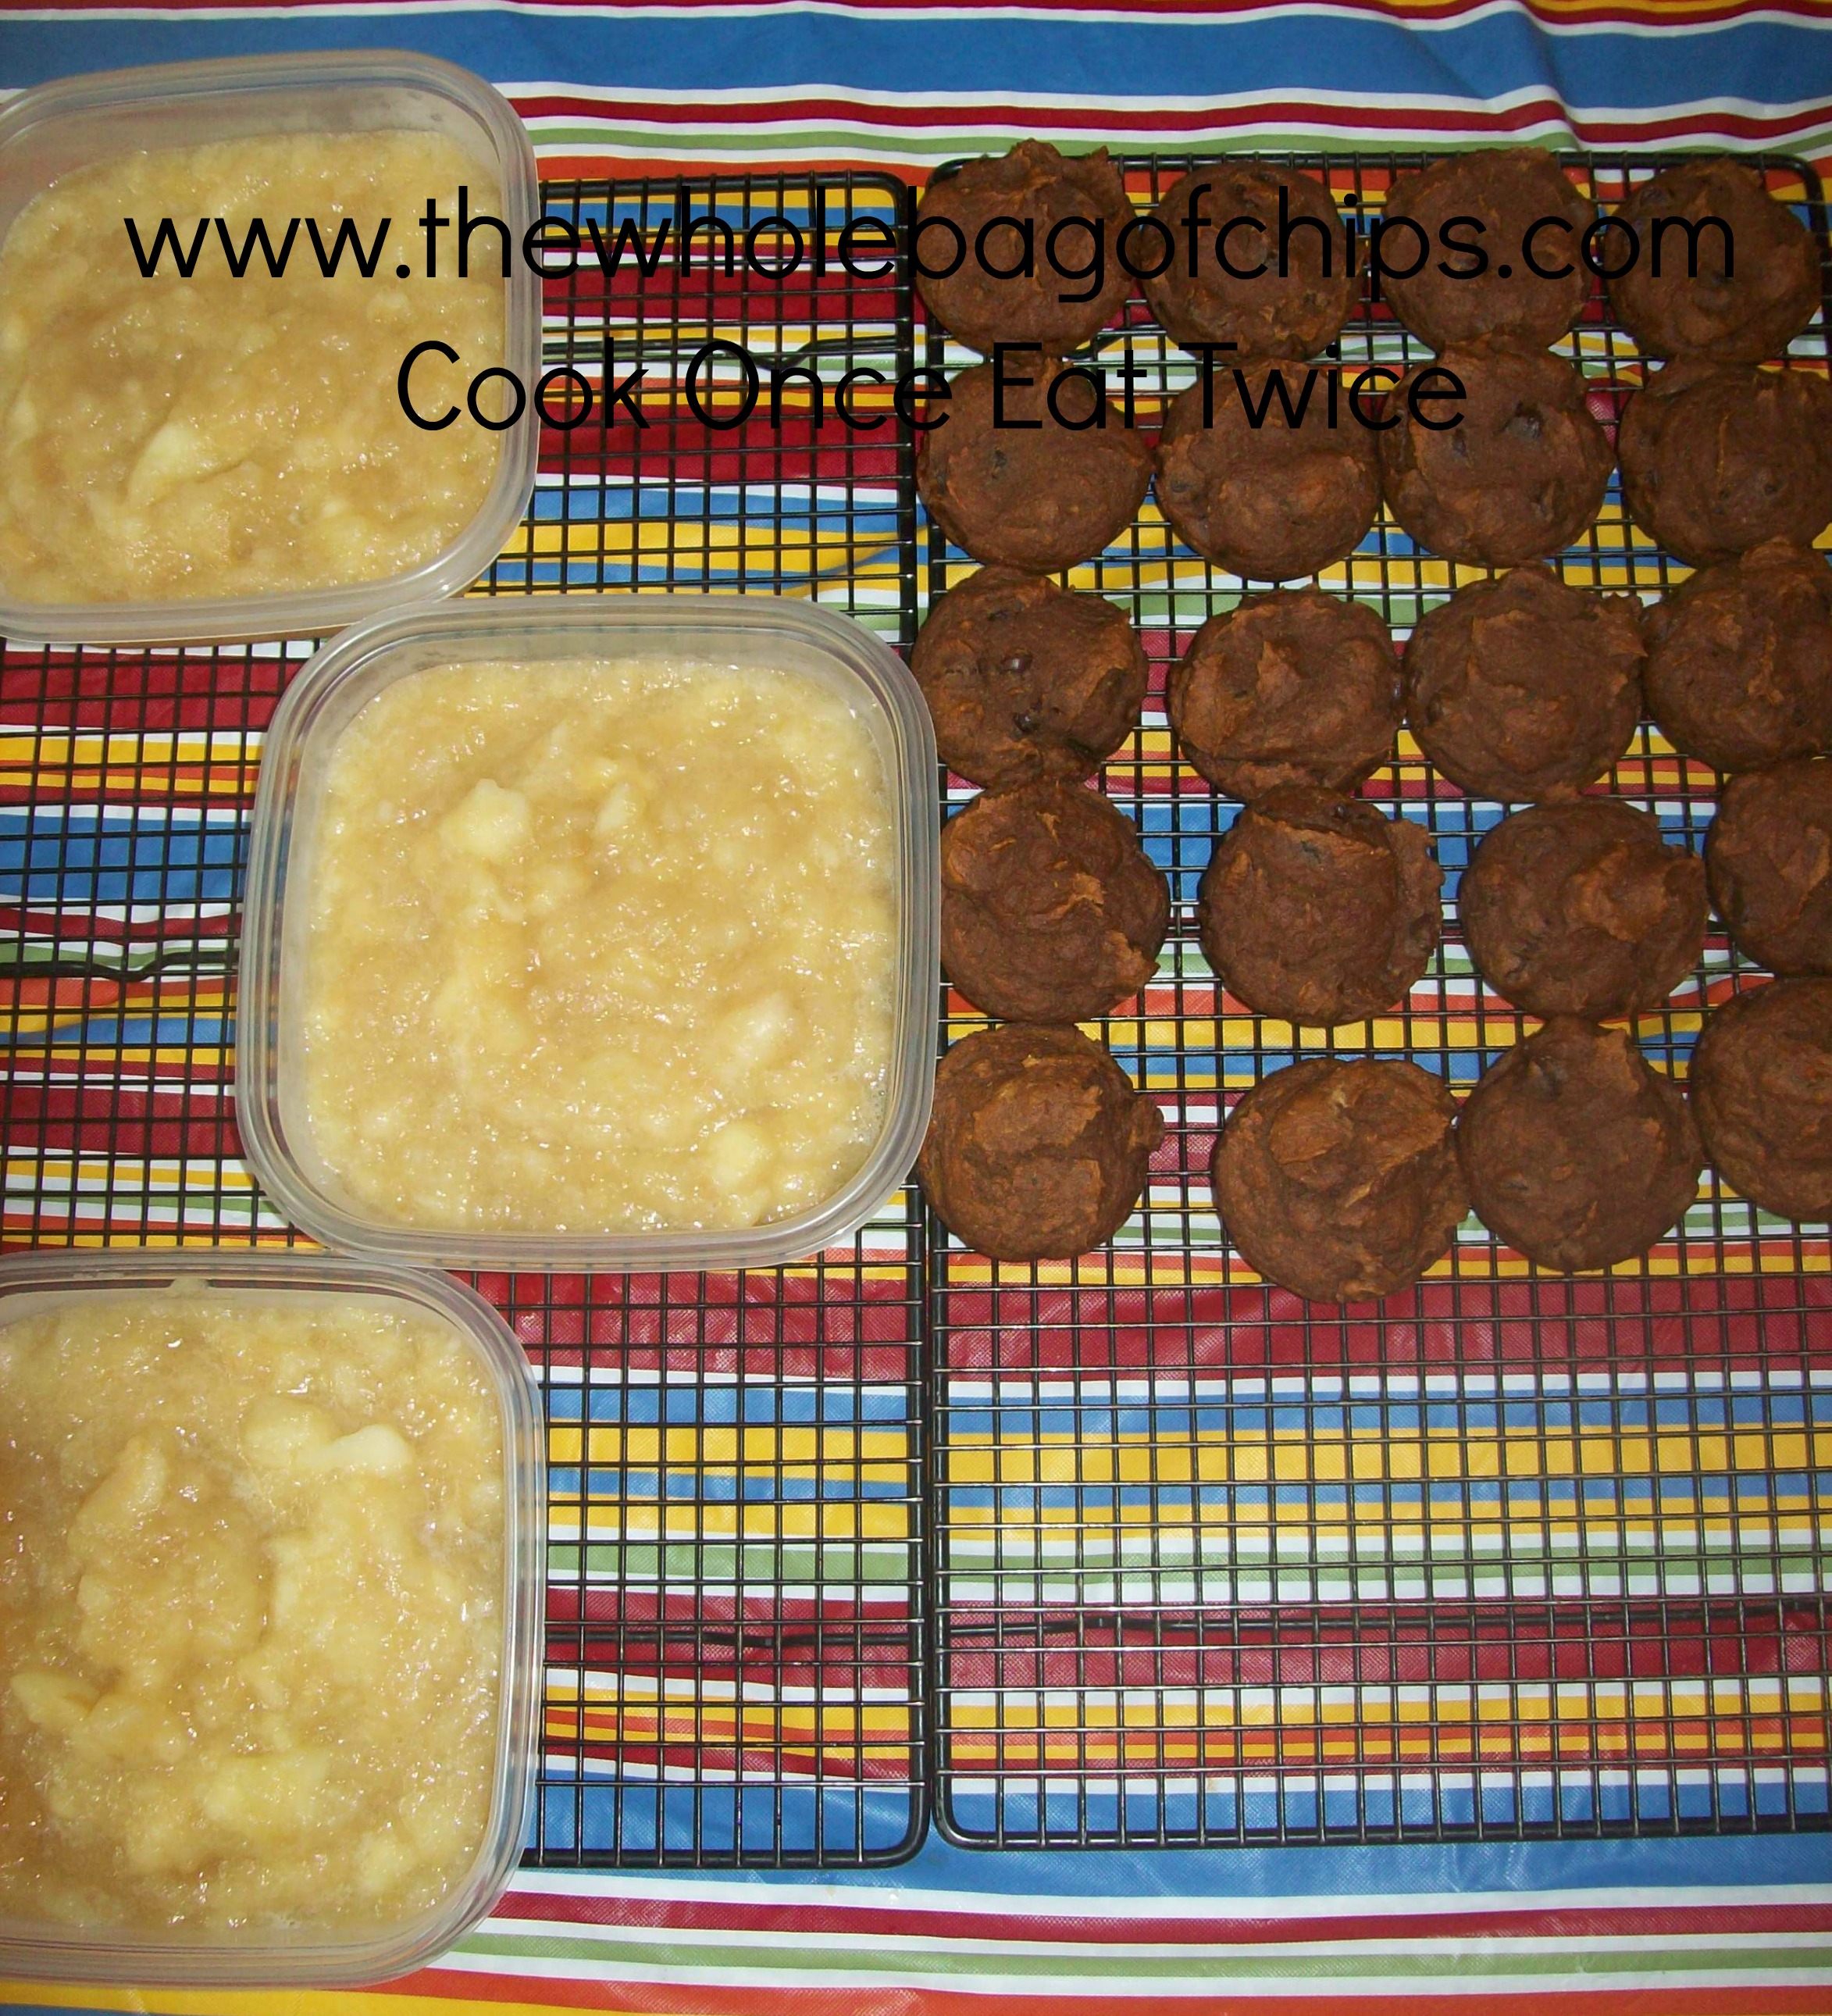
The pumpkin muffins, pictured above, I doubled the recipe to make twice as many. They served as an after school snack, breakfast the next day and a lunchbox snack the day after that.

If I’m going to work hard, I might as well get the mileage out of my efforts.

On that same afternoon this week as the pumpkin muffins, I also made a big batch of homemade applesauce. If I’m going to stand there and peel three pounds of apples, I might as well peel six pounds (although I have to stop there or my hand aches from all the peeling and slicing).

I used one batch in a recipe that night, froze two batches in my freezer for future use, and had some leftover to serve on the side with dinner as well. There’s nothing like homemade applesauce, especially in the fall in New England.

Today, I’m going to share with you the recipe I found for these delicious pumpkin muffins. Note that the recipe calls for mini chocolate chips. I don’t *do* mini chocolate chips. If I’m going, I’m going all the way so mine had regular-sized chips. Otherwise, the recipe I made was the same, just doubled.

This recipe is not my own. Thanks to Skinnytaste.com for posting such a wonderful snack and breakfast! It got all thumbs up at our house and we’d definitely make these again!

If I'm going to spend the time, might as well make it worth my while.

If I’m going to spend the time, might as well make it worth my while.

Skinny Mini Pumpkin Chocolate Chip Muffins
Skinnytaste.com
Servings: 14  • Size: 2 mini muffins  • Old Points: 3 pts • Weight Watcher Points+: 4 pt
Calories: 160 • Fat: 5 g • Carb: 27 g • Fiber: 2 g • Protein: 2 g • Sugar: 18 g
Sodium: 118 mg • Cholest: 0 mg

Ingredients:

  • 1/2 cup white whole wheat flour (King Arthur)
  • 3/4 cups unbleached all purpose flour (King Arthur)
  • 3/4 cup raw sugar
  • 3/4 tsp baking soda
  • 1 3/4 tsp pumpkin pie spice
  • 1/4 tsp cinnamon
  • 1/4 tsp salt
  • 1 1/2 cups canned pumpkin puree (not pumpkin pie filling)
  • 2 tbsp virgin coconut oil (or canola)
  • 2 large egg whites
  • 2 tsp vanilla extract
  • baking spray
  • 2/3 cup mini chocolate chips

Directions:

Preheat the oven to 350°F. Line a mini muffin tin with paper liners and lightly spray liners with oil for easy removal.

In a medium bowl, combine flours, sugar, baking soda, pumpkin spice, cinnamon, and salt with a wire whisk. Set aside.

In a large bowl mix pumpkin puree, oil, egg whites and vanilla; beat at medium speed until thick. Scrape down sides of the bowl.
Add flour mixture to the wet mixture, then blend at low speed until combined; do not over mix. Fold in chocolate chips.

Pour batter into prepared muffin tin and bake on the center rack for 22 to 24 minutes, or until a toothpick inserted in the center comes out clean.

Let them cool at least 15 minutes before serving.

Makes 28 mini muffins or 14 regular sized muffins.

Fun Friday: Banana Split Smoothies

29 Aug
My kids never get tired of having homemade smoothies, especially on these hot days!

My kids never get tired of having homemade smoothies, especially on these hot days!

As I mentioned on Wednesday, this was our first week of school. It was a short week but being the first week, it feels approximately two full weeks long. Not only are we re-adjusting to the school year schedule, but we are also adjusting to a new schedule, an earlier schedule for our oldest daughter, who started her freshman year of high school this week.

To top it off, while our summer has been 8-10 weeks of perfect, not-humid, summer-like weather, not a day over 80 degrees, this first week back in our non-air conditioned schools on our not-air conditioned buses, it’s been nearly 90 degrees, hot and humid every.single.day.

On Day Two, the younger kids took the bus home. They were like soggy noodles getting off the bus; they were so hot, tired and sweaty. As soon as I saw them, I knew exactly what the quick fix would be: smoothies.

Even better, I had a new frozen yogurt in the freezer here at home, an Edy’s Slow Churned, Low Fat, Limited Edition yogurt. When companies call something “Limited Edition,” it almost always becomes a favorite flavor of mine and I almost always pine for it when they take it away from me.

As soon as I saw this, it went right into my shopping cart!

As soon as I saw this, it went right into my shopping cart!

This Limited Edition flavor was made for me: Fun ‘N The Sun Banana Split Frozen Yogurt.

No, I am not even kidding you right now.

It just so happened that I had this Banana Split yogurt, I had two frozen bananas, and I had chocolate syrup. I also had a freezer full of ice and some low fat vanilla yogurt (not the frozen kind) as well. My middle daughter was immediately intrigued by the idea of a banana split smoothie, having had her first-ever banana split dessert on her birthday at a local restaurant this summer.

Suddenly the heat wasn’t so unbearable anymore, and we got to work.

We use our Ninja blender all the time, and I’m so glad we made the investment. I was thankful this week as I put the frozen bananas, the ice, the frozen yogurt, milk and regular yogurt all into the blender. Our old blender could never have handled this type of all-out smoothie that we were creating.

We added some chocolate syrup in, and we turned it on.  Level 1 blending didn’t cut it, so we kicked it up a notch to Level 2. At the end, as I saw some of the ice still in decent sized pieces, I gave it a blast at Level 3.

I poured it into the glasses. My youngest daughter handed out straws. By this time, my oldest was home from her sports practice, which had been outdoors in the hot sun. She too, was melting on the spot. Her eyes lit up when she saw this smoothie that we’d concocted in her absence. She was just in time.

It

Was

Amazing.

If you have the chance, if you have the ingredients, and you’re in the mood, I *highly* recommend you try out your own banana split smoothie. The flavor was fabulous, it hit the spot on a hot day, and I will most definitely be making this again.

And when this limited edition frozen yogurt is gone, I’ll definitely be pining for it all year long until they (hopefully) bring it back again next summer.


Nutella Banana Swirl Muffins

19 Jul
We've made these muffins at least three times since we first saw the recipe online!

We’ve made these muffins at least three times since we first saw the recipe online!

You know how much I love muffins. I’m always on the hunt for a new muffin recipe to try out. My family likes them too.

Add that to the fact that I love Nutella, and they do too, and that makes this muffin recipe from The Novice Chef absolutely perfect. A friend of mine posted it online and tagged me in the post; a list of tons of Nutella recipes all in one spot. This recipe was just the first one, just the tip of the Nutella iceberg.

My usual routine on most Saturday nights is to make a batch of muffins for us to grab and go on Sunday mornings before church. It seems to work well and these muffins were a great addition to my ever-growing list of muffin recipes for our Sunday mornings.

These muffins were also easy enough to make that one afternoon Caroline made them herself. That’s always a good sign: when someone can make the muffins for me!

So if you’re a muffin lover yourself, and a lover of Nutella, I highly recommend that you give these a try! In my opinion, the addition of bananas to the recipe makes it even better…healthier!! It calls for four, and I’ve used as few as three. I also found that using a steak knife for the swirling instead of a toothpick is easier. The batter and the Nutella are thick and a knife holds up better for a great swirl.

And finally, this recipe makes 18 muffins. For a family of 5, that’s excellent. Muffin recipes that yield a dozen are good, but those that yield 18 are better!!

**We omit the pecans when we make them, but I’m sure they’d be delicious with them too!**

Imagine waking up to these on your Sunday morning?

Imagine waking up to these on your Sunday morning?

Nutella Banana Swirl Muffins from the Novice Chef

Yield: 18 muffins

Ingredients:

2 cups all-purpose flour
1 teaspoon baking soda
1 teaspoon baking powder
1/2 teaspoon salt
4 medium over-ripe bananas, mashed
1/2 cup granulated sugar
1/2 cup packed brown sugar
1 large egg
1/4 cup vegetable oil
2 teaspoons vanilla extract
1/2 cup chopped pecans
nutella

Directions:

Preheat oven to 350°F. Line muffin pan with liners.

In a medium bowl, whisk flour, baking soda, baking powder and salt until well combined. Set aside.

In large bowl, whisk together banana, sugar, brown sugar. Beat in egg, vegetable oil and vanilla extract. Slowly whisk in the flour mixture, until there are no lumps. Fold in pecans.

Fill muffin tins 3/4 full. Top each muffin with about 1 teaspoon of Nutella and use a toothpick to swirl it into the batter.

Bake muffins for 15-17 minutes, or until a toothpick inserted in the center comes out clean.

Serve warm or store in an airtight container until ready to serve.


Fun Friday: So Many Strawberries!

4 Jul
What to do with more than ten pounds of strawberries?

What to do with more than ten pounds of strawberries?

We went strawberry picking!!

I had not been strawberry picking since I was a child. Each year it seems, we’d miss the season between the end of school and the start of summer. This year, when a friend posted her picture of her strawberries on Facebook, I decided that I was going to go that same week. I knew my kids would love it and I knew there was lots that I could do with fresh-picked strawberries.

We went on a beautiful, picture-perfect day. There were just a few clouds in the sky, the sun was bright and the temperature was an even 75 degrees; not too hot, not too cold. We couldn’t have asked for a better day.

Within an hour we had picked a basket full of strawberries. I was beyond excited!

As we drove home, I began to consider that full basket of berries that was sitting in the back of my car. I could smell them.

I started to think of all the things I wanted to do with all those berries. I knew that although it seemed like there would be a never-ending supply, I’d have to be strategic and prioritize because eventually they’d run out. I also knew that the berries were fresh and “ready,” which meant they’d turn quickly. I only had a day, two at most, to make use of them.

Right off the bat when I got home, I sliced the berries and put sugar and orange juice on them for strawberry shortcake. I used this recipe from Taste of Home for my biscuits and my berries, but I did add more sugar to my biscuits after taking a quick taste of the batter. I like mine sweet! That would be our dessert for that very night.

This recipe from Caramel Potatoes was so delicious!

This recipe from Caramel Potatoes was so delicious!

Next, I started prepping a dessert recipe I’d seen just days before, on the Caramel Potatoes blog for Strawberry Crumble Pie. I get their email every day and the recipe for the pie looked right up my alley. I happened to have a pie crust in the freezer and I now had plenty of berries.

The pie chilled overnight and we cut into it the next night for dessert. It was amazing!

From there, I needed to think ahead. I knew that part of my goal was to have plenty of berries on hand frozen for smoothies, since that’s something we use a lot of all year long. I had no idea the best way to freeze them, so I Googled how to freeze fresh-picked strawberries and found simple instructions for freezing both whole and sliced from Taste of Home, once again. I decided to do both. The whole would be for smoothies, and the sliced would be for a future strawberry compote, maybe even on July 4th for our breakfast!

The following day I picked one more recipe that I wanted to make as I tried to stretch my berries just a little further: my mother in law’s recipe for Strawberry Bread, one which has always been a favorite of mine. I love that it makes two breads, and we usually freeze one and eat one. This time I put chocolate chips in the one we ate that day and left them out of the one we froze.

There are so many things you can do with strawberries, and the summertime is the very best time to do them. Although picking season is just about done for strawberries, eating season can be all year long between using frozen and fresh, if you can find them. Now that we’ve frozen some, we’ll have the taste of summer once again in the fall or winter, if we can hold off that long!

If you’re looking for additional strawberry recipes, you can find several more here on my blog, just by searching Strawberries in the search bar. There are recipes for desserts, breakfasts, shakes and even a strawberry salad!

And then, before we know it, it’ll be blueberry picking season!