Archive | Eating on a budget RSS feed for this section

Fun Friday: Elizabeth’s Lunches

28 Jun
Elizabeth's cookbook of choice

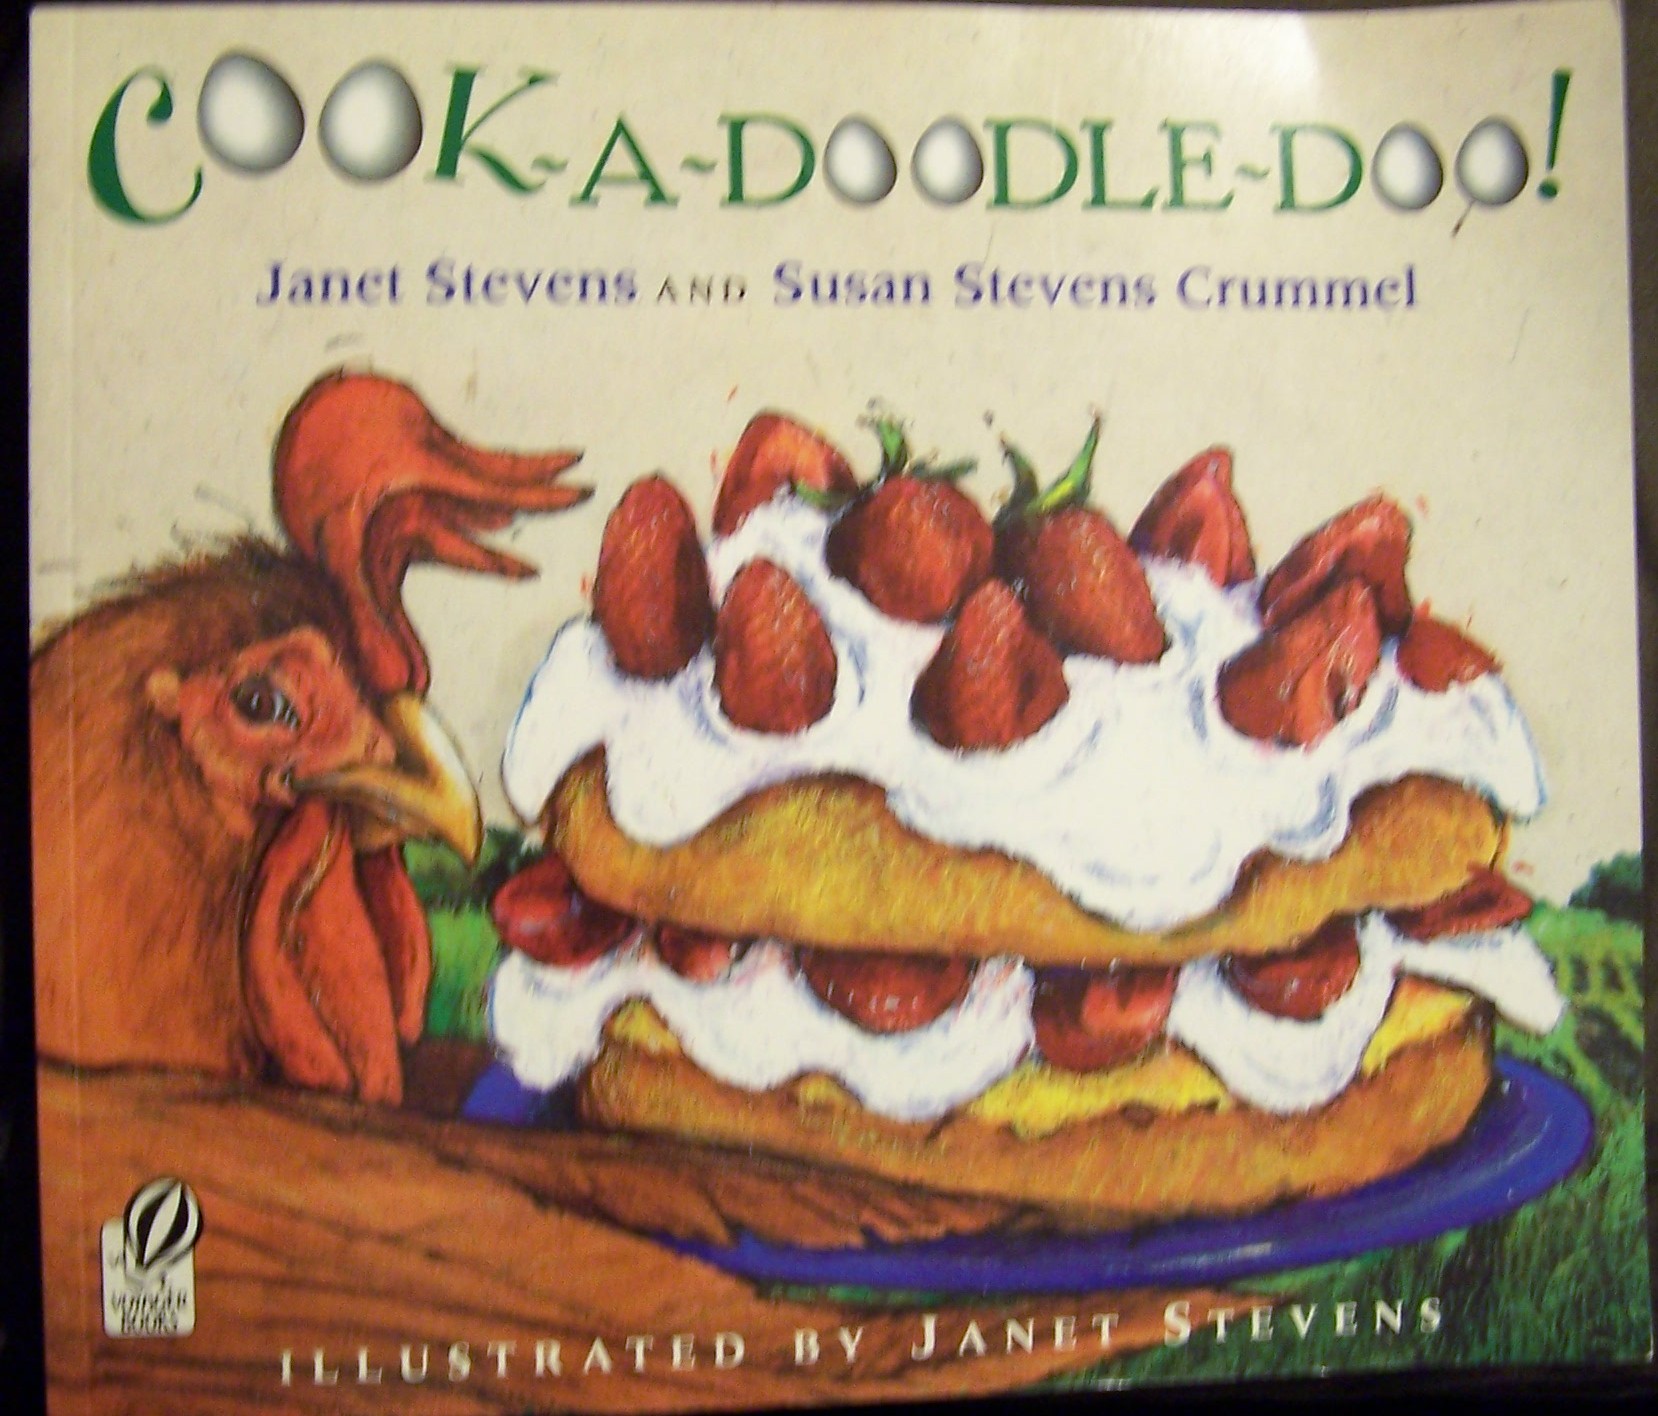
Elizabeth’s cookbook of choice

We’ve often described Elizabeth’s taste as being very mature for her age. She often likes things that surprise us, things that we think other kids her age may not like. It’s exciting to see her try new things, but it’s often challenging to pack her lunch because she’s not a fan of your typical, quick and easy pb&j sandwich.

Last year at some point, she spent one of her Barnes & Noble gift cards on a new cookbook, “The Lunch Box,” filled with unique lunchtime meals. I think she figured if she bought it, we’d make all the things in it for her lunch box.

It was a good thought, but she still ended up with a lot of the more typical lunches we put out each morning- turkey, pb&j, nutella, salad.

Poor Liz.

"The Lunch Box" was not the only cookbook Elizabeth had tabbed for me to start trying some new recipes this summer.

“The Lunch Box” was not the only cookbook Elizabeth had tabbed for me to start trying some new recipes this summer.

But, as the school year came to a close and summer began, Elizabeth came to me with the lunch box cookbook and showed me “a few” of the pages she’d tabbed that sounded good to her. She asked me if we could spend the summer trying out some of these lunches, and I agreed we could. She then showed me a few other cookbooks she’d tabbed a few other pages in.

Just a few.

This might take me more than one summer. Like five.

But, keeping my word, we tried the first recipe Elizabeth picked out, a Tuna & White Bean Salad. She even added in her own ingredient: sliced black olives.

She loved it. I made some for Don, he loved it. I even tried it myself, I loved it. I served some as one of the lunchtime options at a playdate and even they loved it. That’s recipe success in my book.

And so today, for my first real summertime Fun Friday post, here is the first fun lunchtime recipe we tried out of Liz’s cookbook. We’ve tried three or four more, and since I always find lunchtime meals to be particularly challenging, I’ll be sharing more of the recipes with you in the future as well.

In trying this recipe we have found that both cut-up triangles of pita pocket bread or crunchy tortilla chips make a good side with this. You can either put it in the bread, or use the bread or chips to scoop it up. You can eat it with a fork or in a sandwich or wrap. It’s a very versatile tuna salad!

100_4674

The very first recipe we tried from Elizabeth’s cookbook: Tuna & White Bean Salad

Tuna & White Bean Salad

from “The Lunch Box”

“In a small container with a tight-fitting lid, combine 2 teaspoons olive oil, 1 teaspoon lemon juice, and 1/2 teaspoon Dijon mustard. Add equal parts canned white beans, rinsed and drained, and canned tuna, drained and flaked. Sprinkle with minced celery and onion. Cover and shake to combine. Season with salt and pepper.”

Enjoy!!

Fun Friday: Kale Chips

21 Jun
These were a fun after school snack!

These really were a fun after school snack!

Kale doesn’t sound all that fun does it?

It really doesn’t. But, I’ve chosen it for my Fun Friday post today for several reasons.

First: We had Kale Chips at the White House for the first Kids’ State Dinner last August. That whole entire trip was fun, including trying the Kale Chips which were from Samuel Wohabe, age 9, from New York.

Second: The newest winners of the Healthy Lunchtime Challenge were just announced yesterday! The Rhode Island winner, Samantha Mastrati, is from Cranston and a friend of ours! She will have so much fun on her trip!

Finally: These were a fun after school snack for the girls to try out. Although Caroline had them and enjoyed them on the trip, no one else had, so I thought this would be a fun snack to share with them.

To make these is super-easy. I bought one bunch of kale for just over a dollar at the store and it made lots of chips!

The prep instructions are minimal and the cook time is quick. Within minutes you have ahealthy, crunchy snack.

Here, according to Samuel’s instructions is the recipe for Kale Chips.

Coat, toss and bake!

Coat, toss and bake!

KALE CHIPS

INGREDIENTS:

1 bunch kale, stems removed and leaves
torn into bite-size pieces
2 tablespoons olive oil
¼ teaspoon salt

DIRECTIONS:

Preheat the oven to 400°F.

On a large nonstick baking pan, drizzle the kale with olive oil, season with salt, and toss until
evenly coated.

Bake until crispy, about 15 minutes.

Fun Friday: “Cook-A-Doodle-Doo!” A story and an activity for you!

14 Jun
This is a great summer read for you and your family!

This is a great summer read for you and your family!

It’s strawberry season!

Strawberries are one of my all-time favorite fruits no matter what time of year, but in the summertime they are extra delicious! I love to pick them, cook with them and to eat them!

Strawberries are great whether cooked or fresh, and of course, there is nothing like a great Strawberry Shortcake to top off any summer meal!

Last year, my friend Sue brought a book over to my house called “Cook-A-Doodle-Doo!” and it’s a perfect story for this time of year. The story is by Janet Stevens and Susan Stevens Crummel and is illustrated by Janet Stevens.

In the story, the rooster is on a mission to find something better to eat than chicken feed. He enlists the help of several of his animal friends to cook his granny’s Magnificent Strawberry Shortcake.

Through many twists and turns in the kitchen, the group, who is new to cooking and baking, maneuvers through the recipe’s instructions, learning the true meaning behind such things as beating eggs and cutting butter.

One thing that I love about the story is the fact that in the margins of the pages these terms are explained for the young readers so that they can understand more about the ingredients and how they are used. As cute and humorous as the story is, it’s a learning experience for the reader as well.

But the best part of all? At the end of this fabulous story is the recipe for Rooster’s “Great-Granny’s Magnificent Strawberry Shortcake” and it’s a perfect way to end the story, by baking together with the kids, and of course, by eating the fruits of your labor!

I won’t give away the rest of the story, nor will I give away the recipe here. I hope that you’ll gather your family, your ingredients, and get a hold of “Cook-A-Doodle-Doo!” so that you can enjoy some good times in the kitchen this summer!

What’s for Dinner Wednesday: Balsamic Chicken with Rosemary (A South Beach recipe)

12 Jun
This was both simple and delicious!

This was both simple and delicious!

This is a recipe we tried and liked some time back. It’s a South Beach Diet recipe and it was simple, easy and delicious! At this time of year we need quick and easy with all of the end-of-year meetings and events, so I pulled this recipe out again. In this photo, ours is served with couscous and a sauteed vegetable medley of broccoli, cauliflower and zucchini.

BALSAMIC CHICKEN

From the South Beach Diet Book

INGREDIENTS

6 Boneless, skinless chicken breast halves

1 1/2 teaspoons fresh rosemary leaves, minced or 1/2 teaspoon dried

2 cloves garlic, minced

1/2 teaspoon freshly ground pepper

1/2 teaspoon salt

2 tablespoons extra virgin olive oil

4 – 6 tablespoons white wine (optional)

1/4 cup balsamic vinegar

Refrigerate overnight.

Refrigerate overnight.

DIRECTIONS

Rinse the chicken and pat dry.

Combine the rosemary, garlic, pepper and salt in a small bowl and mix well.

Place the chicken in a large bowl. Drizzle with the oil, and rub with the spice mixture.

Cover and refrigerate overnight.

Preheat the oven to 450 degrees.

Spray a heavy roasting pan or iron skillet with cooking spray. Place the chicken in the pan and bake for 10 minutes. Turn the chicken over.

If the drippings begin to stick to the pan, stir in 3-4 tablespoons water (or white wine if using).

Bake about ten minutes or until a thermometer inserted into the thickest part of the portion registers 160 degrees and the juices run clear. If the pan is dry, stir in another 1-2 tablespoons of water or white wine to loosen drippings.

Drizzle the vinegar over the chicken in the pan.

Transfer the chicken to plates. Stir the liquid in the pan and drizzle over chicken.

Serves six

Per serving: 183 calories, 26 g. protein, 4 g. carbohydrates, 6 g. fat, 1 g. saturated fat, 270 mg. sodium, 65 mg. cholesterol, 0 g. fiber

Fun Friday: Spiced Chickpeas for an After School Snack

7 Jun
Everyone enjoyed this snack!

Everyone enjoyed this snack!

I forget sometimes that as much as I love sweets, that there are some people in this house who like the salty, more savory flavored foods. My three kids have a mix of tastes but my snacks are often the sweet kinds because that’s what I like best.

However, recently I found a recipe in the Stop and Shop Magazine for Spiced Chickpeas, which are roasted in the oven, and although I didn’t think I’d personally love them, I decided to try them as a snack for my family. The funny thing is, I personally loved them. Everyone loved them. In fact, I just bought two more cans of chickpeas so we can make them again since it’s been a little while since I made them last.

The recipe was simple and had very few ingredients besides the chickpeas, so it makes it tasty, easy, extremely healthy and affordable. If you’ve never tried them before, if you’re a sweet treats kind of person yourself, I encourage you to step out of your snacking comfort zone and give these a try!

SPICED CHICKPEAS

Makes four 1/2 cup servings

INGREDIENTS

1 can (15.5 oz.) chickpeas (garbanzo beans) about 2/3 cups

1 1/2 tablespoons extra virgin olive oil or canola oil (we used olive)

1/2 teaspoon paprika

Dash of cayenne pepper or to taste

1/4 teaspoon of ground cumin

3/4 teaspoon garlic powder

1/2 teaspoon sea salt (optional)

Nonstick cooking spray

DIRECTIONS

Preheat oven to 400 degrees.

Drain, rinse and dry chickpeas on paper towels.

Combine olive oil and spices in bowl.

Add chickpeas and toss until evenly coated.

Spread chickpeas evenly onto a baking sheet sprayed with non-stick cooking spray.

Bake for 25-30 minutes until golden and crispy.

Shake chickpeas around every 10 minutes or so for even crisping and to prevent sticking.

Remove baking sheet from oven and transfer chickpeas to a serving bowl. Enjoy while warm!

Per serving: 180 calories, 7 g fat, 1 g saturated fat, 0 mg cholesterol, 26g carbohydrates, 5 g fiber, 0 g sugars and 6 g protein

What’s for Dinner Wednesday: Pork Marinade

5 Jun

Dinner: marinated pork, rice pilaf, and carrots/apples/craisins

ORIGINALLY POSTED JANUARY 16, 2012

One of the things I often purchase at Aldi’s at least once per month are their Pork Tenderloins. They’re inexpensive, just the right size for our family (I buy two if we’re having company for dinner) and they come in an “original” flavor, as well as a couple of other flavors. I like the original flavor because we can do whatever we want to the pork. Sometimes we use teriyaki, sometimes we do barbeque, and sometimes we do a simple pork marinade.

Today I’m sharing the recipe with you for the Pork Marinade. Of course, it’s a recipe from my mom and the instructions say “Also good on steak,” and “Don’t double.”  So don’t.

PORK MARINADE

4 TBL Soy Sauce

2 cloves (1 tsp) garlic, crushed or chopped (we usually use minced out of the jar if we don’t have fresh.)

2 TBL olive oil

2 tsp Brown Sugar

1 tsp ground ginger

1/2 tsp pepper

ziploc bag marinated pork tenderloin

Throw it all in a bag and you’re good to go.

That’s all there is to it! Super easy. Throw it all in a ziploc bag or tupperware marinater, throw in the pork and you’re good to go. This can be made ahead and frozen, pork and all, for future use as well. When I was pregnant with my third daughter, during my nesting or as I like to call it, panicking, I marinated and froze many different bags of pork, steak and chicken (different marinade for chicken, I’ll share it another day) ahead of time and we were able to use them for weeks and months afterwards.

Hopefully this budget-friendly dinner idea works well for you too!

Enjoy!

Fun Friday: Oven Fried Parmesean Zucchini Rounds

31 May
This recipe from the Sugar Free Mom blog make a great after school snack!

This recipe from the Sugar Free Mom blog make a great after school snack!

Happy Friday to you!

Part of my Friday routine usually includes a visit to my Grandma Rose with my kids after school. We spend some time together, have a few snacks and treats and then off we go until the next visit.

One thing Grandma Rose is famous for is her Fried Zucchinis. She has a knack for slicing them, coating them and frying them perfectly. Whenever there is an event, she makes about 100 of them.

The funny thing is: she doesn’t even like them!

Let’s just say it’s a good thing I am not the one responsible for bringing them to events. I’d probably start out with 100 and end up with about 50 of them by the time I arrived.

Lately, with our low fat dietary restrictions, I’ve been finding other alternatives to some of our favorite foods, and this recipe from the Sugar Free Mom blog was a great option for us. The author of the blog, Brenda is a local mom in our community.

The zucchini rounds are baked, not fried and they are much lower in fat. Brenda adds in Parmesan cheese to her recipe, where Grandma Rose does not, but it adds a great flavor to it.

Here’s the recipe as Brenda has it on her blog. Be sure to visit her blog as she has loads of great recipes on there, and she has lots of healthy options. No matter what your restrictions are, you will find something you like on her blog.

Sugar Free Mom’s Oven Fried Zucchini Rounds

I used my Pampered Chef slicer to make prettier sliced zucchini.

I used my Pampered Chef slicer to make very pretty sliced zucchini.

INGREDIENTS

  • 3 large zucchini, sliced (6 cups sliced rounds)
  • 1 whole egg
  • 1 egg white
  • 1 1/2cups Parmesan cheese, grated
  • 1/4 cup fresh parsley, chopped
  • 1/2 teaspoon garlic powder
  • olive oil cooking spray
  • DIRECTIONS
  • Preheat oven to 425 degrees.
  • Spray baking sheets with cooking spray.
  • Beat the egg and white in a shallow bowl, set aside.
  • Place the Parmesan, garlic powder and parsley in another bowl and mix well.
  • Dip zucchini rounds in egg mixture then in Parmesan and place on baking sheet.
  • Do not overlap zucchini on baking sheet.
  • Bake for 10 minutes then flip them over and bake until 10 minutes or until the are golden brown on top.

What’s for Dinner Wednesday: Anthony’s Stir Fry in Valerie’s Cast Iron Skillet

29 May
This was a recipe with all the best ingredients.

This was a recipe with all the best ingredients.

Many of you who have been reading this blog since its inception and even those of you who used to read my Sauce vs. Gravy recipe blog way back when, know that recipes mean more to me than a good meal.

To me a good recipe is one that means something to me because of a connection that I have to it, whether it is from a family member or a friend, whether it’s a dish I ate at a memorable event or maybe even stems from a family tradition that we hold near and dear.

Recipes connect me to others and to memories of others.

Today’s recipe is from my friend Anthony. Anthony owns Reel to Real Recording Studio here in Cranston and we will sometimes bump into each other at local events, but we are friends on Facebook so we “see” each other on there all the time.

Recently, Anthony posted a photo on Facebook of a stir fry he was making for dinner at his house. It looked delicious. I had to have it and I asked him if there was anything special in the stir fry as far as a sauce, but he said it was simple: olive oil in the bottom of the pan, and Worcestershire sauce mixed in while cooking, basically made to your liking. Anthony listed some ingredients he will often throw into his stir fry, including chicken or shrimp,  zucchini, broccoli, and cauliflower.

The next time I went to the store, I bought chicken AND shrimp, zucchini, broccoli and cauliflower. I couldn’t wait to get home to make our dinner that night. There was going to be something in this dish that everyone loved.

Even better, I was going to be using our new cast iron skillet, given to me by my cousin Valerie just a few weeks ago. When Val asked me if we had a cast iron skillet, I said that we didn’t, and she said she had an extra one that she would bring to me when she came down for Alexandra’s First Communion.

When she arrived, she gave me the pan and along with it, an envelope with my name on it. Because we were having the party, I didn’t get to read Valerie’s note until the next day, but when I did, I almost cried as I read.  In the letter, Valerie told me the story of the skillet and how she’d found it while shopping with her brother in-law during their annual summer consignment shop shopping trips. She mentioned that it’s just she and he who love these shopping trips. Her husband and his sister are not fans of the “junk” that Val and John bring home.

The story of my cast iron pan makes everything I cook in it, including Anthony's Stir Fry, that much more special.

The story of my cast iron pan makes everything I cook in it, including Anthony’s Stir Fry, that much more special.

The skillet was part of a set of three, “dusty, rusty, neglected diamonds in the rough,” Valerie wrote. She told me of how she and John bought the pans and took them home. She knew that these treasures only needed “a good home, a hot bath, and someone to make them feel useful again, things we all want.”

Valerie cleaned and seasoned our skillet for us, giving us the last of the three rescued trio of pans in the set that she and her brother in-law had found last summer.

“Good, old, seasoned cast iron is a treasure. it is a work horse in the kitchen. It holds the heat well, cooks evenly, is the original ‘non-stick’ cookware. it makes mean fried eggs, crusty hash browns and frittatas to die for,” Valerie said.

Last week, my new cast iron skillet made a fabulous stir fry, Anthony’s Stir Fry, and it was delicious.

Good friends, good pans, and treasured family members. I am blessed to have them all.

Give Anthony’s Stir Fry a try with your favorite ingredients in it.

And if you have a cast iron skillet of your own, definitely use it.

What’s for Dinner Wednesday: John Wayne Casserole

22 May
This was a great Mexican dish that we were able to make using many nonfat ingredients.

This was a great Mexican dish that we were able to make using many nonfat ingredients.

My family enjoys eating Mexican foods. I make a good Taco Bake, we eat quesadillas, tacos and a yummy nacho bake. We’ve had to tone down our menu to make it more fat-free or at least low fat, but it’s easy to do with most of those items by changing just a few key ingredients.

Today’s recipe is one that was sent to me by my father-in-law a couple of weeks back. The title of the email said, “Looks good.”  And indeed, it did look good.

I was able to use the recipe by making the following substitutions:

Ground turkey instead of ground beef

Nonfat sour cream instead of regular

Nonfat cheddar cheese instead of regular

Light mayo made with olive oil instead of regular

I also had to cheat a bit and use salsa instead of the fresh onion, tomato and pepper, because I thought I had a pepper here and when it came time to make dinner, I did not.  If I make this again I’d do the fresh veggies instead, but the salsa did work fine.

Of all people, Alexandra was the kid who loved this the most. She’s by far the pickiest eater. Caroline liked all but the top and Liz liked it well enough. Don and I loved it. I even ate it leftover and it was just as good.

It did make a lot, and I think the next time I’d cut it in half, and use an 11×7 dish rather than a 9×13 dish.

Don even said he’d throw the corn right in the layer with the meat. It was definitely a hearty dish and a tasty one! If your family enjoys Mexican meals too, I’d recommend this!

The recipe as my father-in-law sent it, is below.

JOHN WAYNE CASSEROLE

Ingredients

2 pounds ground beef, cooked and drained
1 (1.25-ounce) packet taco seasoning
4 ounces sour cream
4 ounces mayonnaise
8 ounces Cheddar cheese, shredded and divided
1 yellow onion, sliced
2 cups biscuit mix
2 tomatoes, sliced
1 green bell pepper, sliced
1 (4-ounce) can sliced jalapeno peppers

Directions

1. Heat oven to 325. Brown ground beef and add taco seasoning and water, according to packet instructions; set aside.

2. In a separate bowl, combine sour cream, mayonnaise, 4 ounces of cheddar cheese, and half of the onions; set aside.

3. Stir biscuit mix and water (directions on box) **our box said to use milk so I did and it was skim**to form soft dough. Pat dough on the bottom and one-half-inch up the sides of an 9 x 13 in. greased casserole dish.

4. Saute remaining onions and bell peppers until slightly tender.

5. On top of biscuit mix, evenly distribute ingredients in the following order: ground beef, tomato slices, green peppers, onions, jalapeno peppers, sour cream mixture and end with remaining shredded cheese.

6. Bake for 30-40 minutes or until edges of dough are lightly browned.

Fun Friday: Mozaik 48 Piece Mini Dessert Set

17 May
These were so much fun I just had to feature them for a Fun Friday post!

These were so much fun I just had to feature them for a Fun Friday post!

A few weeks ago we hosted our daughter’s First Communion at our house. Besides cake, we had several other desserts and today I wanted to feature one of them.

My friend Paula had sent me this cute little 48 piece mini dessert set in the mail,  a set from Mozaik. When she saw it in a store near her, she said she thought it would be perfect for First Communion, and she was right.

Around the same time, the girls and I had attended an event at our local library that I covered for the newspaper. Advertised as a Teen Cooking Challenge, the kids had to each create their own healthy trifles, using pudding, whipped cream, and fresh fruit.

Trifle picture

I never imagined that I’d find my First Communion dessert at a kids’ cooking event at our local library!

When I saw the kids’ trifles, I knew I’d found my dessert, simple as it was, for First Communion.

And when I say simple, I mean really.simple.

The desserts I made were in two variations: Jello Sugar Free, Fat Free instant cheesecake flavored pudding or chocolate flavored pudding, prepared using skim milk, and topped with a low fat topping from Aldi’s that’s like Cool Whip. I topped the cheesecake desserts with fresh strawberries and the chocolate desserts with fresh blackberries.

Yup. That’s it!

Each little cup has a matching little spoon, which made for a really cute, yet seemingly elegant, healthy dessert! They were such a hit, there were just a couple of them left over at the end of the day.

There are so many cute ideas that you could use this set for, both desserts and appetizers. Picture a healthy veggie dip in the bottom with a few celery, zucchini and carrot sticks sticking out, or picture individual shrimp cocktail sauces with a few shrimp. Perfect, right?

Right.

And that, my friends, is my Fun Friday post for today!

Enjoy your weekend!