Archive | Cooking with Kids RSS feed for this section

Nutella Banana Swirl Muffins

19 Jul
We've made these muffins at least three times since we first saw the recipe online!

We’ve made these muffins at least three times since we first saw the recipe online!

You know how much I love muffins. I’m always on the hunt for a new muffin recipe to try out. My family likes them too.

Add that to the fact that I love Nutella, and they do too, and that makes this muffin recipe from The Novice Chef absolutely perfect. A friend of mine posted it online and tagged me in the post; a list of tons of Nutella recipes all in one spot. This recipe was just the first one, just the tip of the Nutella iceberg.

My usual routine on most Saturday nights is to make a batch of muffins for us to grab and go on Sunday mornings before church. It seems to work well and these muffins were a great addition to my ever-growing list of muffin recipes for our Sunday mornings.

These muffins were also easy enough to make that one afternoon Caroline made them herself. That’s always a good sign: when someone can make the muffins for me!

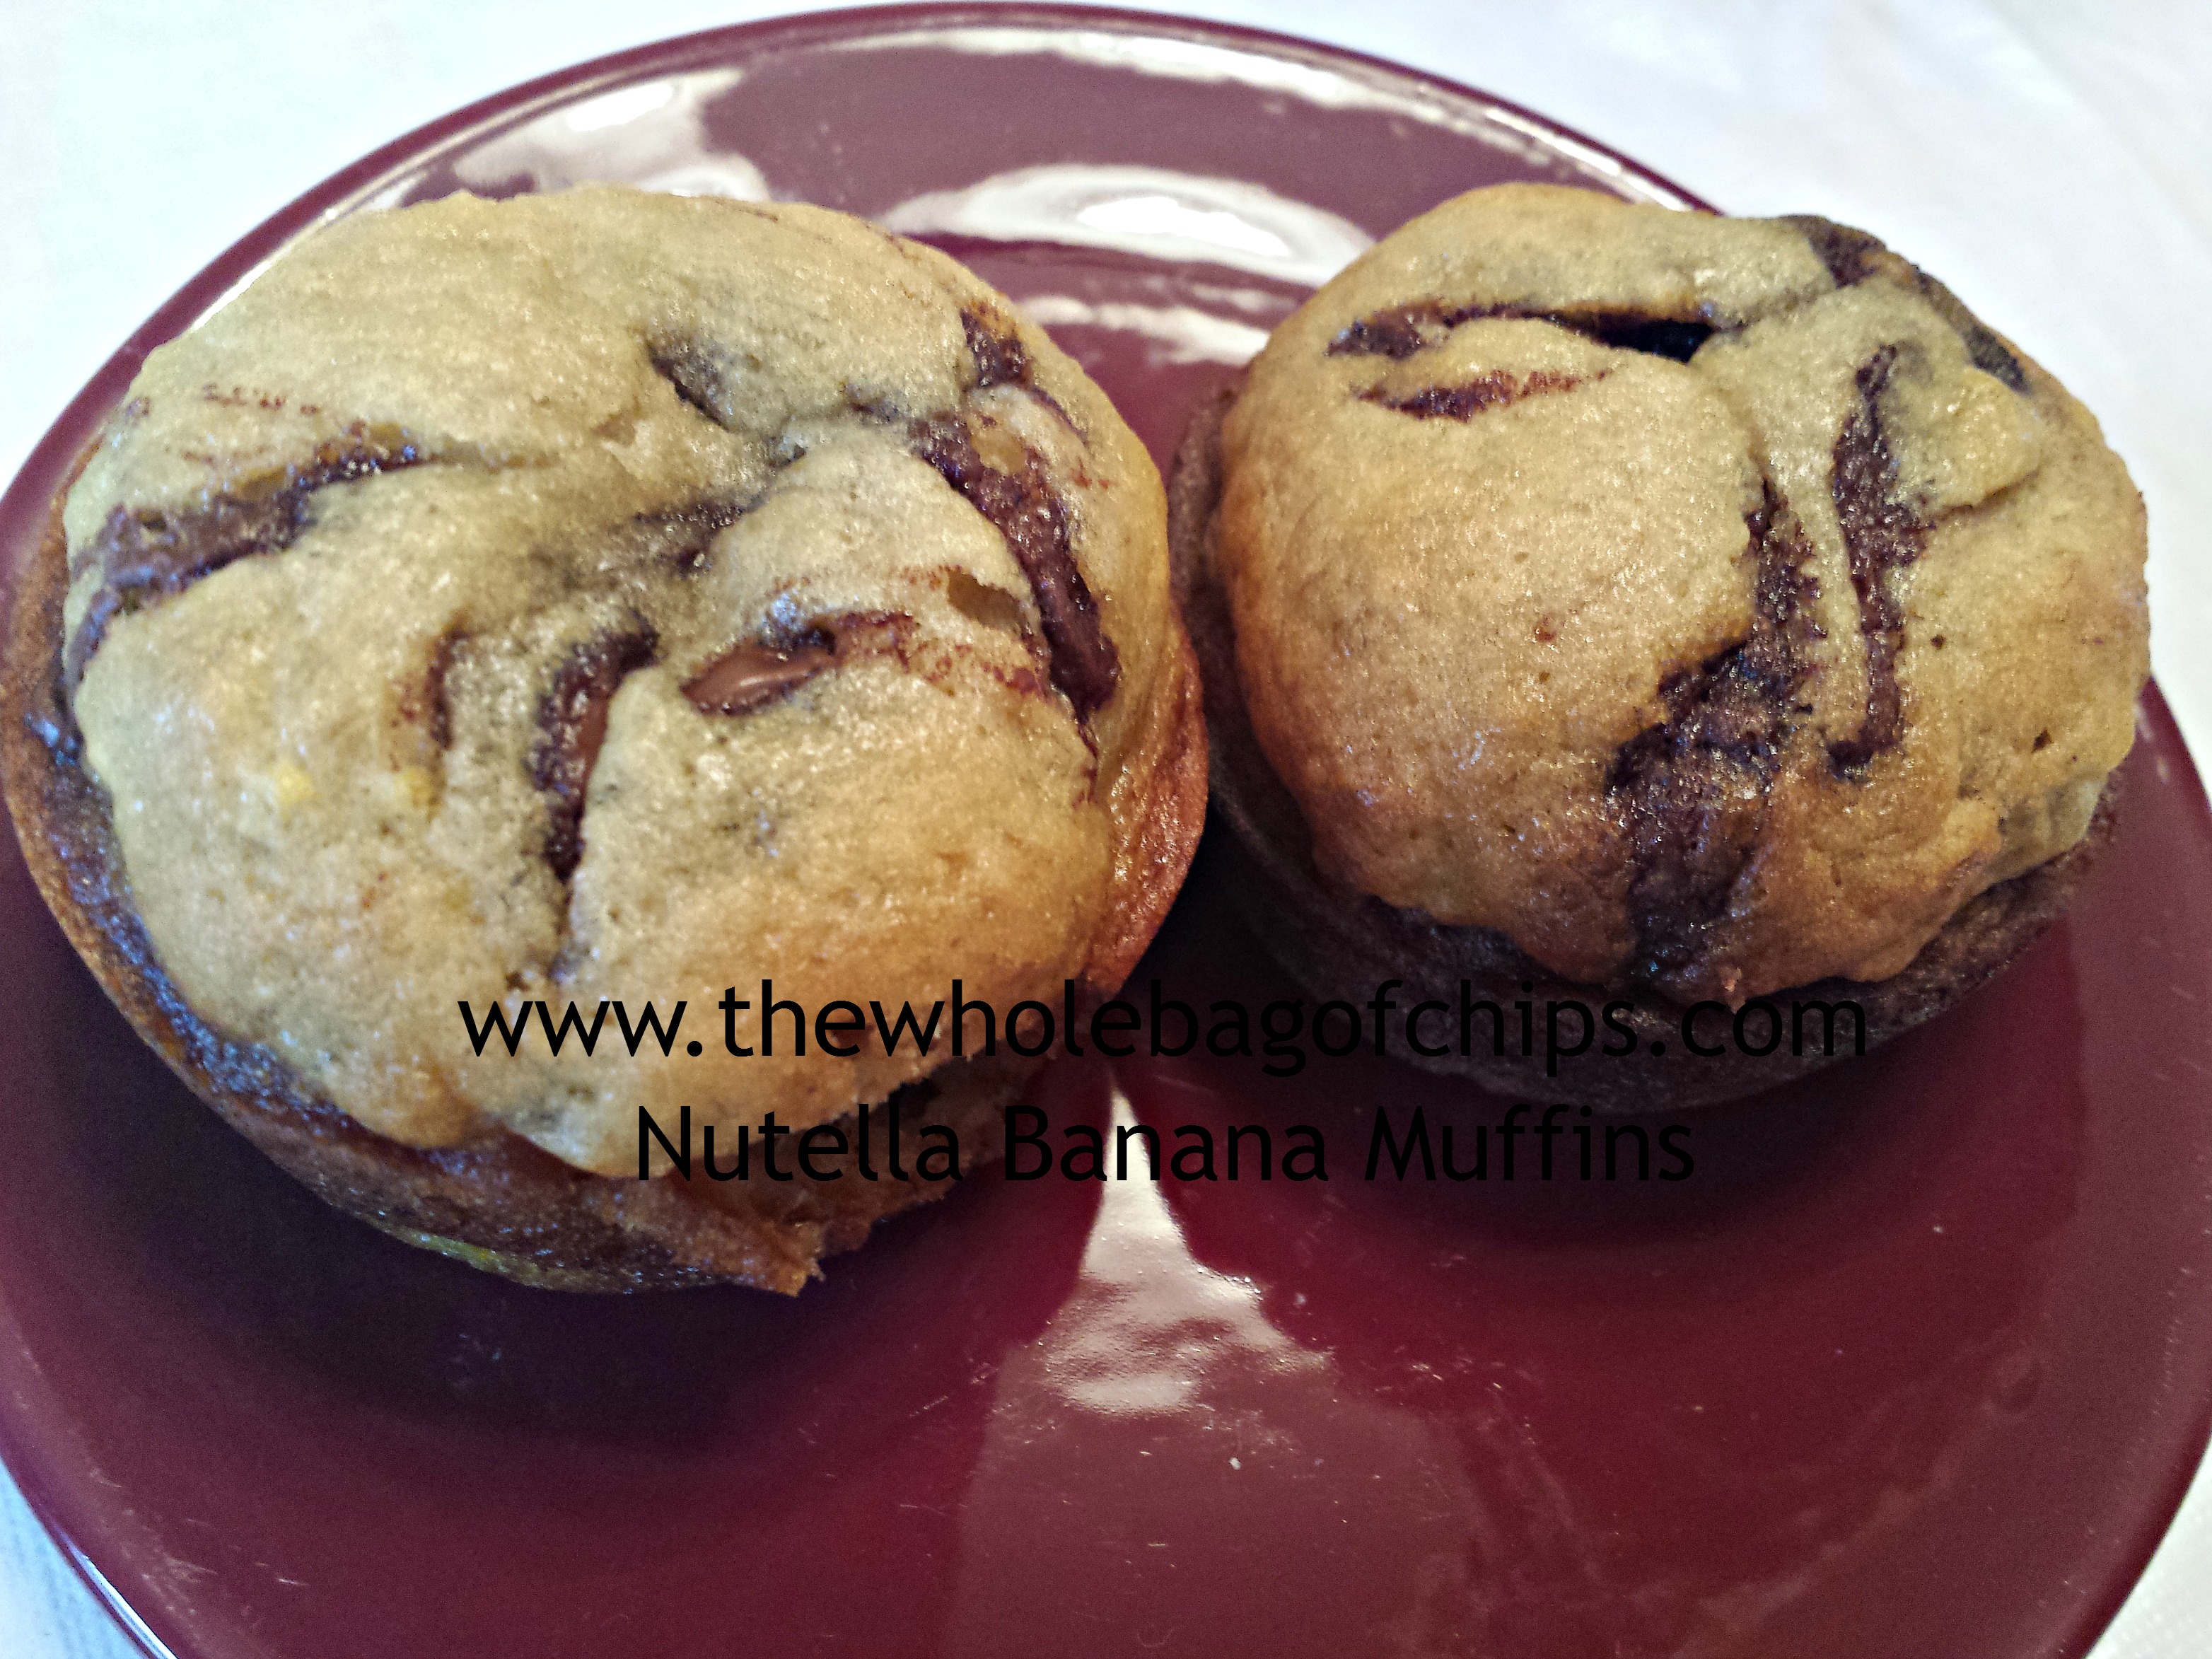
So if you’re a muffin lover yourself, and a lover of Nutella, I highly recommend that you give these a try! In my opinion, the addition of bananas to the recipe makes it even better…healthier!! It calls for four, and I’ve used as few as three. I also found that using a steak knife for the swirling instead of a toothpick is easier. The batter and the Nutella are thick and a knife holds up better for a great swirl.

And finally, this recipe makes 18 muffins. For a family of 5, that’s excellent. Muffin recipes that yield a dozen are good, but those that yield 18 are better!!

**We omit the pecans when we make them, but I’m sure they’d be delicious with them too!**

Imagine waking up to these on your Sunday morning?

Imagine waking up to these on your Sunday morning?

Nutella Banana Swirl Muffins from the Novice Chef

Yield: 18 muffins

Ingredients:

2 cups all-purpose flour
1 teaspoon baking soda
1 teaspoon baking powder
1/2 teaspoon salt
4 medium over-ripe bananas, mashed
1/2 cup granulated sugar
1/2 cup packed brown sugar
1 large egg
1/4 cup vegetable oil
2 teaspoons vanilla extract
1/2 cup chopped pecans
nutella

Directions:

Preheat oven to 350°F. Line muffin pan with liners.

In a medium bowl, whisk flour, baking soda, baking powder and salt until well combined. Set aside.

In large bowl, whisk together banana, sugar, brown sugar. Beat in egg, vegetable oil and vanilla extract. Slowly whisk in the flour mixture, until there are no lumps. Fold in pecans.

Fill muffin tins 3/4 full. Top each muffin with about 1 teaspoon of Nutella and use a toothpick to swirl it into the batter.

Bake muffins for 15-17 minutes, or until a toothpick inserted in the center comes out clean.

Serve warm or store in an airtight container until ready to serve.


Fun Friday: Peach Cobbler from GirlsGoGames.com

20 Jun
After a long, hard day, this was a great dessert to come home to, thanks to Liz.

After a long, hard day, this was a great dessert to come home to!

This was a long, tough school year. Lots of hard work, lots of time and schedule commitments. Oftentimes our kids, just like lots of other people’s kids, could be found on some device or other during their downtime, if they happened to have any. They’d make Video Star videos to their favorite songs, play a game or chat with friends.

I was surprised however, when one day my daughter approached me asking if she could make a recipe from GirlsGoGames.com. I didn’t even realize Girls Go Games had recipes. I wasn’t even sure if they were real, doable recipes or not, but when I took a look, they were. The site listed tons and tons of recipe ideas, complete with ingredients and directions.

I immediately said yes, we definitely could do that. We chose a peach cobbler, an easy recipe which used canned peaches, even though I’m sure you could substitute fresh if you had them. It wasn’t quite peach season here yet, so we were going with the canned option.

Having the ingredients here at the house, now that was another story. It turned out that we were low on lots of stuff and and there wasn’t one recipe on that particular day, that we had everything for. We had to put our baking plans on hold temporarily until I picked up a few things we needed.

Sunday turned into Monday, and Tuesday and Wednesday, and you know how the days fly by.

“Mom, WHEN can we make my recipe from Girls Go Games????” she asked.

I didn’t really have an answer. There wasn’t time to do it when I was home, at least not for a few more nights until the next weekend arrived.

However, one night while I was out, I got a text from home. The text contained a photo of a bubbling peach cobbler coming right out of the oven at that very moment, courtesy of my daughter and my husband, who helped her make it that night.

“I’m on my way home!” I wrote back, as I thanked him profusely for taking over the cooking project for me.

SUCH a good dad.

I arrived home, just in time to be handed a pretty plate of cobbler with vanilla ice cream on top.

It was amazing. So delicious, I was shocked. I couldn’t believe such a great recipe that was kid-friendly could come from an online kids’ game site. It was definitely a keeper.

My kids work hard and they play hard, and I don’t mind giving them down time ever. I think they need it as much as I do. They read a lot but they’re also on their devices a lot too. It was nice to know, at least this time around, that it wasn’t just mindless time spent staring at a screen. Although I don’t mind them having that kind of down time on occasion too, it was great to see that their screen time turned into a delicious treat for all of us.

I’ve linked over to the recipe twice in this post. If you have a daughter who likes games and likes to cook, you can have them check out the site, and maybe one day you’ll come home to a yummy dessert at your house too!

Hot and bubbly, this recipe was definitely a keeper!

Hot and bubbly, this recipe was definitely a keeper!


What’s for Dinner Wednesday: Summer Pasta Salad with Peaches

4 Jun
This salad was a hit all around!

This salad was a hit all around!

I’m always getting emails with recipes in my inbox, and every so often one of them will catch my eye and I’ll open it up. The other day I happened to notice a recipe from Cooking Light for a Summer Peach and Tomato Salad.

The name of the recipe, the combination of peaches and tomatoes made me click on it and read it. Of course other than peaches and tomatoes, yet not all the kinds of tomatoes they recommended, I didn’t have most of the ingredients for the salad. I didn’t have Sherry Vinegar or red onions or Feta cheese (I don’t even like Feta cheese) or fresh Basil.

Even still, the recipe stayed on my mind. I knew I wanted to try it one day. In the meantime, I still had to come up with my meal planning for this week, and one night we were going to be grilling pork chops. I went downstairs to my pantry to see what I could put as a side dish or two with the chops, and of course, we had next to nothing since we hadn’t done our “big shopping” yet. However, we had a box of pasta, we had honey and olive oil, I knew we had tomatoes, cucumbers, mozzarella cheese and….fresh summer peaches. I decided to do a variation on the Cooking Light recipe and make my pasta salad for the side dish, but add in some peaches with the other veggies.

“Ewwww….” my daughter said. “That sounds gross together.”

Excellent. A vote of confidence.

Not.

But no worries, I was going to try it anyway. To me, the tomatoes and peaches sounded like they’d go well together, and I looked up a substitution for Sherry Vinegar which said Rice Wine Vinegar which we always have and like to use.

I put on the water to boil and began slicing my peaches. As my pasta cooked and I sliced, that same daughter wandered into the kitchen.

“Can I help?” she asked.

I let her help despite her lack of confidence in this new recipe. As I sliced up the peaches, she threw them into a big bowl and added in the tomatoes, honey, olive oil and vinegar. As I drained the pasta, she peeled and sliced the cucumber and threw that in too. She took a taste.

“This is actually pretty good together!” she said.

I might’ve said, “I told you so,” but I will neither confirm or deny that.

We tossed in the pasta and mixed it all together noting how pretty the reds and yellows looked together. I was wishing I had fresh Basil to add a touch of green, and I debated adding another peach, but decided for this first time out, just to leave it all as is, and see how well this Summer Pasta Salad with Peaches went over with the rest of the family.

Well….I couldn’t have been happier. Everyone loved it and the combination of the peaches with the other fruits, veggies and seasonings was perfect.

My daughter redeemed herself by exclaiming over and over again how great this was together, and I was happy.

I would definitely recommend bringing some summer into your recipes too, adding in peaches and other summer fruits to some of your regular meals. Making this recipe made me even more excited for the end of school and the summertime and for all the delicious summer-only items that are starting to come into season now.

Next time you’re making a salad, think of Cooking Light and their recipe, of my Summer Pasta Salad with Peaches, and see what variation you can come up with!

Even though initially she thought this salad didn't sound appealing at all, she was my biggest helper and biggest fan of the recipe at mealtime!

Even though initially she thought this salad didn’t sound appealing at all, she was my biggest helper and biggest fan of the recipe at mealtime!


Fun Friday: Dump Cake for April Fools Day or any day!

4 Apr
This was a quick and easy dessert!

This was a quick and easy dessert!

In a recent What’s for Dinner Wednesday post, I mentioned that the stir fry recipe I was trying out reminded me of a cake recipe I’d once heard of called Dump Cake, because like that cake recipe, the stir fry recipe was one where you just dumped a whole bunch of ingredients in and cooked them.

That reference in my post got me thinking about Dump Cake recipes. I couldn’t remember having had one myself and I wasn’t even sure where I’d heard about Dump Cake, but I knew I had somehow, from somewhere. So of course I turned to Google and searched the term Dump Cake to see what kinds of recipes would come up and to see if Dump Cake was something I’d like to try making. As I looked, I found that they varied slightly in the types of ingredients that could go in them. Some had canned fruits, some had fresh. Some had butter: one stick or two, and some had a can of soda. They all used a yellow cake mix and all called for an optional addition of chopped walnuts.

I decided to find one somewhere in the middle. I had a can of crushed pineapple already and a yellow cake mix. I did not want to go the soda route, so I knew I’d be using butter (we use I Can’t Believe It’s Not Butter), but I didn’t want to use a lot. Ultimately, I chose a recipe that used a can of crushed pineapple, a can of cherry pie filling, one stick of butter and a cake mix. I did not choose to use the walnuts.

The recipe I chose was from Allrecipes.com, and it claimed to be “as easy as dumping ingredients in a pan,” and it sure was. There were enough steps for everyone to have a turn helping to make the cake. We were using this as part of this year’s April Fools Day dinner, our first ever, and the girls and I were in cahoots, creating a fun meal for their dad. Part of the fun was having a “cake” for dinner and this Dump Cake for dessert.

The “cake” for dinner was going to be heart-shaped and as it turned out, our Dump Cake turned pink, so it was a very funny meal to be eating in April.

The recipe, as it appears on Allrecipes.com is below. It truly is as easy as they say, and it was really tasty too! We had ours with a simple squirt of whipped cream, but I’m sure it’d be delicious with ice cream on top too. I’m also sure that any variety of fresh fruits would be good as well. The only thing I was unsure of was whether or not to spray my pan with non-stick spray, and I opted to do so, rather than risk the cake not coming out of the dish.

Next time you’re looking for a fun cake to make, remember my April Fools Dinner and try a Dump Cake!

DUMP CAKE BY ALLRECIPES.COM

A few ingredients were all we needed!

A few ingredients were all we needed!

INGREDIENTS

 Original recipe makes 1 – 9×13 inch cake

  • 1 (21 ounce) can cherry pie filling
  • 1 (15 ounce) can crushed pineapple
  • 1 (18.25 ounce) package yellow cake mix
  • 8 ounces chopped walnuts
  • 1/2 cup butter

DIRECTIONS

  1. In a 9×13 inch pan mix cherries and pineapple. Sprinkle dry cake mix over pineapple, and cherry mixture stir until just combined. Then sprinkle walnuts over top. Drizzle top with melted butter or margarine.
  2. Bake in a 350 degree F (175 degree C) oven for 35 or 40 minutes or until golden brown. 

    "Cake" for dinner and Dump Cake for dessert for April Fools Day!

    “Cake” for dinner and Dump Cake for dessert for April Fools Day!

What’s for Dinner Wednesday: An April Fools Day Dinner!

2 Apr
Not for pranks, but just for fun, an April Fools Day Dinner

Not for pranks, but just for fun, an April Fools Day Dinner!

If you’re a fan of The Whole Bag of Chips, you know from reading over the years that I incorporate creativity into our meals whenever the opportunity exists, whether it’s green smoothies for St. Patrick’s Day or creating a special cake for a sleepover birthday party. I always try to make things fun whenever I can.

But I don’t love April Fools Day and I never commemorate it in any way at home. In general I don’t love pranks, especially when they’re mean, but last year specifically, we had a terrible April Fools Day, with a funeral in the morning and a wake in the evening. It had been such a sad day all around, and yesterday I was thinking back to that day and all that took place throughout, and I was thinking of those two families one year later in their own lives, as well.

As sad a day as it was last year, I decided that I’d do something fun this year. For the first time ever, I’d acknowledge April Fool’s Day with some mealtime antics.

For once, we didn’t have to be anywhere before or after dinner and it was a beautiful day outside. I clicked over to Pinterest, and I searched for April Fools Day Dinners. There was certainly plenty to choose from! I quickly assessed what was offered and thought about what I wanted to do and what I didn’t want to do. I didn’t want to have candy or dessert for dinner, so that ruled out all of the neat ideas for making things that looked like dinner, using candy. As cool as that sounded, I wanted dinner to be dinner. I saw lots of ideas for using meatloaf and mashed potatoes for cupcakes and cakes, which I thought would have been perfect, had I not just made Shepherd’s Pie last week, and a whole lot of it, enough for leftovers a couple of times. We were meatloaf and mashed potato’d out, but it’s something I’d consider for another year.

I finally found something I could pull off: an April Fools Cake recipe that looked like a cake but was actually similar to a pizza. It was from Taste of Home, and it called for using a bundt pan, of which I only have a heart-shaped one, but I thought that’d add to the fun. At first I thought I’d do this to surprise the kids, but then I decided that time-wise that wouldn’t work out very well since I’d have to do it while they were all here. I opted instead, to let them in on the fun and give them all a job to do in creating our “cake” for dinner and they could in turn, surprise their dad when he got home from work. The months of March and April are pretty insane for an elementary principal, with lots of dinner-less late nights, and I thought this would brighten his day as well as give the kids something fun to do.

I also decided to make “Dump Cake” for dessert so that they could then say we were having cake for dinner and cake for dessert. I had them help out with that also, but that’s a post for this week’s Fun Friday! You’ll have to check back in a few days to see that post!

The recipe was an easy one and I had to modify it to use what I had at home because I didn’t want to go out to pick anything up or spend any additional money on ingredients. Their recipe called for a Bisquick type of mix, which I had here. It called for three cups, and when I measured what was left in my box it was *exactly* three cups. That was pretty great. It called for sausage and pepperoni in the “pizza” type of filling but I opted to use meatballs instead, since everyone likes them. I also threw in olives. It called for slices of mozzarella cheese for the “frosting,” which I did not have. I had shredded instead. I decided we’d be “drizzling icing” instead of frosting our cake. It worked out fine.

Overall, this was a fun recipe for April Fools Day dinner. I don’t know that it’s something I’d incorporate into our regular menus throughout the year, as we regularly make some kickin’ real pizzas that I like much better. But, it was fun, and the kids liked surprising their dad, and he liked playing up the surprise as well. He enjoyed the meal. We followed dinner by a long walk outside until after dark, and came in for our Dump Cake dessert, which was really just a perfect day to replace my memories from last year. Now next year when I look back on April Fools Day, it won’t have such a dark shadow in my mind. Instead, I’ll remember this day, which was much, much better. No sadness or pranks, thankfully, but some great, great family memories.

And I’ll take that ANY day of the year.

Below is the Taste of Home recipe as they have it on their site, with all of my modifications in italics. Their recipe served as my inspiration, but I adapted it to suit our needs quite a bit. Next year, when April 1 rolls around you might want to give it a try too!

APRIL FOOLS CAKE BY TASTE OF HOME

Ingredients

  • 1 jar (14 ounces) pizza sauce
  • 1/2 pound Johnsonville® Mild Ground Italian Sausage, cooked and crumbled  *I used meatballs and olives*
  • 1 package (8 ounces) sliced pepperoni *I skipped this*
  • 3 cups biscuit/baking mix
  • 3/4 cup milk
  • 2 eggs
  • 2 tablespoons butter, melted *I used I Can’t Believe It’s Not Butter*
  • 1 teaspoon garlic salt *I had to make my own with garlic powder and salt*
  • 5 to 6 slices mozzarella cheese *I used shredded mozzarella for icing instead of frosting*

Directions

  • In a bowl, combine the pizza sauce, sausage and pepperoni; set aside.
  • In another bowl, combine the biscuit mix, milk, eggs, butter and
  • garlic salt. Spread half of the batter on the bottom and up the
  • sides of a greased 10-in. fluted tube pan. Spoon meat mixture over
  • batter; cover with remaining batter.
  • Bake at 375° for 35-40 minutes or until browned and a toothpick
  • comes out clean. Invert onto a baking sheet. Arrange cheese over
  • cake. Return to the oven for 5 minutes or until cheese is melted.
  • Using two large metal spatulas, transfer cake to a serving platter;
  • serve immediately. Yield: 8 servings.


New sponsored post for Jimmy Dean Sausage crumbles

16 Mar
Be sure to check out my newest post for Jimmy Dean!

Be sure to check out my newest post for Jimmy Dean!

I’m excited to share that my second post for Jimmy Dean Sausage Crumbles is now live on SheKnows.com! I hope you’ll check it out by clicking on this link.

Since completing the posts for Jimmy Dean, we’ve been finding all kinds of great ways to incorporate them into our recipes. We’ve used them in eggs and pasta, among other things. They’re a very versatile and convenient ingredient and I like to have them on hand.

Enjoy my post at SheKnows, and give Jimmy Dean sausage crumbles a try!

Fun Friday: Dreaming of the gardening days

14 Mar
I love seeing their kids out in the garden, exploring the things we're growing.

I love seeing their kids out in the garden, exploring the things we’re growing.

I don’t know about you, but I totally have spring fever! We’ve had a cold and snowy winter, and although I have loved those days too, I’m ready to move on. We’ve had some warm days mixed in with our end-of-winter weather this past week and it’s given us a taste of what’s coming.

Spring is right around the corner!

I truly believe that having all four seasons is a blessing, and it allows us to love and appreciate each season for its differences. To me, there’s nothing like seeing those first buds of spring as they’re starting to make their way through the ground. Seeing the leaves on the trees sprouting and feeling the sunshine and warm wind on your face is exciting to me after the winter days.

As I’ve run my errands over the past week, I’ve started to see it: signs of spring inside too…packets of seeds, seed starter kits, grass fertilizers and outdoor patio furniture. It makes my heart skip a beat when I go past the aisle, thinking of those days being upon us so soon.

This week, a friend posted an article on Facebook called “Advice for eating well on a tight budget from a mom who’s been there.” It’s about a woman who is helping those on public assistance learn how to use fresh, home-grown fruits and vegetables to supplement what they get for public assistance and to enhance their eating habits. The woman herself had been on public assistance as a mom of seven and had always tried to utilize things she could grow, in order to help nourish her family. I thought it was a great article and great to see someone who’s “been there,” giving back.

One year we "accidentally" grew pumpkins, and these were our three Halloween pumpkins that year; first time we'd ever grown our own.

One year we “accidentally” grew pumpkins, and these were our three Halloween pumpkins that year; first time we’d ever grown our own.

Although we have never been on public assistance, we have always had a pretty tight budget and we’ve always had a summer garden which helps us stay below budget on our food spending during the summer months. We grow mostly vegetables, but one year we were able to grow pumpkins, and that’s a fruit! I love seeing the kids take on roles with the garden, helping to plan it, clean it up, plant it, water it, and then to watch them run out every day to see what’s grown and what’s ready to pick. One of my all-time favorite photos from years ago is a picture of two of my daughters out in the garden in their Halloween and dress-up costumes, picking tomatoes off the plants. We had one Minnie Mouse and one Cinderella, outside, in the garden, picking veggies and it was so funny to see; but such a special memory for me as well.

There is absolutely nothing in the world like fresh, garden vegetables in my opinion, and when you’ve grown them yourself, that makes them exponentially better! I love cooking and baking with the things they’ve planted and picked and I love telling them, “This is from our garden!”

A pack of seeds is not expensive and the amount it yields is far more than what you put out financially for the seeds. As soon as last year’s garden was done, I already had a list on the fridge of our successes, so that we wouldn’t forget to plant them again this coming year. The list is still there, and it’s ready to go.

I love to see the kids eating the veggies they've picked, right off the vine, all summer long.

I love to see the kids eating the veggies they’ve picked, right off the vine, all summer long.

I think it’s important too, to make sure that our kids have an understanding of where their food comes from, that it’s not just from the grocery store. I think it’s important that they understand about nutrition and local produce as well. I like to see them eating their snap peas right off the plant outside or eating their cherry tomatoes as they pick them. I like them to know that they can grow their own food, and that you don’t need a lot of space to do it. We don’t have a huge house or a huge yard but we have a really good-sized garden and it teaches them that it doesn’t take much of anything other than hard work, to grow their own food.

So as winter comes to a close, and spring begins, I’m already dreaming of our gardening days. Spring Fever has hit hard, and I can’t wait to start picking out seeds and planning out what we’ll plant, pick and cook all summer long. Take a look at the article above, and think about how you too, can add home-grown fruits and vegetables to your summer menu!

It doesn't take a lot of space to have a garden, and lots can be done in containers if you don't have a yard at all.

It doesn’t take a lot of space to have a garden, and lots can be done in containers if you don’t have a yard at all.


What’s for Dinner Wednesday: Ham and Spinach Puff Pancake

12 Mar
A dish from my past! Delicious memories!

A dish from my past! Delicious memories!

Every so often I come across a recipe that reminds me of my childhood because it’s a recipe from my mom and I grew up eating it. Today’s recipe is one of those. I came across it when I was looking for a different recipe. It’s another one that although I grew up eating it, my kids had never had it, meaning it’s been “that long” since I’ve made it.

I like this recipe because it’s adaptable. You can fill the center of the pancake as is, or you can add in or take out ingredients or change them all together to suit your needs. We were out of mushrooms this time around so we didn’t use them even though the recipe calls for them. There are lots of combinations that would be great in the center of this pancake and it’s great for a variety of taste buds!

I love kitchen science. The kids' eyes pop when they see how big this rises in the oven.

I love kitchen science. The kids’ eyes pop when they see how big this rises in the oven.

This recipe is a little long, but I encourage you to give it a try anyway. It’s a fun recipe to watch bake in the oven because it puffs up quite a bit and it’s neat to show the kids the difference before and after. We had it for dinner, but it’d also be great for a brunch or even for a breakfast dish.

Enjoy!

HAM AND SPINACH PUFF PANCAKE
INGREDIENTS
PANCAKE:
1/4 cup butter (I used I Can’t Believe It’s Not Butter)

2/3 cup flour

3/4 cup milk (I used Skim)

2 eggs

1/2 tsp. salt

We filled our puff pancake with ham and spinach. What would you put in yours?

We filled our puff pancake with ham and spinach. What would you put in yours?

FILLING:

3 tsp. butter

2 cups (8 oz) sliced fresh mushrooms (this time around I didn’t have any so they’re not pictured)

1/2 lb. cooked and cubed to 1/2″ ham

10 oz. package chopped, frozen spinach thawed and well drained

1 1/2 cups (6 oz) shredded cheddar cheese ( I used very little cheese due to our dietary restrictions, and this time I used reduced fat provolone cheese.)

DIRECTIONS

Heat oven to 400 degrees.

In a 9″ glass pie plate melt 1/4 cup of butter in oven  (2-4 minutes).

Simple ingredients make this pancake easy to prepare.

Simple ingredients make this pancake easy to prepare.

In large bowl combine milk, flour, eggs and salt.

Using wire whisk or rotary beater, beat until smooth (2-3 minutes).

Pour batter onto pie plate. Bake 20-25 minutes or until golden brown.

Meanwhile, in 10″ skillet, melt 3 tsp. butter. Stir in mushrooms, cook over medium heat, stirring occasionally until mushrooms are soft (5-7 minutes).

Stir in ham and spinach. Continue cooking until heated (3-4 minutes).

Stir in one cup of cheese.

Spoon filling into center of hot pancake.

Sprinkle with 1/2 cup of cheese. Heat until melted and serve.

Fun Friday: War Cake

7 Mar
I love when books contain recipes that go along with the story. This was a great one!

I love when books contain recipes that go along with the story. This was a great one!

My kids and I are huge readers, and when it comes to history, all five of us, my husband included, are big fans. We all love to cook and bake, so when my daughter found a historical fiction book about the life and times of a girl during World War II, she was excited to read it.

“My Secret War: The World War II Diary of Madeline Beck” is part of the Dear America series of books.

At the end of the book there was a recipe for War Cake, something that was spoken about throughout the story.

She was so excited! We had to make it.

I looked at the ingredients and we had them all. Well, we had almost all of them. The recipe called for walnuts and I don’t love them so we don’t often have them here.

I came up with a great substitution though: chocolate chips! Everything goes well with chocolate chips.

This was an excellent book and the recipe inside was a bonus!

This was an excellent book and the recipe inside was a bonus!

We decided that on Sunday afternoon this would be a great recipe for her to make. Looking at it further, I realized that it was ultimately pretty healthy too, as far as cakes and desserts go.

Due to the fact that ingredients were hard to come by during World War II, this cake is made with brown sugar rather than white, no eggs, no milk, and only a little butter. My daughter learned in the story that white sugar was used to make gunpowder during the war and therefore, was almost impossible to come by. Although the character in the story is fiction, the events are based on true historical events during WWII and are based on the author, Mary Pope Osborne’s own parents’ experiences as well. Mary Pope Osborne is also the author of the popular Magic Treehouse series of books.

I know that my daughter will be returning this book to the library this weekend during our weekly Saturday visit and she’ll be on the lookout for another Dear America story to read, since she devoured this one.

Almost literally.

Until then, here’s the recipe for Mary Pope Osborne’s War Cake.

Enjoy!

War Cake

By Mary Pope Osborne

INGREDIENTS

1 cup brown sugar

1 cup water

1 cup raisins

2 T. margarine (I used I Can’t Believe It’s Not Butter)

1 tsp. cinnamon

1/2 tsp. ground cloves

1 and 1/2 cups flour

1/2 tsp. salt

1/2 tsp. baking powder

1/2 tsp. baking soda

1/2 c. chopped walnuts (I used chocolate chips instead)

DIRECTIONS

Preheat the oven to 350 degrees. Grease and flour an 8×4″ baking pan (we used 8×8).

Place the brown sugar, water, raisins, margarine, cinnamon, and cloves in a heavy-bottomed saucepan and bring to a boil.

Turn down heat and cook gently for 5 minutes.

Remove from heat and let cool until mixture is lukewarm.

Sift together flour, salt, baking powder and baking soda.

Add flour mixture to the cooled sugar mixture, beating until the batter is smooth.

Stir in the walnuts (or if desired, chocolate chips).

Spread evenly in the baking pan and bake for 25-30 minutes or until a toothpick inserted in the middle comes out clean.

Let cool in the pan 10 minutes, then turn onto a rack to cool completely.

What’s for Dinner Wednesday: Paninis

5 Mar
This made for an awesome Sunday night supper!

This made for an awesome Sunday night supper!

This past weekend was a busy one. We were all over the place on Saturday, and on Sunday it was much the same. It was all good, just busy.

By the time dinnertime planning time came around on Sunday afternoon, I was stumped and had to run out the door onto the next “thing” before I could help with the decision making.

As I was standing outside in the freezing cold that afternoon, helping to man my daughter’s Girl Scout cookie sale at the local grocery store, I got a text from my husband: Paninis for dinner.

YUM!!

I was so excited! We have a panini maker but I never, ever think to use it. It’s stored neatly in the box it came in, with the booklets of recipes tucked neatly inside, all in a closet in our hallway.

Out of sight, out of mind.

Apparently, the decision was a group decision made by Don and the remaining kids at home. A menu of paninis, roasted red potatoes, cole slaw (not seen on my plate because I’m not a fan), and sauteed zucchini was created and the specific types of paninis were requested.

We could have any of the ingredients on our sandwiches, or all of them.

We could have any of the ingredients on our sandwiches, or all of them.

The ingredients for the sandwiches were also decided upon together: bbq chicken, tomatoes, bacon and cheese. We could have any or all of those ingredients in our sandwiches, allowing everyone to tailor their dinner to their liking.

It was SO good. So, so good!

There were even some halves of sandwiches leftover, so they became lunch this week. Don reported his was even better the second time around!

Although we chose chicken, bacon, cheese and tomato for our panini ingredients, you can have virtually anything in yours! A list of suggested recipes were given to us as part of our gift when we received our panini maker, and a guide came with the maker itself.

Here’s a list of some suggested panini recipes for you to try. Be sure to read to the end!!

Portobello Panini

Panini with Prosciutto, Roasted Pepper and Mozzarella

Roast Turkey Panini with Pesto, Roasted Red Peppers and Fontina

Grilled Prosciutto, Soppressata, and Mozzarella Panini

Fresh Eggplant and Roasted Red Pepper Panini

Pesto Chicken Panini

Grilled Eggplant Panini

Grilled Marinated Artichoke Heart, Ham and Provolone Panini

Panini Caprese

Grilled Chicken and Arugula Panini

Mediterranean Tuna Melt

Salami, Sun-dried Tomato, Basil Panini

Ham, Chestnut Honey Mustard and Gouda Panini

Turkey and Cranberry Panini

Roasted Eggplant, Sweet Pepper, Feta and Fresh Spinach Painini

Flank Steak, Vidalia Onion, Porcini and Fontina Panini

Grilled Sausage, Peronata and Herbed Goat Cheese Panini

Sweet Dolci Chocolate Panini

Dolci di Latte Caramel Sauce and Apple Panini

Ricotta and Preserved Orange Panini on Raisin Bread